How to Install Matrix Synapse Chat on Ubuntu 20.04 LTS
This tutorial exists for these OS versions
- Ubuntu 22.04 (Jammy Jellyfish)
- Ubuntu 20.04 (Focal Fossa)
- Ubuntu 18.04 (Bionic Beaver)
On this page
Matrix is a new ecosystem for decentralized communication in real-time for open federated instant messaging and VoIP services. It provides RESTful HTTP JSON APIs for building distributed and federated chat servers with no single point of control and failure and provides all references for the APIs.
Synapse is an implementation of the matrix home server that's created by a matrix team and written in Python/Twisted. With this software, we can implement the matrix way for decentralized communication, we can create our home server and store all user personal info, chat history, create the room for own use, etc.
In this tutorial, we will show you how to install and configure the Matrix Synapse on Ubuntu 20.04. We will set up the Matrix Synapse with the Nginx as a reverse proxy and secure the installation using the SSL provided by Letsencrypt.
Prerequisites
For this guide, we will install the Matrix Synapse on the latest Ubuntu 20.04 with 1Gb of RAM, 25GB free disk space, and 2CPUs. Also, you must have access to your server with the root privilege on it.
What we will do?
- Install Matrix Synapse
- Configure Matrix Synapse
- Generate SSL Letsencrypt
- Set up Nginx as a Reverse Proxy
- Set up UFW Firewall
- Register New User
- Testing
Step 1 - Install Matrix Synapse
First, we will install the Matrix Synapse to the latest Ubuntu 20.04 Server. To do that, we need to add the GPG key and official repository of Matrix Synapse.
Before going any further, install some packages dependencies using the apt command below.
sudo apt install -y lsb-release wget apt-transport-https
After that, add the GPG key and repository of the Matrix Synapse for the Debian/Ubuntu-based system.
sudo wget -qO /usr/share/keyrings/matrix-org-archive-keyring.gpg https://packages.matrix.org/debian/matrix-org-archive-keyring.gpg
echo "deb [signed-by=/usr/share/keyrings/matrix-org-archive-keyring.gpg] https://packages.matrix.org/debian/ $(lsb_release -cs) main" |
    sudo tee /etc/apt/sources.list.d/matrix-org.list
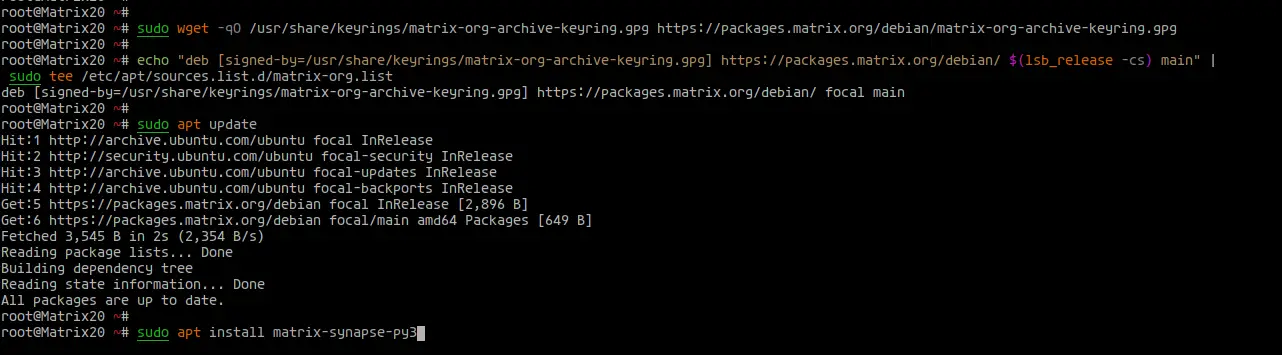
Now update all packages repository list and install Matrix Synapse packages.
sudo apt update
sudo apt install matrix-synapse-py3
Now you will be asked for the domain name configuration.

Type your domain name for the Matrix Synapse installation and select 'OK' to continue.
For the 'Anonymous Data Statistic', choose 'No'.

And the installation of Matrix Synapse has been completed.
Next, start the 'matrix-synapse' service and add it to the system boot.
systemctl start matrix-synapse
systemctl enable matrix-synapse
The Matrix Synapse is up and running, check it using the following command.
systemctl status matrix-synapse
ss -plnt
Below is the result you will get.
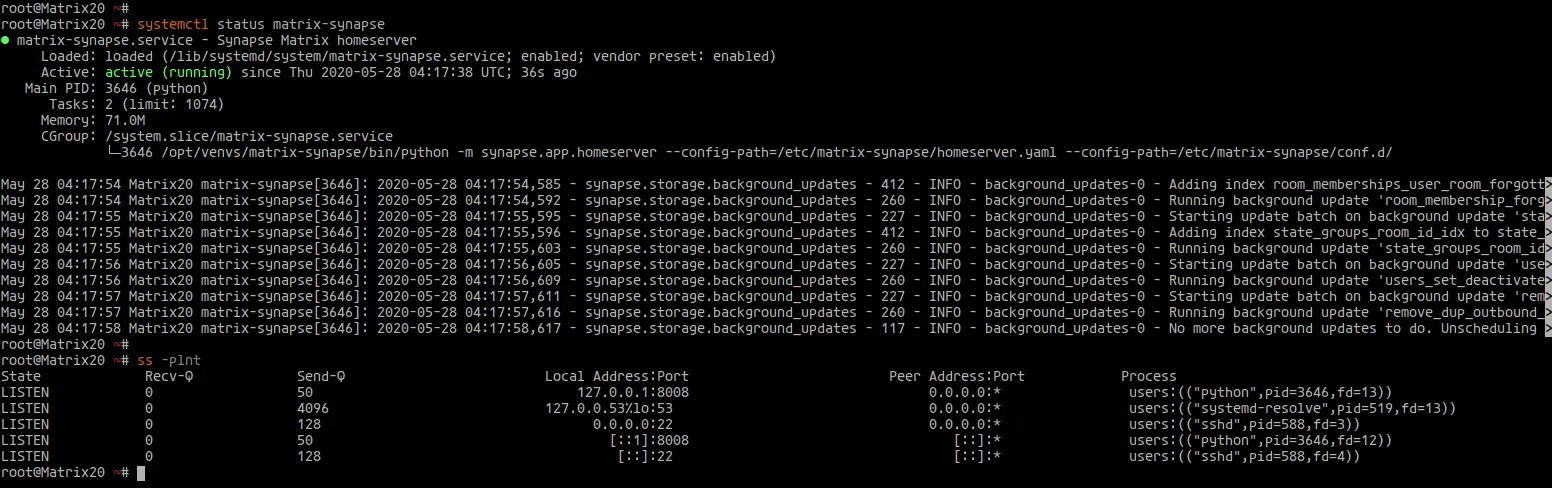
As a result, the Matrix Synapse is running with default TCP port '8008' on the Ubuntu 20.04.
Step 2 - Configure Matrix Synapse
In this step, we will configuration the 'bind-addresses' for Matrix synapse, disable the registration on our server, and set up the registration shared secret.
Before going any further, generate the Matrix Synapse registration secret using the following command.
cat /dev/urandom | tr -dc 'a-zA-Z0-9' | fold -w 32 | head -n 1
Now you will get the random key, copy the key, and save it on your note.
GH7AP4Zcthz02Cmg58sqUgonm7zlwH0f
Next, go to the '/etc/matrix-synapse' directory and edit the configuration 'homeserver.yaml' using vim editor.
cd /etc/matrix-synapse/
vim homeserver.yaml
Move to the 'listeners' section and change the 'bind-addresses' value with the local IP address as below.
listeners:

  - port: 8008
    tls: false
    type: http
    x_forwarded: true
    bind_addresses: ['127.0.0.1']

    resources:
      - names: [client, federation]
        compress: false
Now disable the Matrix Synapse if you're running the node only for you.
enable_registration: false
Change the 'registration_shared_secret' with the random passphrase generated on top.
registration_shared_secret: "GH7AP4Zcthz02Cmg58sqUgonm7zlwH0f"
Save and close.
Next, restart the Matrix Synapse service to apply the new configuration.
systemctl restart matrix-synapse
Check the service using the following command.
ss -plnt
systemctl status matrix-synapse
Below is the result you will get.
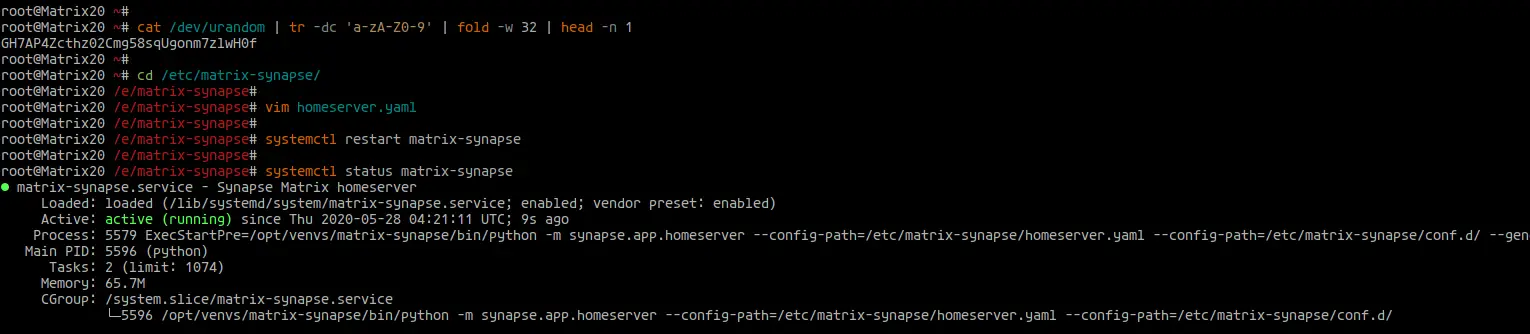
As a result, the Matrix Synapse service is up and running with a new configuration.
Step 3 - Generate SSL Letsencrypt
In this step, we will generate the SSL Letsencrypt using the certbot tool. The Matrix Synapse will be running under the secure HTTPS connection using the SSL certificates provided by Letsencrypt.
Install the certbot tool using the apt command below.
sudo apt install certbot -y
After that, generate a new SSL certificate using the certbot command below, and make sure to change the email address and domain name with your own.
certbot certonly --rsa-key-size 2048 --standalone --agree-tos --no-eff-email --email [email protected] -d hakase-labs.io
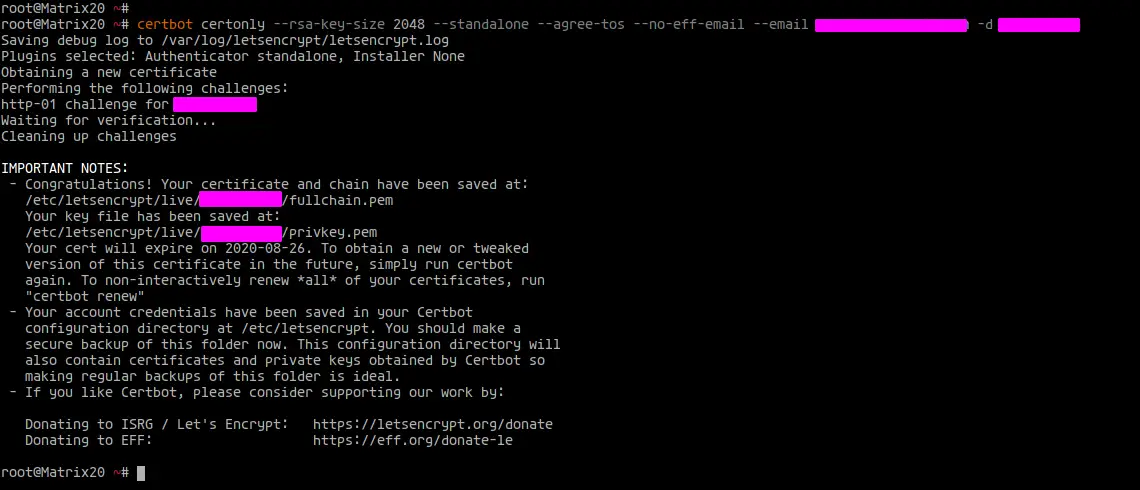
Once all is completed, your SSL certificates will be available at the '/etc/letsencrypt/live/domain.com/' directory.
ls -lah /etc/letsencrypt/live/domain.com/
The 'fullchain.pem' is the public key, and the 'privkey.pem' is the private key.
Step 4 - Setup Nginx as a Reverse Proxy
For this tutorial, we will run the Matrix Synapse under the Nginx Reverse proxy. And for this step, we will install Nginx packages and set up it as a Reverse Proxy.
The Nginx web server will be running on 3 ports, the default HTTP port '80', the secure HTTPS port '443', and the TCP port '8448' that will be used for the Matrix Synapse federation.
Install Nginx packages using the apt command below.
sudo apt install nginx -y
Once all installation is completed, go to the '/etc/nginx/sites-available' directory and create a new virtualhost configuration named as 'matrix' using the vim editor.
cd /etc/nginx/sites-available/
vim matrix
Change the domain name and the path of SSL certificates with your own, the paste the configuration into it.
server {
    listen 80;
    server_name hakase-labs.io;
    return 301 https://$host$request_uri;
}

server {
    listen 443 ssl;
    server_name hakase-labs.io;

    ssl_certificate /etc/letsencrypt/live/hakase-labs.io/fullchain.pem;
    ssl_certificate_key /etc/letsencrypt/live/hakase-labs.io/privkey.pem;

    location /_matrix {
        proxy_pass http://localhost:8008;
        proxy_set_header X-Forwarded-For $remote_addr;
        # Nginx by default only allows file uploads up to 1M in size
        # Increase client_max_body_size to match max_upload_size defined in homeserver.yaml
        client_max_body_size 10M;
    }
}

# This is used for Matrix Federation
# which is using default TCP port '8448'
server {
    listen 8448 ssl;
    server_name hakase-labs.io;

    ssl_certificate /etc/letsencrypt/live/hakase-labs.io/fullchain.pem;
    ssl_certificate_key /etc/letsencrypt/live/hakase-labs.io/privkey.pem;

    location / {
        proxy_pass http://localhost:8008;
        proxy_set_header X-Forwarded-For $remote_addr;
    }
}
Save and close.
Next, activate the 'matrix' virtualhost and test the Nginx configuration. Also, make sure there is no error.
ln -s /etc/nginx/sites-available/matrix /etc/nginx/sites-enabled/
nginx -t
Now restart the Nginx service and add it to the system boot.
systemctl restart nginx
systemctl enable nginx

After that, check the Nginx service using the command below.
ss -plnt
systemctl status nginx
Below is the result you will get.
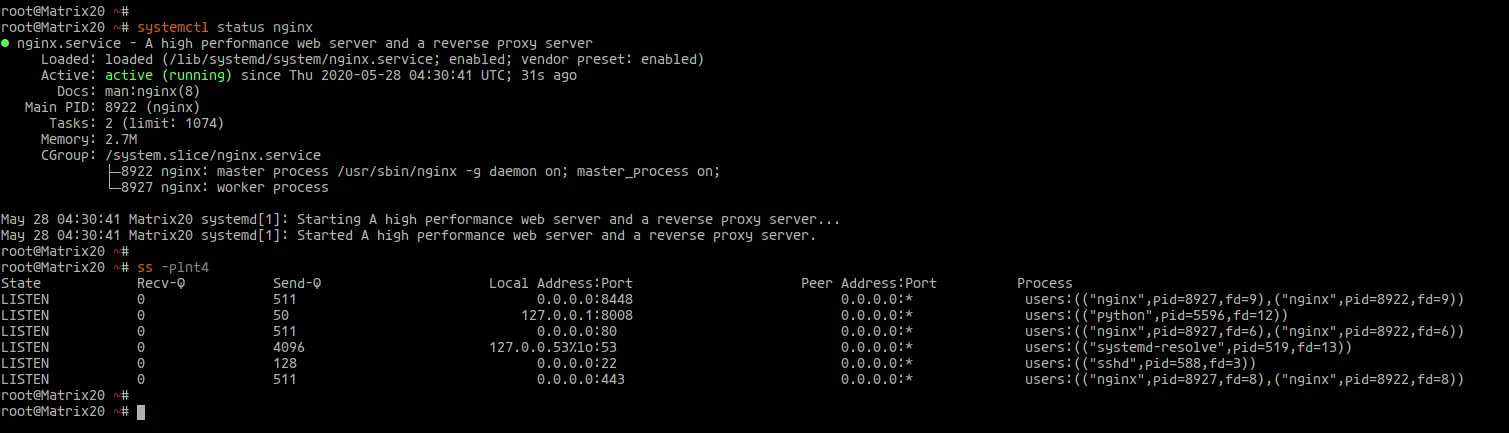
As a result, the Nginx service is up and running on the Ubuntu 20.04 with three different ports, the default HTTP port 80 that will be automatically redirected to the secure HTTPS port, and port '8448' that will be used for Matrix Synapse Federation.
Step 5 - UFW Firewall
For this tutorial, we will run the Matrix Synapse on the Ubuntu 20.04 with the UFW firewall enabled.
Add the ssh, http, https, and the TCP port '8448' to the UFW firewall using the command below.
for svc in ssh http https 8448
do
ufw allow $svc
done
After that, run and enable the UFW firewall.
ufw enable
Type 'y' to confirm and the UFW firewall is up and running, check all available rules on the UFW firewall using the command below.
ufw status numbered
Below is the result you will get.
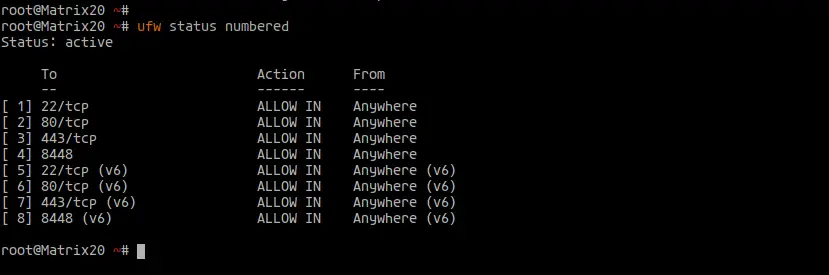
As a result, the UFW firewall configuration has been completed.
Step 6 - Register User
At this stage, the matrix synapse home server installation and configuration is complete. And in this step, we will show you how to add a new matrix user from the command line server.
To create a new matrix user, run the command below.
sudo register_new_matrix_user -c /etc/matrix-synapse/homeserver.yaml http://localhost:8008
Now type the username and password for your user, to make the user an administrator, type 'yes'.
New user localpart [root]: changbin
Password:
Confirm password:
Make admin [no]:
Sending registration request...
Success!
As a result, the new Matrix user has been created.
Step 7 - Testing
For this step, we will test our Matrix Synapse server installation.
- Testing Matrix Synapse Federation
Go to the Matrix Synapse Federation Tester URL below.
https://federationtester.matrix.org/
Now type your Matrix Synapse domain name and click the 'Go' button, and you will get the successful result as below.
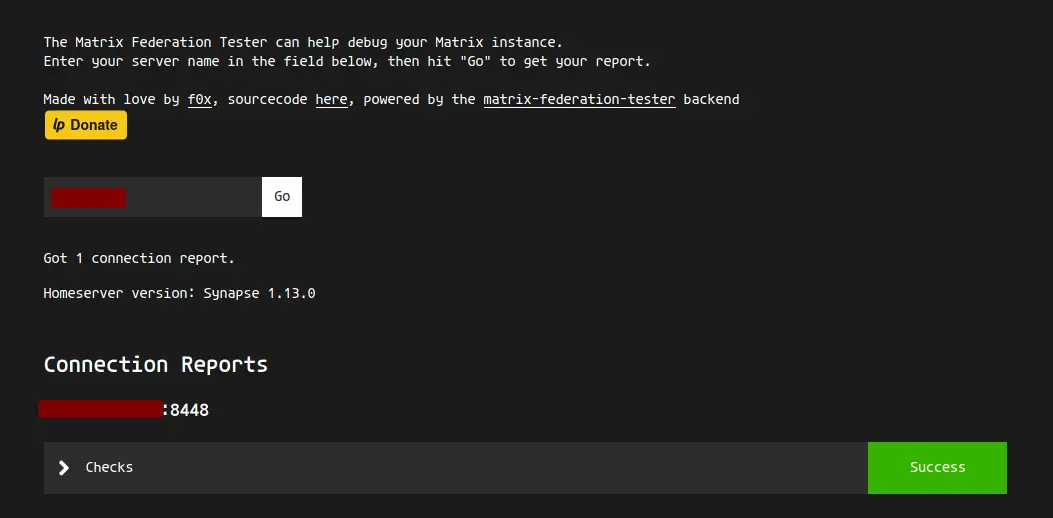
As can be seen, the Matrix Synapse Federation is working through the port '8448'.
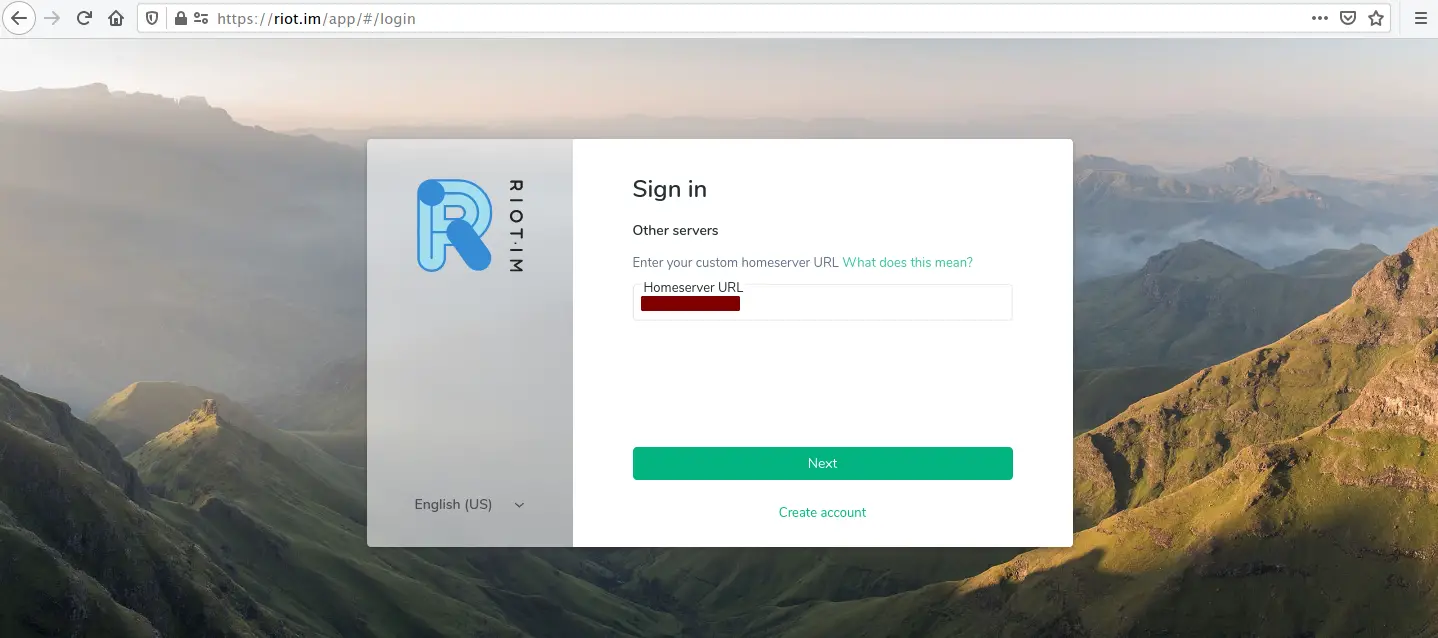
- Test Matrix Login with User and Password
Go to the web-based Matrix client called 'riot.im' as URL below.
Click the 'Sign In' button and you can use your custom Matrix Synapse server.

Type your domain name and click 'Next'.
Now type your username and password, then click the 'Sign In' button.
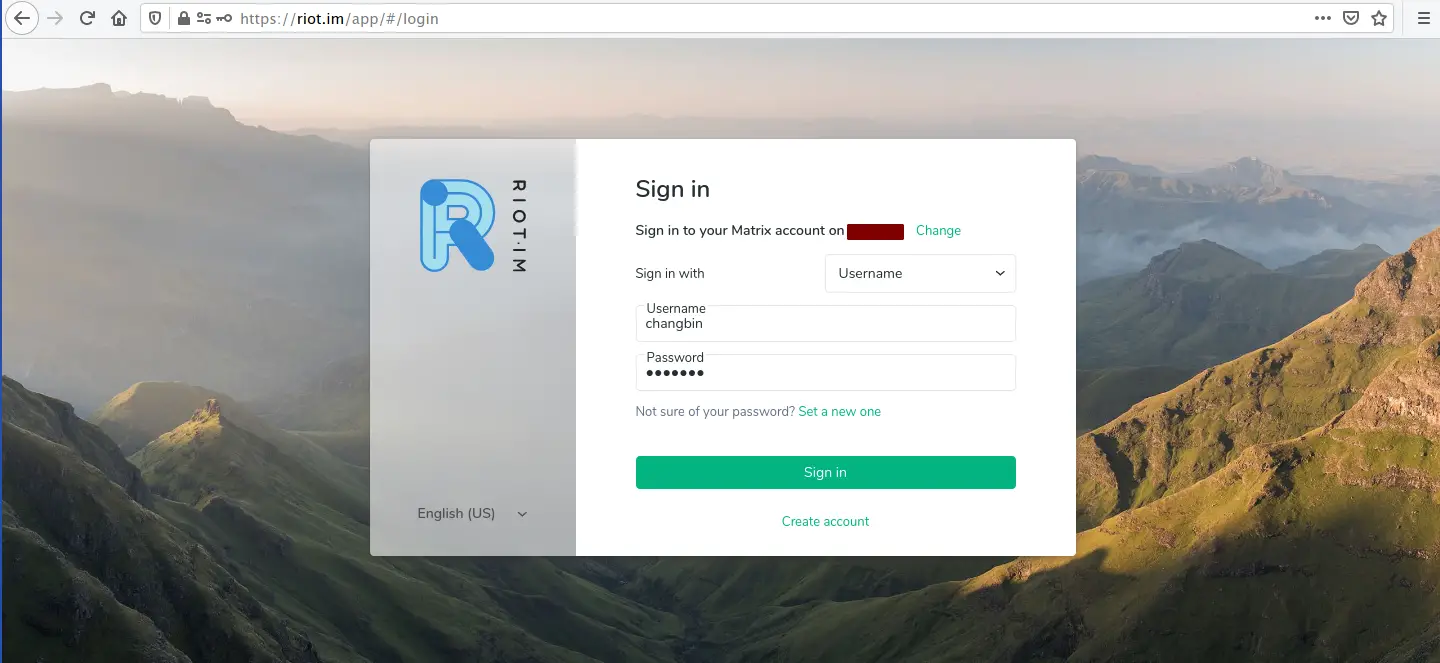
You will be asked for additional security questions.
Once you've logged in, you will get the following page.
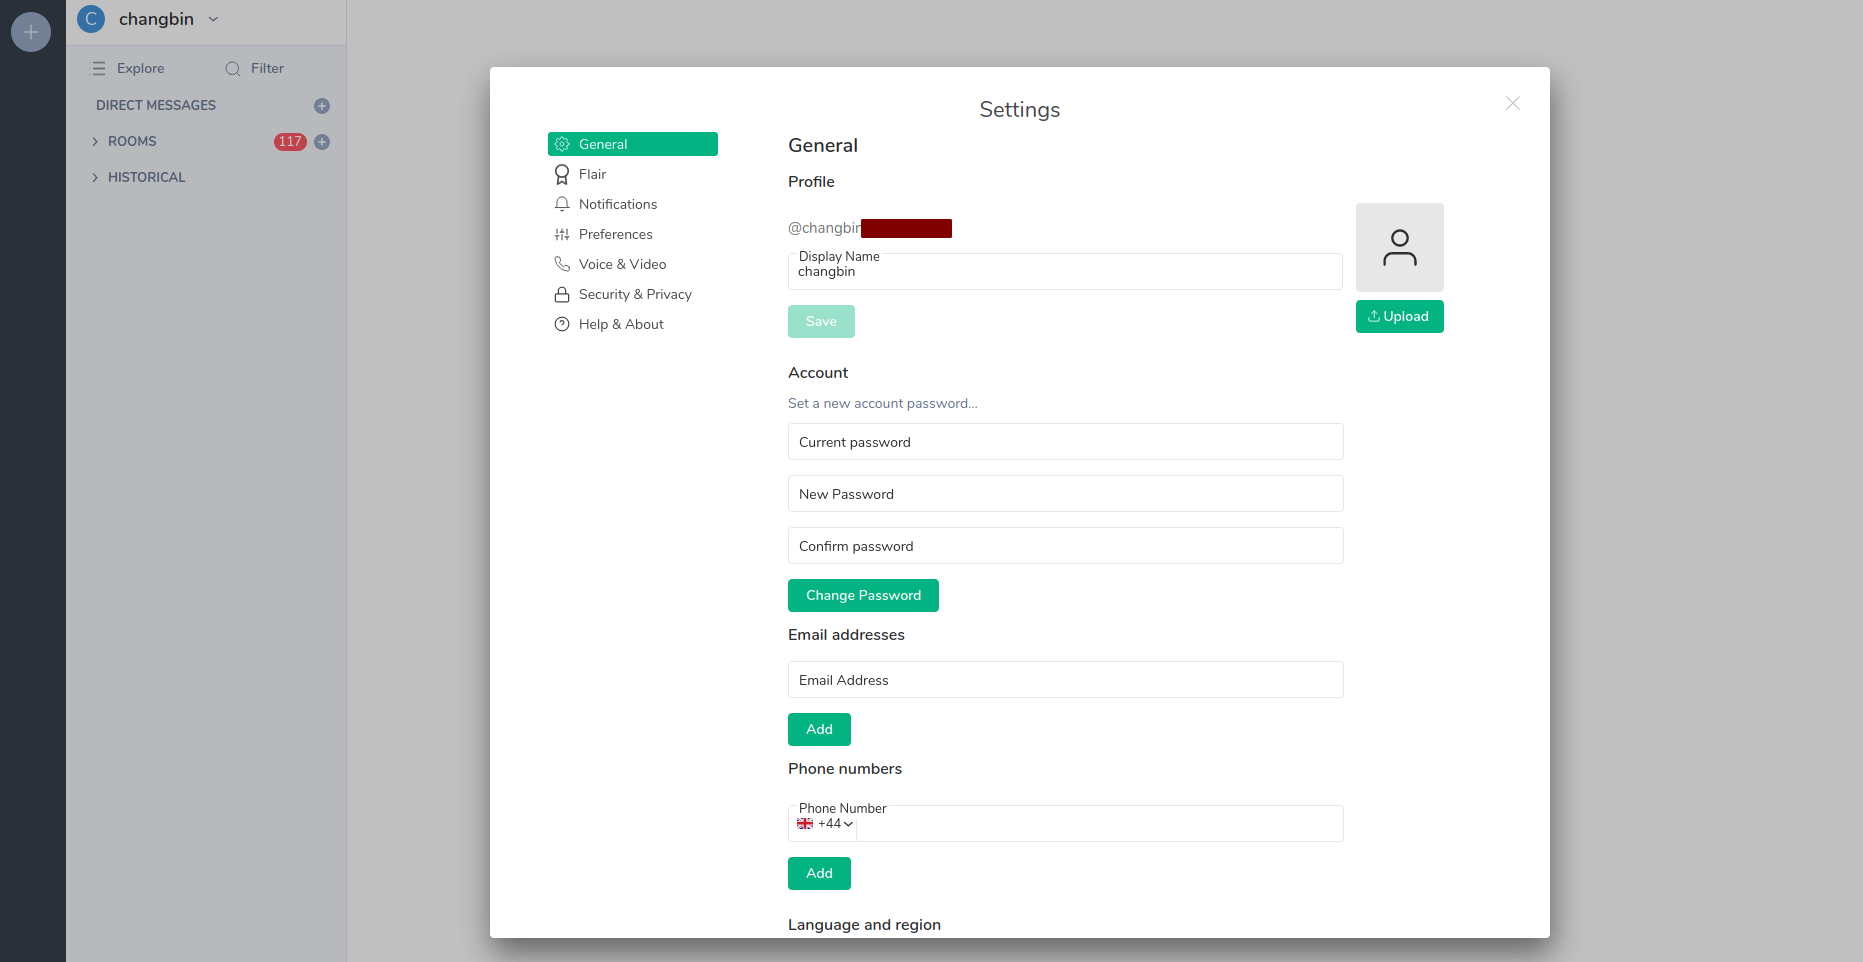
As a result, the installation of Matrix Synapse with the Nginx reverse-proxy and Federation enabled on Ubuntu 20.04 has been completed successfully.

