How to Install Wiki.js on Rocky Linux 9
On this page
- Prerequisites
- Step 1 - Configure Firewall
- Step 2 - Install PostgreSQL and Utilities
- Step 3 - Configure PostgreSQL
- Step 4 - Install Node.js
- Step 5 - Download Wiki.js
- Step 6 - Configure and Run Wiki.js
- Step 7 - Setup a Systemd Service
- Step 8 - Install Nginx
- Step 9 - Install SSL
- Step 10 - Configure SELinux
- Step 11 - Configure Nginx
- Step 12 - Finish the Installation
- Conclusion
Wiki.js is an open-source, lightweight wiki software. It is built on the Node.js JavaScript framework. It can be used to write documentation, wiki, and web content using a Markdown editor for developers and a WYSIWYG editor for non-technical people. It supports multiple content types including UML diagrams, Math expressions using Tex or MathML syntax, and code. It includes multiple modules for various functions including analytics, authentication, logging, third-party search engines, and multiple storage services to sync your content to.
In this tutorial, you will learn to install Wiki.js on a Rocky Linux 9 server using the PostgreSQL database and Nginx server for proxying.
Prerequisites
-
A server running Rocky Linux 9.
-
A non-root user with sudo privileges.
-
A fully qualified domain name (FQDN) pointing to your server. For our purposes, we will use
wiki.example.comas the domain name. -
Make sure everything is updated.
$ sudo dnf update
-
Install basic utility packages. Some of them may already be installed.
$ sudo dnf install wget curl nano unzip yum-utils -y
Step 1 - Configure Firewall
The first step is to configure the firewall. Rocky Linux uses Firewalld Firewall. Check the firewall's status.
$ sudo firewall-cmd --state
running
The firewall works with different zones, and the public zone is the default one that we will use. List all the services and ports active on the firewall.
$ sudo firewall-cmd --permanent --list-services
It should show the following output.
cockpit dhcpv6-client ssh
Wiki.js needs HTTP and HTTPS ports to function. Open them.
$ sudo firewall-cmd --add-service=http --permanent
$ sudo firewall-cmd --add-service=https --permanent
Reload the firewall to apply the changes.
$ sudo firewall-cmd --reload
Step 2 - Install PostgreSQL and Utilities
Rocky Linux 9 ships with an older version of PostgreSQL. We will install Postgres 14 for our tutorial.
Install the repository RPM for PostgreSQL.
$ sudo dnf install -y https://download.postgresql.org/pub/repos/yum/reporpms/EL-9-x86_64/pgdg-redhat-repo-latest.noarch.rpm
Install PostgreSQL 14 server.
$ sudo dnf install -y postgresql14-server postgresql14-contrib
Initialize the database.
$ sudo /usr/pgsql-14/bin/postgresql-14-setup initdb
Enable and start the PostgreSQL service.
$ sudo systemctl enable postgresql-14 --now
Check the status of the service.
$ sudo systemctl status postgresql-14
? postgresql-14.service - PostgreSQL 14 database server
     Loaded: loaded (/usr/lib/systemd/system/postgresql-14.service; enabled; vendor preset: disabled)
     Active: active (running) since Sat 2022-10-22 09:52:41 UTC; 2s ago
       Docs: https://www.postgresql.org/docs/14/static/
    Process: 103857 ExecStartPre=/usr/pgsql-14/bin/postgresql-14-check-db-dir ${PGDATA} (code=exited, status=0/SUCCESS)
   Main PID: 103862 (postmaster)
      Tasks: 8 (limit: 5915)
     Memory: 16.6M
        CPU: 61ms
     CGroup: /system.slice/postgresql-14.service
             ??103862 /usr/pgsql-14/bin/postmaster -D /var/lib/pgsql/14/data/
             ??103863 "postgres: logger "
             ??103865 "postgres: checkpointer "
             ??103866 "postgres: background writer "
             ??103867 "postgres: walwriter "
             ??103868 "postgres: autovacuum launcher "
             ??103869 "postgres: stats collector "
             ??103870 "postgres: logical replication launcher "

Oct 22 09:52:41 wiki.example.com systemd[1]: Starting PostgreSQL 14 database server...
Step 3 - Configure PostgreSQL
Log in to the PostgreSQL shell.
$ sudo -i -u postgres psql
Create a new database for Wiki.js.
postgres=# CREATE DATABASE wikidb;
Create a new database user with a strong password.
postgres=# CREATE USER wikiuser WITH ENCRYPTED PASSWORD 'wikipassword';
Grant the rights to the user to use the database.
postgres=# GRANT ALL PRIVILEGES ON DATABASE wikidb TO wikiuser;
Exit the Postgres Shell.
postgres=# \q
Step 4 - Install Node.js
Wiki.js supports Node v16 at the moment of writing this tutorial.
Install the Node repository using the following command.
$ curl -fsSL https://rpm.nodesource.com/setup_16.x | sudo bash -
Install Node.
$ sudo dnf install nodejs -y
Verify Node installation.
$ node --version
v16.18.0
Step 5 - Download Wiki.js
Create a folder to install Wiki.js.
$ sudo mkdir -p /var/www/wikijs
Set the currently logged-in user as the owner of the folder.
$ sudo chown $USER:$USER /var/www/wikijs
Switch to the directory and download the Wiki.js code archive.
$ cd /var/www/wikijs && wget https://github.com/Requarks/wiki/releases/latest/download/wiki-js.tar.gz
Extract the downloaded archive.
$ tar xzf wiki-js.tar.gz
Step 6 - Configure and Run Wiki.js
Create the configuration file from the sample.
$ cp config.sample.yml config.yml
Open the configuration file for editing.
$ nano config.yml
Find the following database settings and update their values with the ones configured in step 3.
# PostgreSQL / MySQL / MariaDB / MS SQL Server only:
host: localhost
port: 5432
user: wikiuser
pass: wikipassword
db: wikidb
ssl: false
Find the line bindIP: 0.0.0.0 and update it as follows.
bindIP: 127.0.0.1
This will make WIki.js listen on the loopback address because we will be using the Nginx proxy to access it from the outside.
Save the file by pressing Ctrl + X and entering Y when prompted.
Run Wiki.js by using the following command.
$ node server
You will receive a similar output confirming a successful install.
2022-10-22T10:25:48.187Z [MASTER] info: =======================================
2022-10-22T10:25:48.190Z [MASTER] info: = Wiki.js 2.5.289 =====================
2022-10-22T10:25:48.191Z [MASTER] info: =======================================
2022-10-22T10:25:48.191Z [MASTER] info: Initializing...
2022-10-22T10:25:49.079Z [MASTER] info: Using database driver pg for postgres [ OK ]
2022-10-22T10:25:49.086Z [MASTER] info: Connecting to database...
2022-10-22T10:25:49.117Z [MASTER] info: Database Connection Successful [ OK ]
2022-10-22T10:25:49.467Z [MASTER] warn: DB Configuration is empty or incomplete. Switching to Setup mode...
2022-10-22T10:25:49.468Z [MASTER] info: Starting setup wizard...
2022-10-22T10:25:49.740Z [MASTER] info: Starting HTTP server on port 3000...
2022-10-22T10:25:49.741Z [MASTER] info: HTTP Server on port: [ 3000 ]
2022-10-22T10:25:49.745Z [MASTER] info: HTTP Server: [ RUNNING ]
2022-10-22T10:25:49.745Z [MASTER] info: .......................................
2022-10-22T10:25:49.745Z [MASTER] info:
2022-10-22T10:25:49.746Z [MASTER] info: Browse to http://YOUR-SERVER-IP:3000/ to complete setup!
Press Ctrl + C to stop the process.
Step 7 - Setup a Systemd Service
The above process to keep Wiki.js running is temporary. To make the process permanent, we will need to create a systemd service for Wiki.js to run it as a background service. This will allow Wiki.js to run across system reboots.
Create a systemd service file for Wiki.js and open it for editing.
$ sudo nano /etc/systemd/system/wikijs.service
Paste the following code in it. Replace the value of the variable User with the name of your system user.
[Unit]
Description=Wiki.js
After=network.target

[Service]
Type=simple
ExecStart=/usr/bin/node server
Restart=always

User=navjot
Environment=NODE_ENV=production
WorkingDirectory=/var/www/wikijs

[Install]
WantedBy=multi-user.target
Save the file by pressing Ctrl + X and entering Y when prompted.
Reload the system daemon.
$ sudo systemctl daemon-reload
Enable the Wiki.js service.
$ sudo systemctl enable wikijs
Step 8 - Install Nginx
Rocky Linux ships with an older version of Nginx. You need to download the official Nginx repository to install the latest version.
Create and open the /etc/yum.repos.d/nginx.repo file for creating the official Nginx repository.
$ sudo nano /etc/yum.repos.d/nginx.repo
Paste the following code in it.
[nginx-stable]
name=nginx stable repo
baseurl=http://nginx.org/packages/centos/$releasever/$basearch/
gpgcheck=1
enabled=1
gpgkey=https://nginx.org/keys/nginx_signing.key
module_hotfixes=true

[nginx-mainline]
name=nginx mainline repo
baseurl=http://nginx.org/packages/mainline/centos/$releasever/$basearch/
gpgcheck=1
enabled=0
gpgkey=https://nginx.org/keys/nginx_signing.key
module_hotfixes=true
Save the file by pressing Ctrl + X and entering Y when prompted.
Install the Nginx server.
$ sudo dnf install nginx -y
Verify the installation.
$ nginx -v
nginx version: nginx/1.22.1
Enable and start the Nginx server.
$ sudo systemctl enable nginx --now
Check the status of the server.
$ sudo systemctl status nginx
? nginx.service - nginx - high performance web server
     Loaded: loaded (/usr/lib/systemd/system/nginx.service; enabled; vendor preset: disabled)
     Active: active (running) since Sat 2022-10-22 11:15:39 UTC; 49min ago
       Docs: http://nginx.org/en/docs/
    Process: 116236 ExecStart=/usr/sbin/nginx -c /etc/nginx/nginx.conf (code=exited, status=0/SUCCESS)
   Main PID: 116237 (nginx)
      Tasks: 2 (limit: 5915)
     Memory: 5.0M
        CPU: 245ms
     CGroup: /system.slice/nginx.service
             ??116237 "nginx: master process /usr/sbin/nginx -c /etc/nginx/nginx.conf"
             ??116238 "nginx: worker process"

Oct 22 11:15:39 wiki.example.com systemd[1]: Starting nginx - high performance web server...
Step 9 - Install SSL
We will use the Certbot tool using the Snapd tool to issue SSL certificates. It requires the EPEL repository to work.
$ sudo dnf install epel-release
We will use Snapd to install Certbot. Install Snapd.
$ sudo dnf install snapd
Enable and Start the Snap service.
$ sudo systemctl enable snapd.socket --now
Create necessary links for Snapd to work.
$ sudo ln -s /var/lib/snapd/snap /snap
$ echo 'export PATH=$PATH:/var/lib/snapd/snap/bin' | sudo tee -a /etc/profile.d/snapd.sh
Install the core Snapd repository.
$ sudo snap install core
$ sudo snap refresh core
Install Certbot.
$ sudo snap install --classic certbot
$ sudo ln -s /snap/bin/certbot /usr/bin/certbot
Generate the certificate. The following command will also automatically configure Nginx.
$ sudo certbot certonly --nginx --agree-tos --no-eff-email --staple-ocsp --preferred-challenges http -m [email protected] -d wiki.example.com
The above command will download a certificate to the /etc/letsencrypt/live/wiki.example.com directory on your server.
Generate a Diffie-Hellman group certificate.
$ sudo openssl dhparam -dsaparam -out /etc/ssl/certs/dhparam.pem 4096
Do a dry run of the process to check whether the SSL renewal is working fine.
$ sudo certbot renew --dry-run
If you see no errors, you are all set. Your certificate will renew automatically.
Step 10 - Configure SELinux
Run the following commands to apply the correct SELinux context to the Wiki.js directory.
$ sudo semanage fcontext -a -t httpd_sys_rw_content_t "/var/www/wikijs(/.*)?"
$ sudo restorecon -Rv /var/www/wikijs
Create a port for HTTP and assign it to 3000 to make Wiki.js work with SELinux.
$ sudo semanage port -a -t http_port_t -p tcp 3000
Allow Nginx to connect to the network.
$ sudo setsebool -P httpd_can_network_connect 1
Step 11 - Configure Nginx
Create and open the file /etc/nginx/conf.d/wikijs.conf for editing.
$ sudo nano /etc/nginx/conf.d/wikijs.conf
Paste the following code in it.
# enforce HTTPS
server {
  listen 80;
  listen [::]:80;
  server_name wiki.example.com;
  return 301 https://$server_name$request_uri;
}

server {
    listen 443 ssl http2;
    listen [::]:443 ssl http2;
    server_name wiki.example.com;

    root /var/www/wikijs;

    access_log  /var/log/nginx/wiki.access.log;
    error_log   /var/log/nginx/wiki.error.log;

    http2_push_preload on; # Enable HTTP/2 Server Push

    ssl_certificate /etc/letsencrypt/live/wiki.example.com/fullchain.pem;
    ssl_certificate_key /etc/letsencrypt/live/wiki.example.com/privkey.pem;
    ssl_trusted_certificate /etc/letsencrypt/live/wiki.example.com/chain.pem;
    ssl_session_timeout 1d;

    # Enable TLS versions (TLSv1.3 is required upcoming HTTP/3 QUIC).
    ssl_protocols TLSv1.2 TLSv1.3;

    # Enable TLSv1.3's 0-RTT. Use $ssl_early_data when reverse proxying to
    # prevent replay attacks.
    #
    # @see: https://nginx.org/en/docs/http/ngx_http_ssl_module.html#ssl_early_data
    ssl_early_data on;

    ssl_ciphers 'ECDHE-ECDSA-AES256-GCM-SHA384:ECDHE-RSA-AES256-GCM-SHA384:ECDHE-ECDSA-CHACHA20-POLY1305:ECDHE-RSA-CHACHA20-POLY1305:ECDHE-ECDSA-AES256-SHA384:ECDHE-RSA-AES256-SHA384';
    ssl_prefer_server_ciphers on;
    ssl_session_cache shared:SSL:50m;

    # OCSP Stapling ---
    # fetch OCSP records from URL in ssl_certificate and cache them
    ssl_stapling on;
    ssl_stapling_verify on;
    ssl_dhparam /etc/ssl/certs/dhparam.pem;

    add_header X-Early-Data $tls1_3_early_data;

    location / {
        proxy_http_version 1.1;
        proxy_set_header Upgrade $http_upgrade;
        proxy_set_header Connection "upgrade";
        proxy_set_header Host $http_host;
        proxy_set_header X-Real-IP $remote_addr;
        proxy_set_header X-Forwarded-For $proxy_add_x_forwarded_for;
        proxy_set_header X-Forwarded-Proto $scheme;
        proxy_pass http://127.0.0.1:3000;
    }
}

# This block is useful for debugging TLS v1.3. Please feel free to remove this
# and use the `$ssl_early_data` variable exposed by NGINX directly should you
# wish to do so.
map $ssl_early_data $tls1_3_early_data {
  "~." $ssl_early_data;
  default "";
}
Replace the root location in the above file with the directory on your server.
Save the file by pressing Ctrl + X and entering Y when prompted.
Open the file /etc/nginx/nginx.conf for editing.
$ sudo nano /etc/nginx/nginx.conf
Add the following line before the line include /etc/nginx/conf.d/*.conf;.
server_names_hash_bucket_size 64;
Save the file by pressing Ctrl + X and entering Y when prompted.
Verify your Nginx configuration.
$ sudo nginx -t
If you see no errors, it means you are good to go.
Start the Wiki.js service.
$ sudo systemctl start wikijs
Reload the Nginx server.
$ sudo systemctl reload nginx
Step 12 - Finish the Installation
Visit the URL https://wiki.example.com to finish the installation.
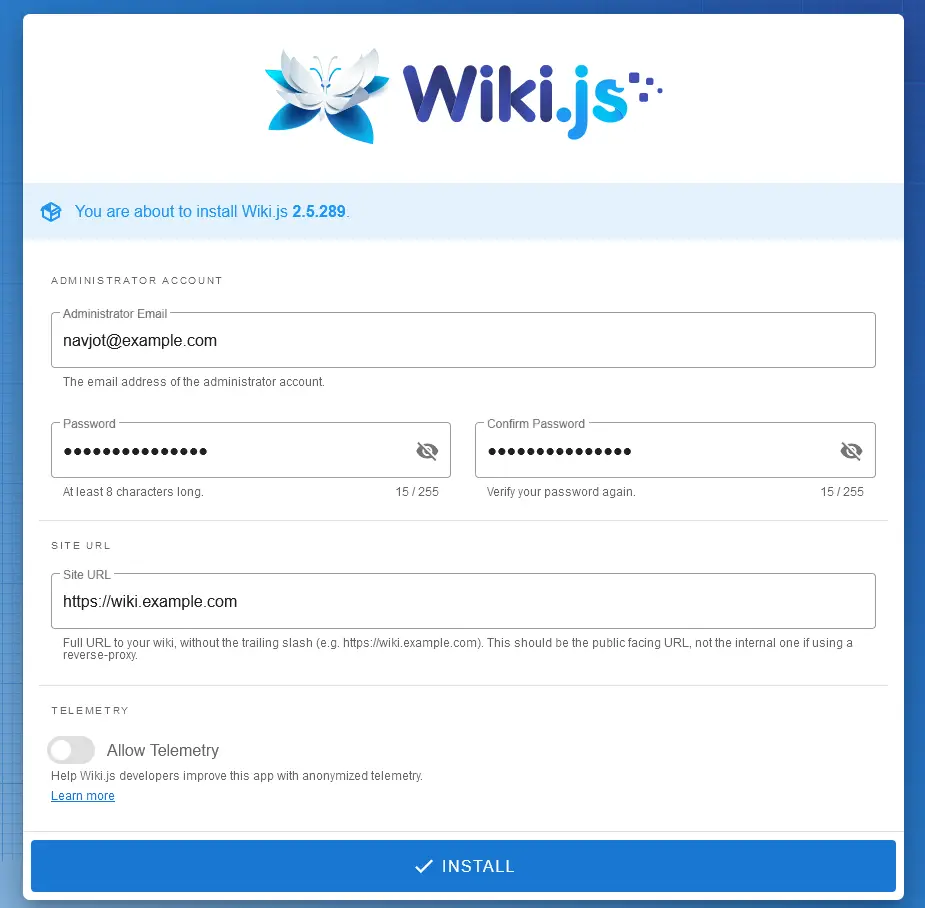
Fill in your administrator account details and the URL. Disable Telemetry by unchecking the Allow Telemetry option. You can disable it from the Administration panel as well. Click the Install button to proceed.
You will be taken to the login page.
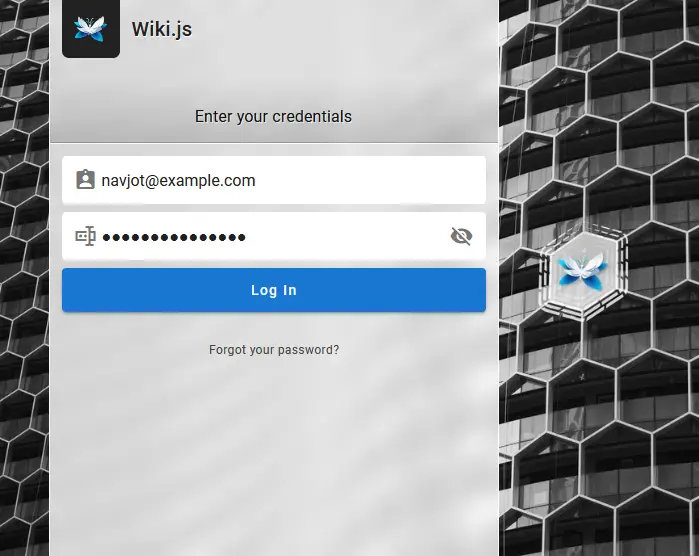
Enter your account details and click the Log in button to proceed to the administration page.

You can now start using Wiki.js.
Conclusion
This concludes our tutorial where you learned how to install Wiki.js on a Rocky Linux 9 server. If you have any questions, post them in the comments below.

