How to Install OTRS (CE) Ticketing System on Rocky Linux
OTRS Community Edition is an open-source helpdesk software written in Perl. OTRS is a web-based ticketing system for customer service, IT Service Management, and Help Desk.
OTRS is a flexible ticketing system and service management suit. It provides an agent portal, administration dashboard, and customer portal.
In this article, you will learn how to install OTRS Community Edition on the Rocky Linux system. You will be installing OTRS with the MariaDB database and Apache webserver.
Prerequisites
This is a walkthrough guide, ensure you have got following requirements:
- Operating System: Rocky Linux 8.4 (Green Obsidian)
- Memory: 2GB (for small deployment)
- IP Address: 192.168.1.10
- Domain Name: example.io (for production environment)
Now let's start the installation.
Install Packages Dependencies
First, you will be installing some basic packages dependencies to your Rocky Linux system. You will be installing EPEL repository, Perl, httpd, and MariaDB packages.
1. Run the DNF command below to install the EPEL repository.
sudo dnf install epel-release -y
2. After EPEL repository installation completes, install GCC and Perl packages.
sudo dnf install gcc expat-devel perl perl-core procmail -y
3. Next, install the httpd web server and MariaDB database using the following command.
sudo dnf install httpd mariadb-server mod_perl
Type 'y' to confirm and press 'Enter' to continue the installation.
After the MariaDB installation completes, edit the configuration '/etc/my.cnf.d/mariadb-server.cnf' using nano editor.
nano /etc/my.cnf.d/mariadb-server.cnf
Copy and paste the following configuration under the '[mysqld]' section.
[mysqld]

max_allowed_packet=256M
character-set-server=utf8
collation-server=utf8_general_ci
innodb_buffer_pool_size=4G
innodb_log_file_size=1G
Save the configuration and exit.
4. Now start and enable the httpd and MariaDB services using the following command.
sudo systemctl enable --now httpd
sudo systemctl enable --now mariadb
Now move to the next step to install additional Perl dependencies and set up the MariaDB database.
Installing Perl Dependencies
The OTRS project is written in Perl, you must install some Perl dependencies from the Comprehensive Perl Archive Network (CPAN) repository.
To install packages from the CPAN repository, use the cpan command.
1. Execute the cpan command below to install Perl dependencies for OTRS.
sudo cpan Net::DNS Moo Date::Format DateTime Text::CSV_XS XML::Parser XML::LibXML JSON::XS YAML
sudo cpan Crypt::PasswdMD5 CSS::Minifier CGI Template YAML::XS
sudo cpan Crypt::Eksblowfish::Bcrypt
2. Next, you can install some optional Perl dependencies using the cpan command below.
sudo cpan DBD::Pg Mail::IMAPClient Authen::SASL XML::LibXSLT
Now go to the next step for setting up the MariaDB database, then installing the OTRS.
Setup Database for OTRS
In this step, you will be set up the root password for MariaDB and create a new database and user for the OTRS installation.
You can use the command 'mysql_secure_installation' to configure the root password for the MariaDB server.
1. Setup MariaDB root password using the following command.
mysql_secure_installation
Type a new password for the MariaDB root user and type 'y' to confirm all suggested configurations.
2. Next, log in to the MariaDB shell using the mysql command below.
mysql -u root -p
Type the password for MariaDB root user.
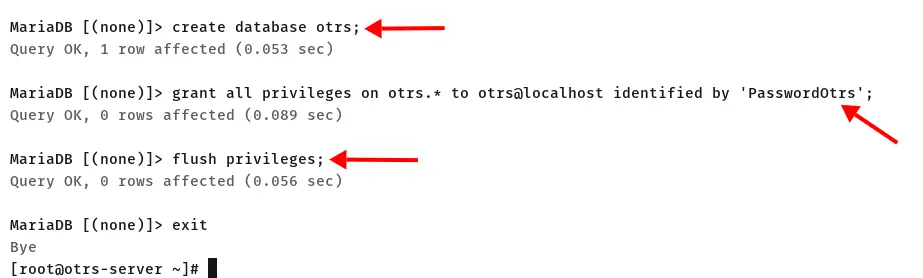
3. Next, execute the following query to create a new database 'otrs' and the user 'otrs'. Ensure to change the password.
create database otrs;
grant all privileges on otrs.* to otrs@localhost identified by 'PasswordOtrs';
flush privileges;
Now type 'exit' and press 'Enter' to log out from the MariaDB shell.
You're ready to install OTRS on your system.
Download and Configure OTRS Community Edition
In this step, you will be downloading the OTRS community edition and configuring it for installation.
1. At first, create a new system user 'otrs' using the following command.
adduser -M -r -s /sbin/nologin otrs
Now run the command below to add the user 'otrs' to the group 'apache'.
usermod -aG apache otrs
2. Next, change your current working directory to '/opt' and download OTRS source code using the wget command below.
cd /opt
wget https://otrscommunityedition.com/download/otrs-community-edition-6.0.32.tar.gz
If the OTRS download process completes, extract the OTRS source code and rename the directory to 'otrs'.
tar -xf otrs-community-edition-6.0.32.tar.gz
mv otrs-community-edition-*/ otrs/
3. Before the OTRS installation begin, ensure all Perl modules and dependencies for OTRS are available on your system.
Change the working directory to '/opt/otrs' and execute the Perl script 'otrs.CheckModules.pl'.
export OTRS=/opt/otrs
cd $OTRS

perl bin/otrs.CheckModules.pl
The script 'otrs.CheckModules.pl' will perform system checking for all Perl dependencies for the OTRS installation.
Ensure all essential Perl modules are installed on your system. You can install optional Perl modules using the suggested command on the message output.
Below is the similar output you will see.
  o Apache::DBI......................ok (v1.12)
  o Apache2::Reload..................ok (v0.13)
  o Archive::Tar.....................ok (v2.30)
  o Archive::Zip.....................ok (v1.60)
  o Crypt::Eksblowfish::Bcrypt.......ok (v0.009)
  o Date::Format.....................ok (v2.24)
  o DateTime.........................ok (v1.54)
    o DateTime::TimeZone.............ok (v2.51)
  o DBI..............................ok (v1.641)
  o DBD::mysql.......................ok (v4.046)
  o DBD::ODBC........................Not installed! To install, you can use: 'cpan DBD::ODBC'. (optional - Required to connect to a MS-SQL database.)
  o DBD::Oracle......................Not installed! To install, you can use: 'cpan DBD::Oracle'. (optional - Required to connect to a Oracle database.)
  o DBD::Pg..........................Not installed! To install, you can use: 'cpan DBD::Pg'. (optional - Required to connect to a PostgreSQL database.)
  o Digest::SHA......................ok (v6.02)
  o Encode::HanExtra.................Not installed! To install, you can use: 'cpan Encode::HanExtra'. (optional - Required to handle mails with several Chinese character sets.)
  o IO::Socket::SSL..................ok (v2.066)
  o JSON::XS.........................ok (v4.03)
  o List::Util::XS...................ok (v1.49)
  o LWP::UserAgent...................ok (v6.54)
  o Mail::IMAPClient.................Not installed! To install, you can use: 'cpan Mail::IMAPClient'. (optional - Required for IMAP TLS connections.)
    o IO::Socket::SSL................ok (v2.066)
    o Authen::SASL...................Not installed! To install, you can use: 'cpan Authen::SASL'. (optional - Required for MD5 authentication mechanisms in IMAP connections.)
    o Authen::NTLM...................Not installed! To install, you can use: 'cpan Authen::NTLM'. (optional - Required for NTLM authentication mechanism in IMAP connections.)
  o ModPerl::Util....................ok (v2.000011)
  o Moo..............................ok (v2.005004)
  o Net::DNS.........................ok (v1.32)
  o Net::LDAP........................Not installed! To install, you can use: 'cpan Net::LDAP'. (optional - Required for directory authentication.)
  o Net::SMTP........................ok (v3.11)
  o Template.........................ok (v3.009)
  o Template::Stash::XS..............ok (undef)
  o Text::CSV_XS.....................ok (v1.46)
  o Time::HiRes......................ok (v1.9758)
  o XML::LibXML......................ok (v2.0207)
  o XML::LibXSLT.....................Not installed! To install, you can use: 'cpan XML::LibXSLT'. (optional - Required for Generic Interface XSLT mapping module.)
  o XML::Parser......................ok (v2.46)
  o YAML::XS.........................ok (v0.83)
4. Next, copy the OTRS configuration to the 'Config.pm' file using the following command.
sudo cp $OTRS/Kernel/Config.pm.dist $OTRS/Kernel/Config.pm
5. Now verify the OTRS main script using the following command.
perl -cw $OTRS/bin/cgi-bin/index.pl
perl -cw $OTRS/bin/cgi-bin/customer.pl
perl -cw $OTRS/bin/otrs.Console.pl
Ensure you get the output message 'Syntax OK'.
6. Lastly, set up the permission of the OTRS installation directory '/opt/otrs' using the following command.
perl $OTRS/bin/otrs.SetPermissions.pl
Now ensure the OTRS installation directory '/opt/otrs' is belonging to user 'otrs' and the group 'apache'.
Verify using the following command.
ls -lah /opt/otrs
ls -lah $OTRS
Move to the next step for setting up the httpd configuration for OTRS.
Setup Apache Virtual Host for OTRS
In this step, you will be creating a new virtual host configuration for OTRS. In this example, we're using the domain name 'example.io', and the OTRS installation will be available at the path URL 'example.io/otrs/'.
1. First, copy the defualt httpd configuration 'otrs.conf' from the OTRS installation directory to the '/etc/httpd/conf.d' directory.
cp $OTRS/scripts/apache2-httpd.include.conf /etc/httpd/conf.d/otrs.conf
2. Next, create a new virtual host configuration 'example.conf' using nano editor.
cd /etc/httpd/conf.d/
nano example.conf
Copy and paste the following configuration. And make sure to change the domain name with your domain.
<VirtualHost *:80>
   ServerAdmin [email protected]

   ServerName example.io
   ServerAlias www.example.io

   ErrorLog /var/log/httpd/otrs_error.log
   CustomLog /var/log/httpd/otrs_access.log combined
</VirtualHost>
Save the configuration and exit.
For the OTRS with Apache HTTPS configuration as below. Change the domain name and path of the SSL certificates path.
<VirtualHost *:80>
   ServerAdmin [email protected]

   ServerName example.io
   ServerAlias www.example.io
  Redirect permanent / https://example.io/

</VirtualHost>

<VirtualHost *:443>
   ServerAdmin [email protected]

   ServerName example.io

   Protocols h2 http/1.1

   SSLEngine On
   SSLCertificateFile /etc/letsencrypt/live/example.io/fullchain.pem
   SSLCertificateKeyFile /etc/letsencrypt/live/example.io/privkey.pem

   ErrorLog /var/log/httpd/otrs_error.log
   CustomLog /var/log/httpd/otrs_access.log combined
</VirtualHost>
3. Next, verify the httpd configuration and make sure there is no error, then restart the httpd service to apply the new configuration.
apachectl configtest
sudo systemctl restart httpd
Your OTRS installation is accessible from your web browser.
OTRS Installation
1. To start the OTRS installation, open your web browser and type your OTRS domain name on the address bar.
https://example.io/otrs/installer.pl
You will see the welcome message from OTRS Community Edition.
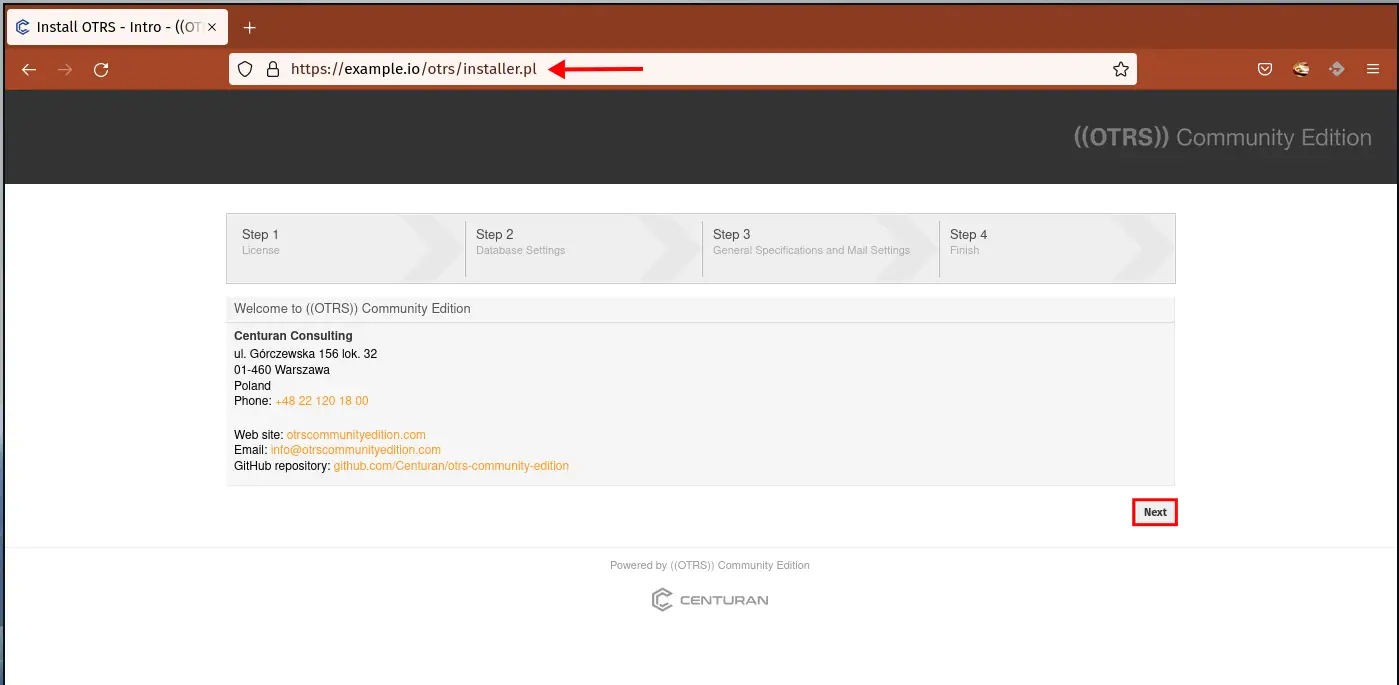
Click the 'Next' button to continue.
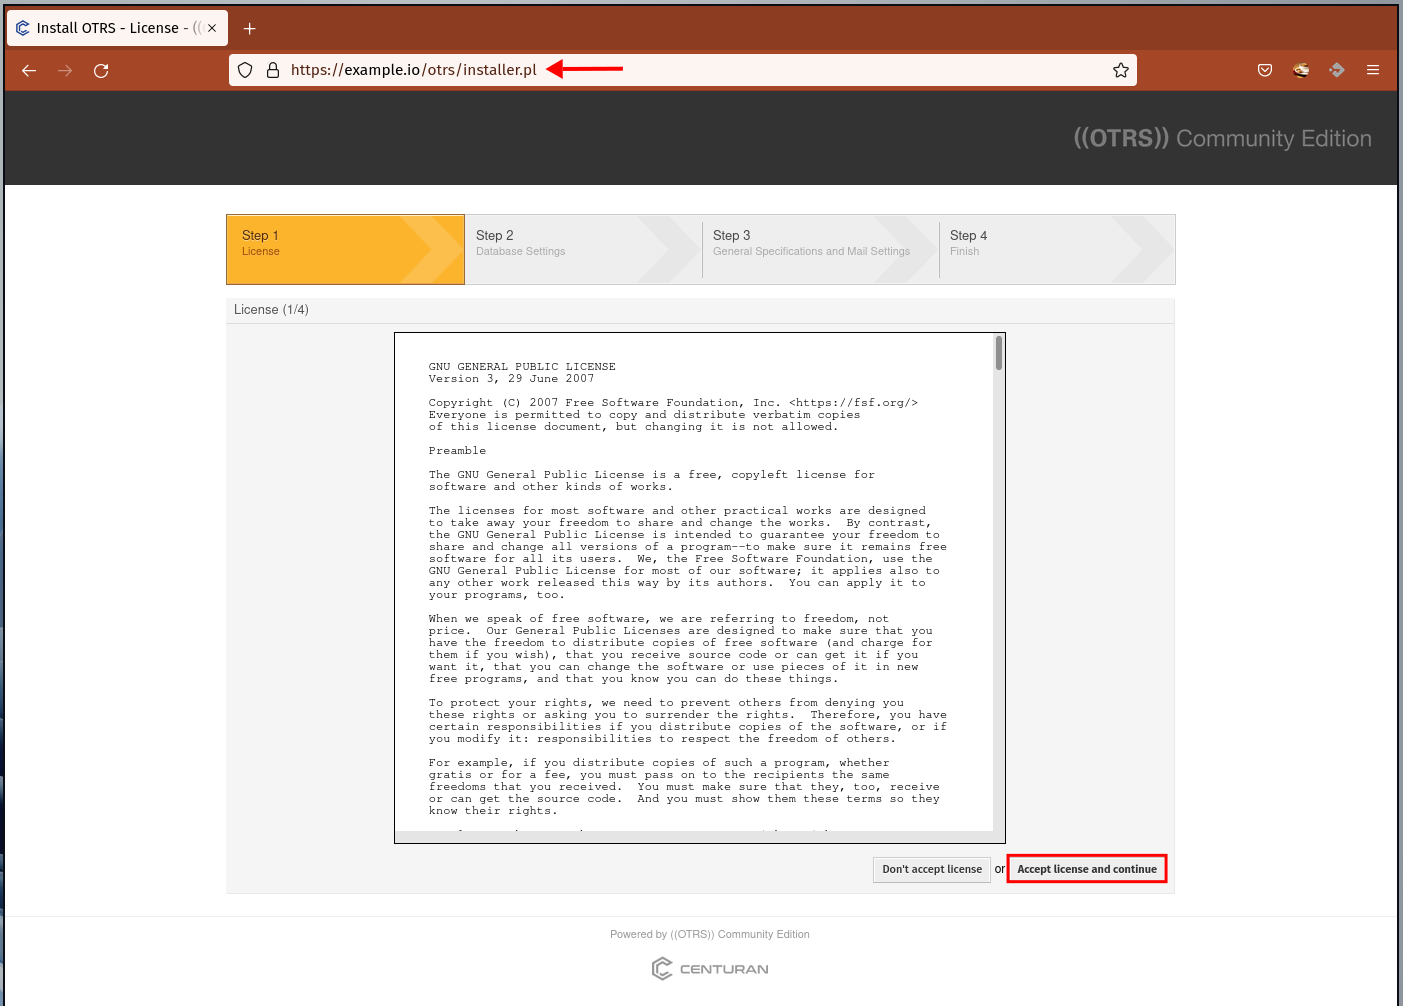
2. The OTRS Community Edition comes with GNU GPL License. Click the button 'Accept license and continue'.
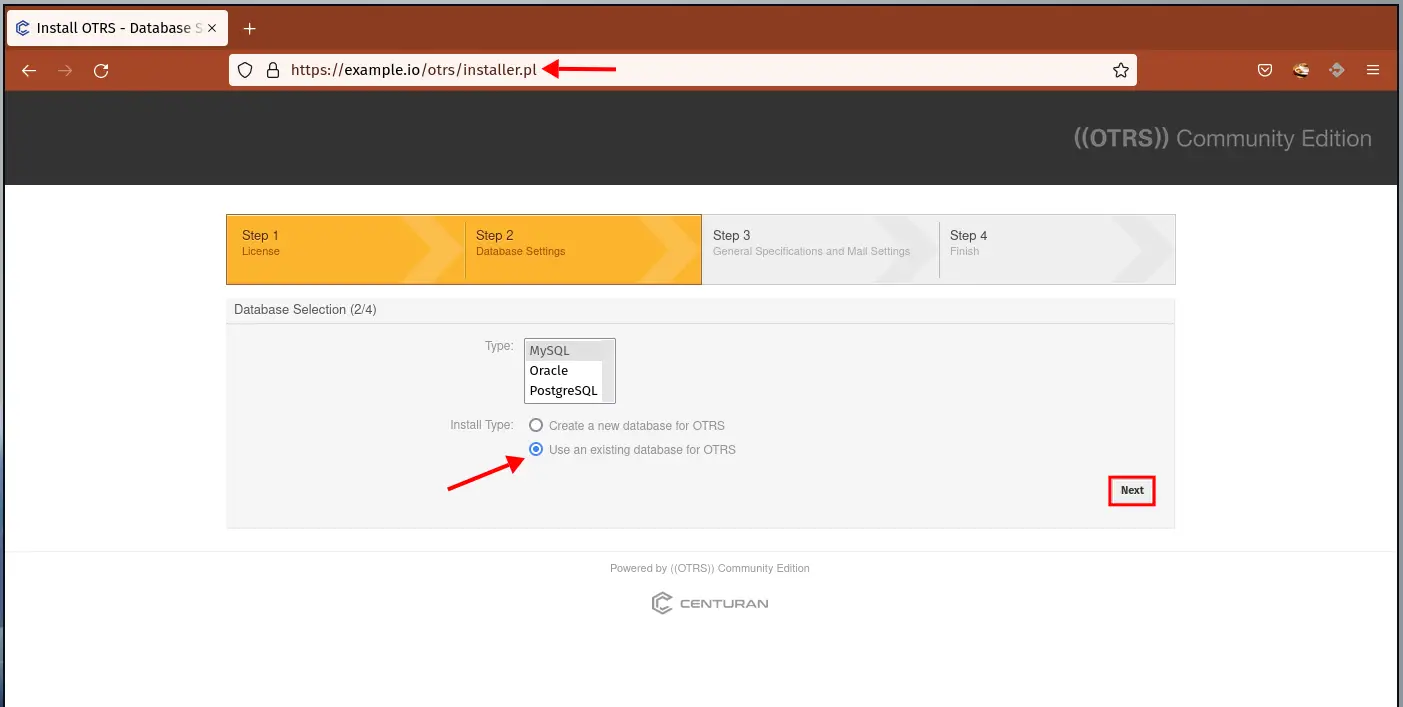
3. For the database configuration, select type as 'MySQL' and choose the option 'Use an existing database for OTRS', then click the 'Next' button again.
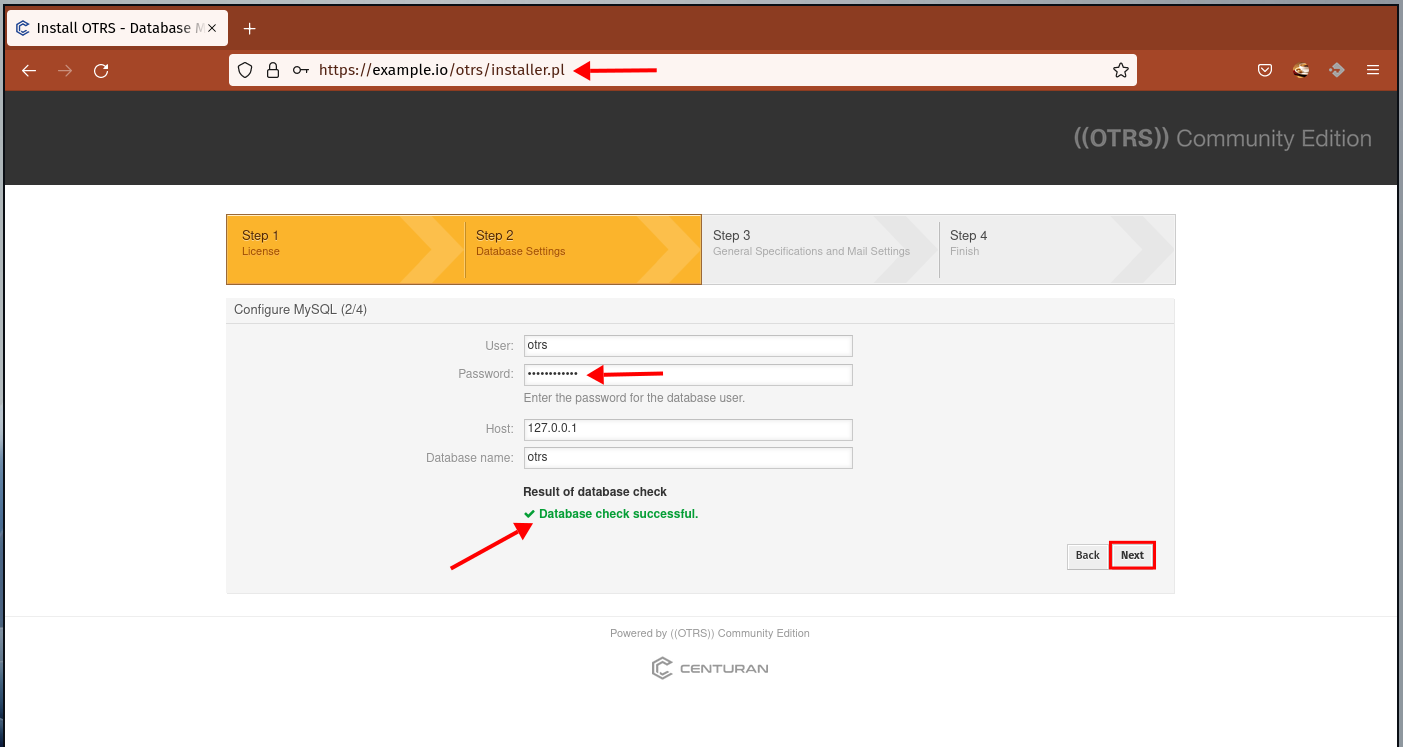
4. Type your MariaDB database name, user, password, and hosts, then click the button 'Check database settings'.
Ensure you get the output message 'Database check successful' and click the 'Next' button.
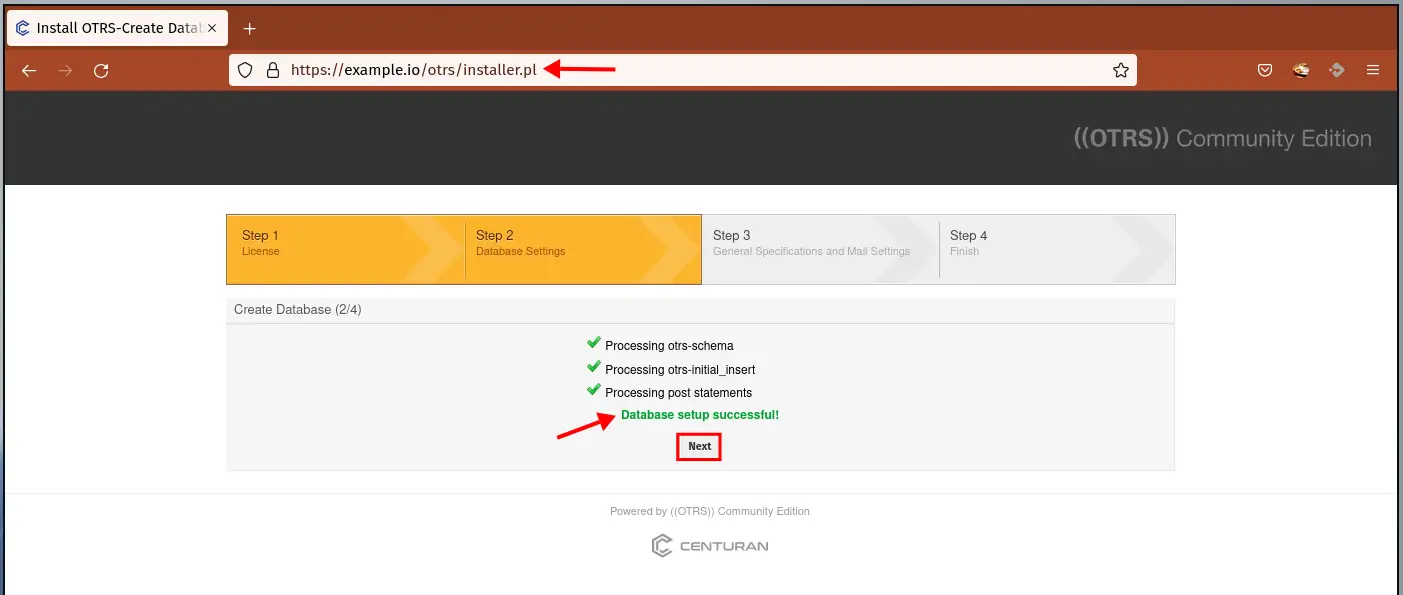
The OTRS installer imports the database scheme, then click the 'Next' button.
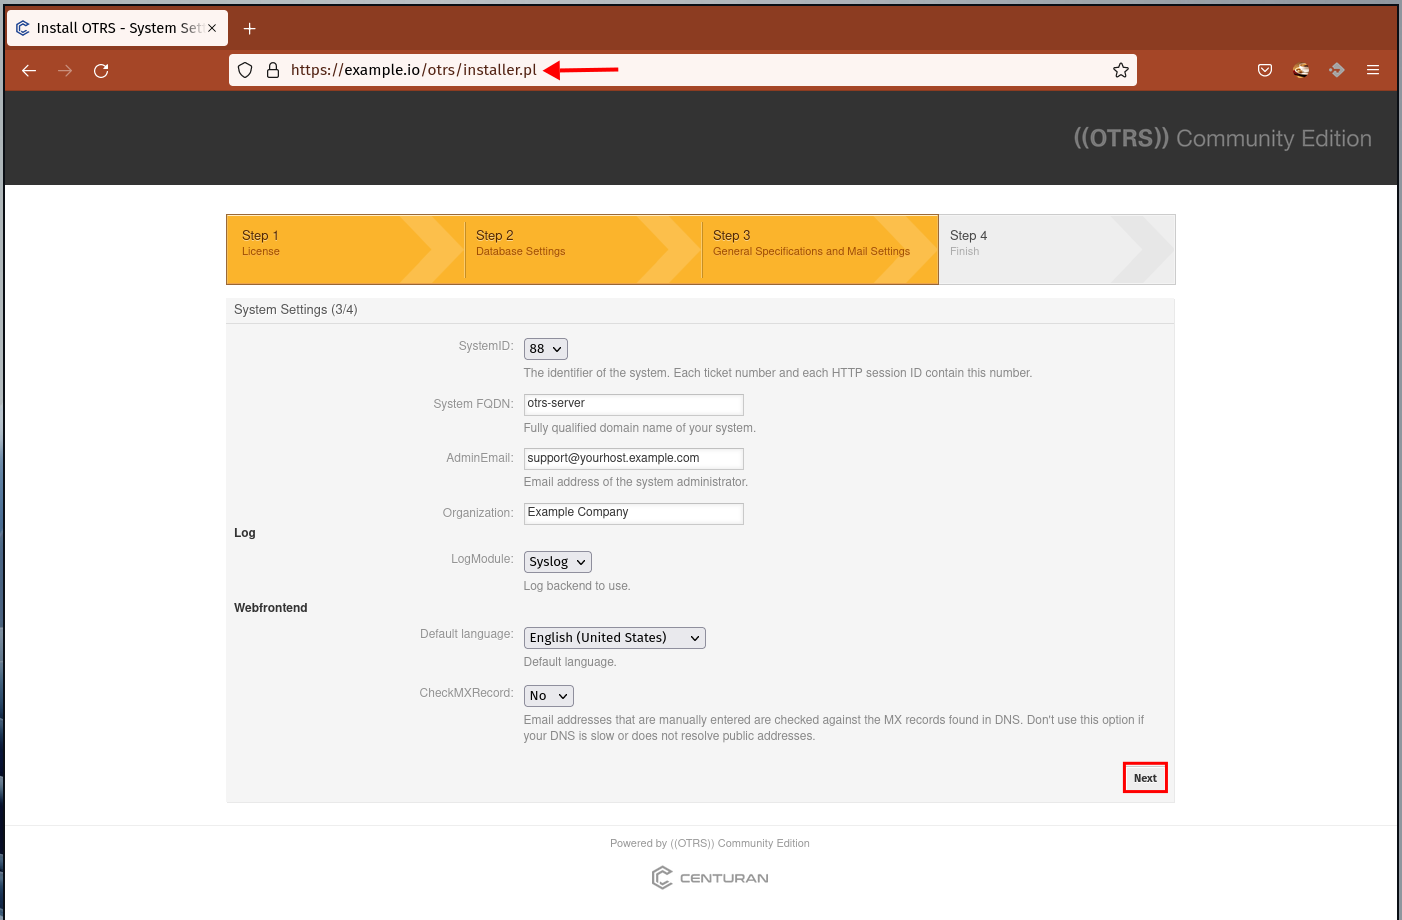
5. For the OTRS general configuration, leave it as default and click 'Next'.
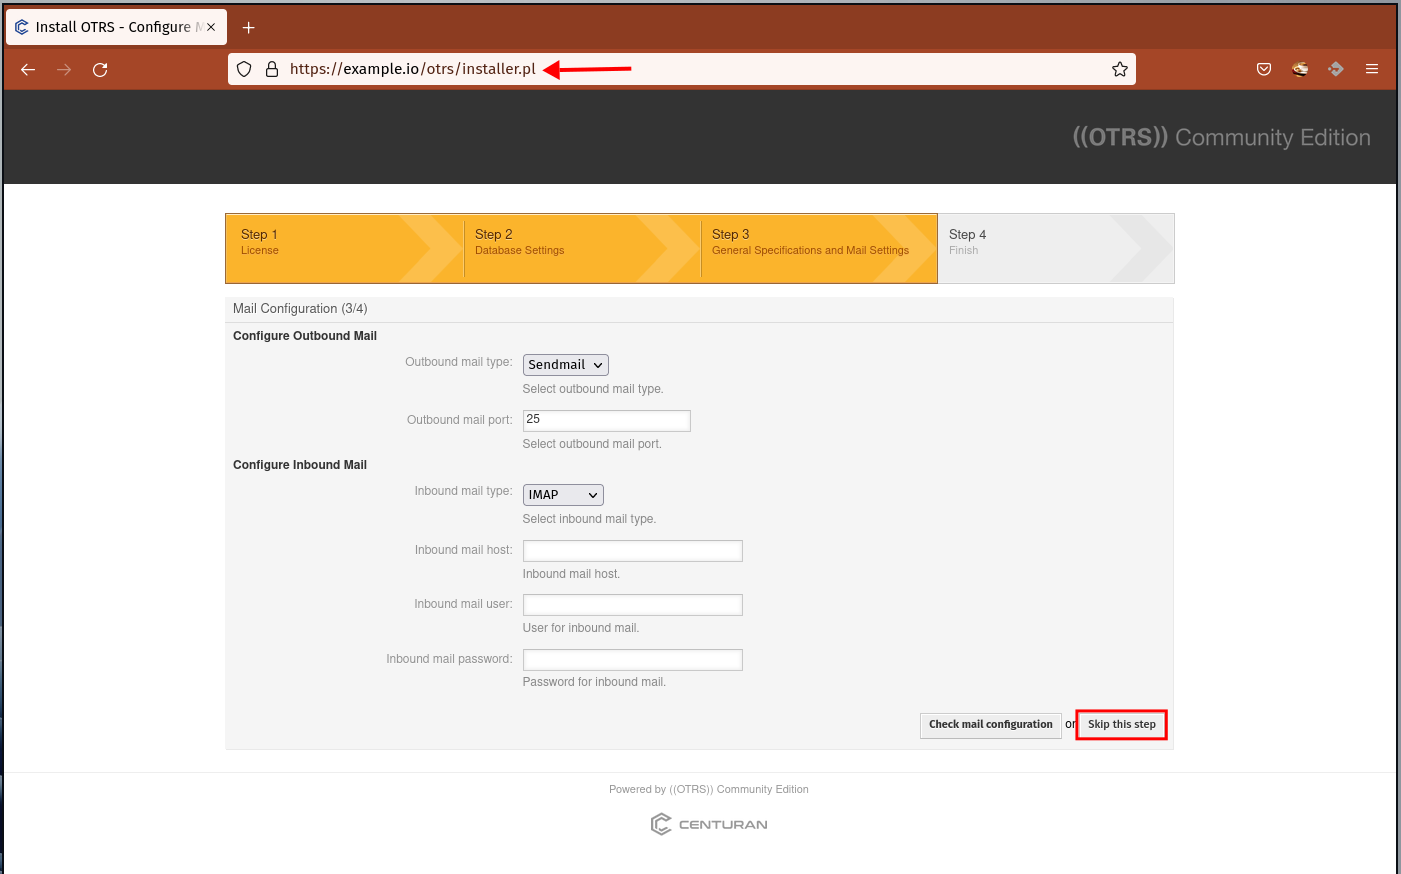
6. For the mail configuration, you can configure it later. Click the button 'Skip this step'.
7. When the OTRS installation completes, take a note of the URL, username, password generates by the OTRS installer.
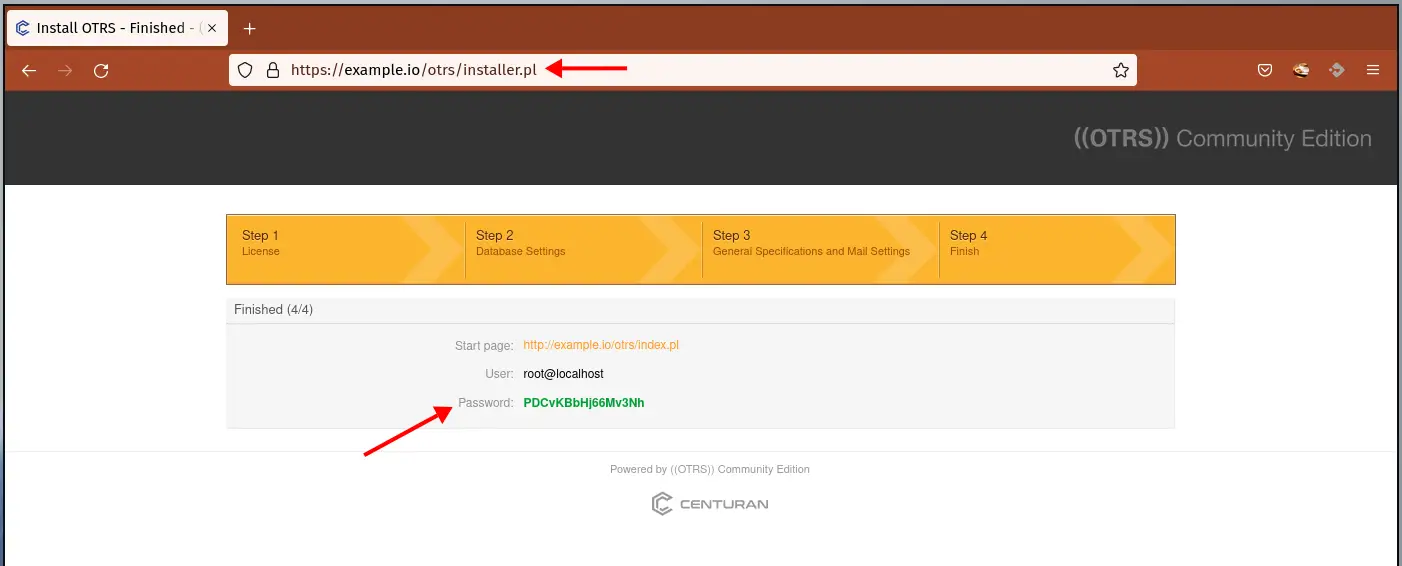
8. Open the OTRS installation URL on the address bar.
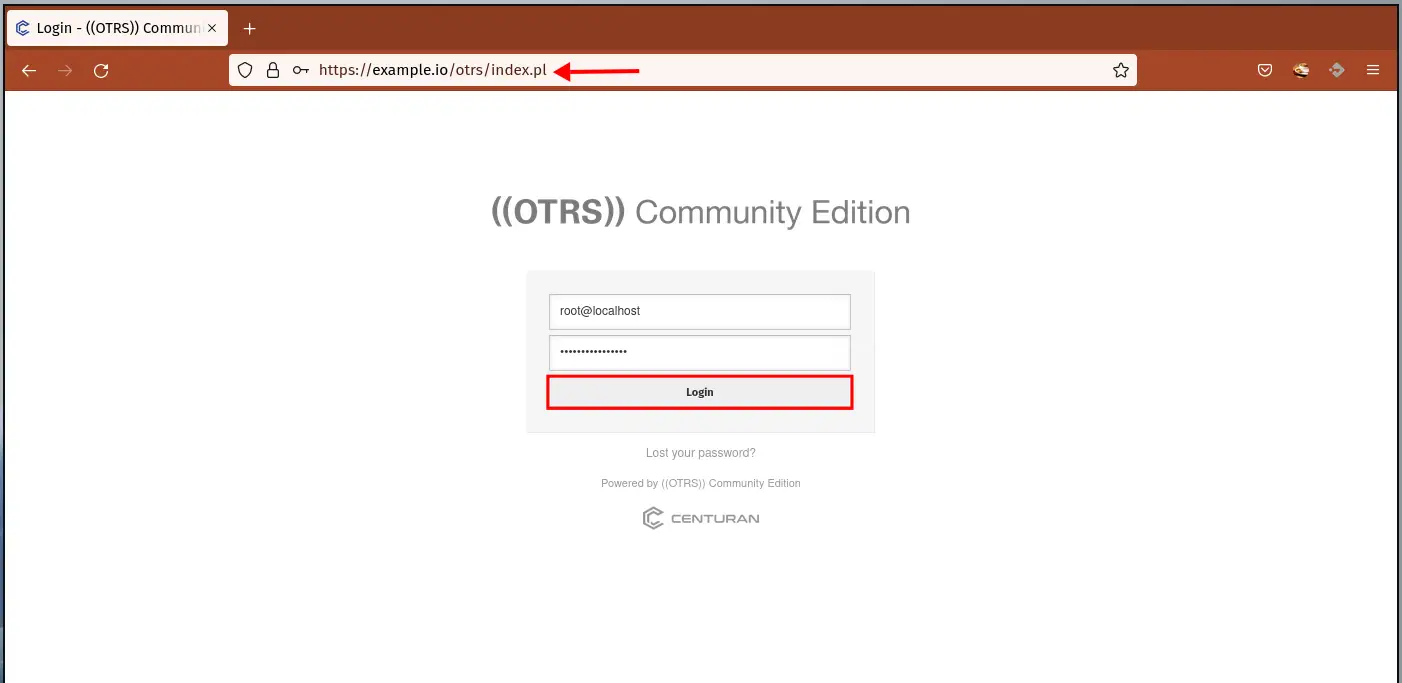
https://example.io/otrs/index.pl
Type your username and password, then click the 'Login' button.
9. Now you will see the OTRS admin dashboard as below.
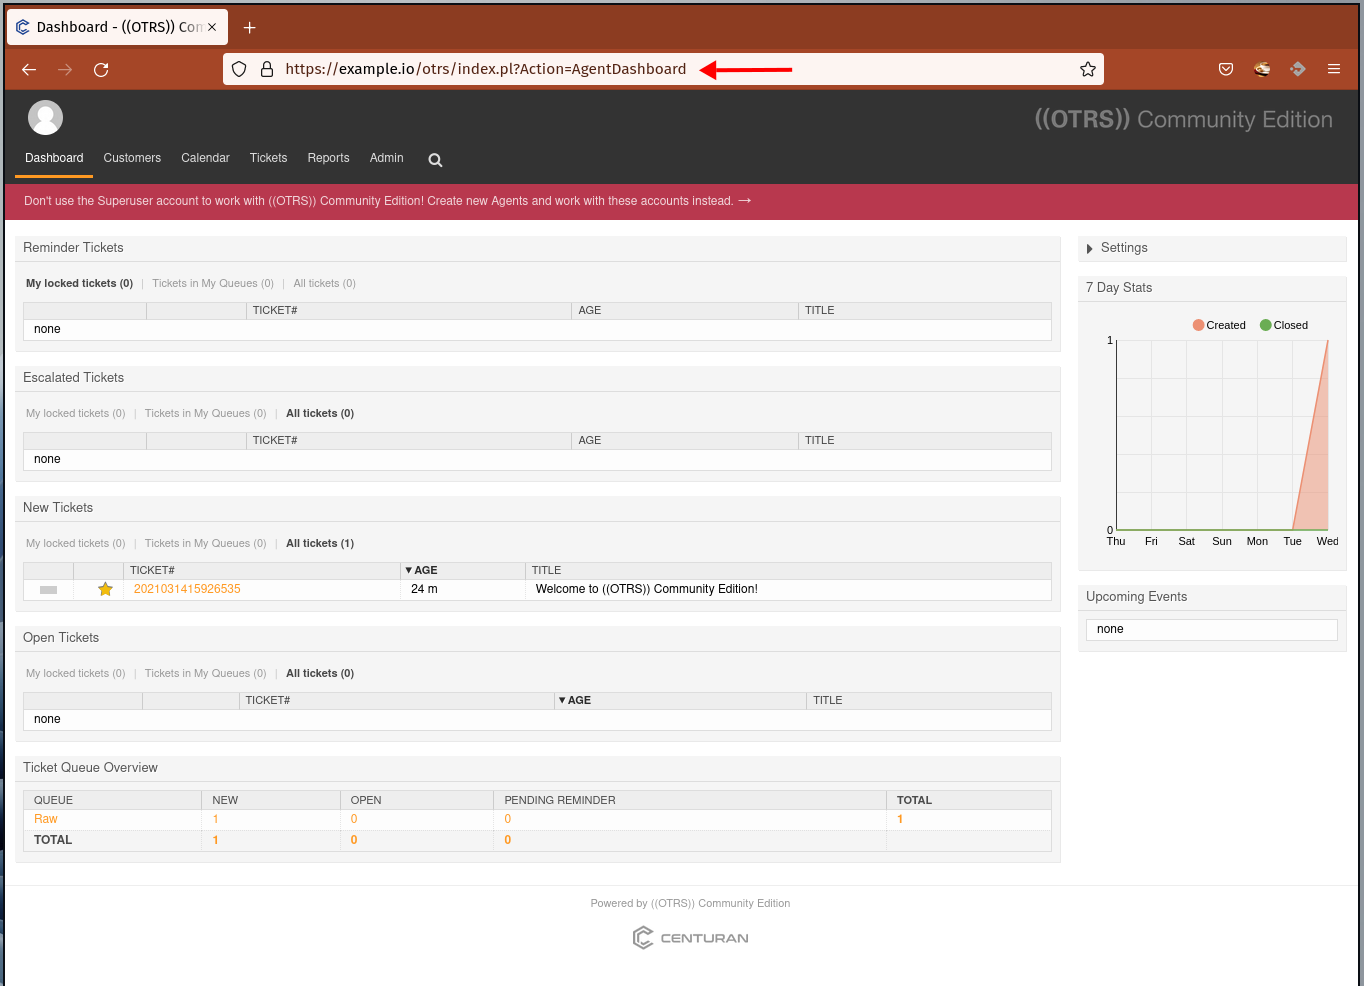
The OTRS Community Edition installation is now completes.
Finishing the OTRS Installation
After completing the OTRS installation through the web installer, you must add some additional configurations as below.
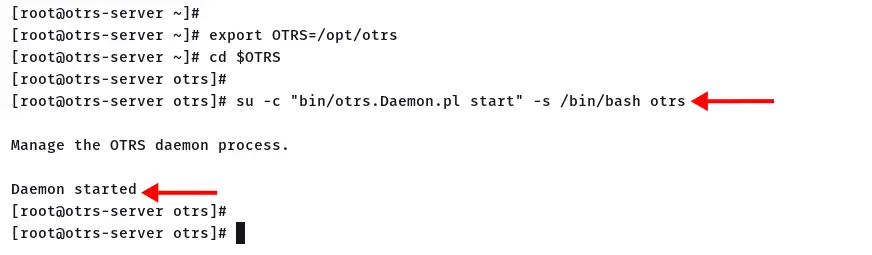
1. Change the working directory to '/opt/otrs' and start the OTRS daemon script. Ensure the OTRS daemon script running as a user 'otrs'.
cd /opt/otrs/
su -c "bin/otrs.Daemon.pl start" -s /bin/bash otrs
2. Next, execute all following commands to set up and start the OTRS script.
cd /opt/otrs/var/cron/
for foo in *.dist; do cp $foo 'basename $foo .dist'; done

su -c "bin/Cron.sh start" -s /bin/bash otrs
And the OTRS installation on the Rocky Linux system completes.
Conclusion
Congratulations! You've learned the installation of OTRS Helpdesk Software on the Rocky Linux with MariaDB database and Apache/Httpd web server.

