How to Install Mastodon Social Network on Ubuntu 22.04
Mastodon is free and open-source software for running self-hosted social networking services. It offers microblogging features that allow you to follow other users and post messages and images with Mastodon. It is written in Ruby and JavaScript and supports audio, video, and picture posts, accessibility descriptions, polls, content warnings, animated avatars, custom emojis, and more. Mastodon offers an application for various platforms like Android and iOS.
In this tutorial, we will show you how to install Mastodon on Ubuntu 22.04.
Update: The guide was updated and successfully retested on 11/30/2022 to clarify the installation and fix issues mentioned in the comments, as some software versions had changed since the guide was written.
There is also an alternative installation guide for Mastodon on Ubuntu 22.04 available here which uses Docker to install Mastodon on Ubuntu.
Prerequisites
- A server running Ubuntu 22.04.
- A root password is configured on your server.
- A valid domain name is pointed to your server IP address.
Getting Started
First, updating your system packages with the latest version is recommended. You can do it by running the following command:
apt update -y
apt upgrade -y
After updating your system, you will need to install some dependencies required by Mastodon. You can install all of them with the following command:
apt install git software-properties-common make apt-transport-https redis-server optipng pngquant jhead jpegoptim gifsicle imagemagick ffmpeg libpq-dev libxml2-dev libxslt1-dev file g++ libprotobuf-dev protobuf-compiler pkg-config gcc autoconf bison build-essential libssl-dev libyaml-dev libreadline6-dev zlib1g-dev libncurses5-dev libffi-dev libgdbm-dev libidn11-dev libicu-dev libjemalloc-dev -y
Once all the dependencies are installed, you can proceed to the next step.
Install Node.js
Mastodon requires Node.js to be installed on your system. To install Node.js, add the Node.js repository to your server using the following command:
curl -sL https://deb.nodesource.com/setup_16.x | bash -
Once the repository has been added, install Node.js version 16 with the following command:
apt install nodejs -y
Next, download and add Yarn's GPG key and enable the repository with the following command:
curl -sL https://dl.yarnpkg.com/debian/pubkey.gpg | gpg --dearmor | tee /usr/share/keyrings/yarnkey.gpg >/dev/null
echo "deb [signed-by=/usr/share/keyrings/yarnkey.gpg] https://dl.yarnpkg.com/debian stable main" | tee /etc/apt/sources.list.d/yarn.list
Once added, update the repository and install Yarn with the following commands:
apt update -y
apt -y install yarn
Once you have finished, you can proceed to the next step.
Install and Configure PostgreSQL
Mastodon uses PostgreSQL as a database backend. You can install the latest version of PostgreSQL with the following command:
apt install -y postgresql postgresql-contrib
After installing PostgreSQL, start the PostgreSQL service using the following command:
systemctl start postgresql
Next, log in to the PostgreSQL shell:
sudo -u postgres -i psql
Next, create a database for Mastodon:
CREATE DATABASE mastodon;
Next, create a database user with the following command:
CREATE USER mastodon;
Next, set a password for Mastodon user with the following command:
ALTER USER mastodon WITH ENCRYPTED PASSWORD 'password';
Next, set proper permission to create the database:
ALTER USER mastodon createdb;
Next, Set this user as the owner of the Mastodon database:
ALTER DATABASE mastodon OWNER TO mastodon;
Finally, exit from the PostgreSQL shell with the following command:
\q
Install Ruby
Mastodon also requires a Ruby version 2.5+ to be installed on your server. If not installed, you can install it with the following command:
apt install -y ruby ruby-dev
After the installation, you can verify the Ruby version using the following command:
ruby -v
You will get the Ruby version in the following output:
ruby 3.0.2p107 (2021-07-07 revision 0db68f0233) [x86_64-linux-gnu]
Install and Configure Mastodon
Next, you will need to create a dedicated user to run Mastodon. You can create it with the following command:
adduser mastodon --system --group --disabled-login
Next, download the latest version of Mastodon from the Git repository:
git clone https://github.com/tootsuite/mastodon.git
Next, create a /var/www/ directory for Mastodon if not exists.
mkdir -p /var/www/
Next, move the Mastodon directory to the /var/www directory:
mv mastodon/ /var/www/
Next, change the ownership of the Mastodon directory to mastodon:
chown -R mastodon:mastodon /var/www/mastodon/
Next, navigate to the /var/www/mastodon directory and check out the latest branch:
cd /var/www/mastodon/
sudo -u mastodon git checkout v4.0.2
You will get the following output:
Note: switching to 'v4.0.2'. You are in 'detached HEAD' state. You can look around, make experimental changes and commit them, and you can discard any commits you make in this state without impacting any branches by switching back to a branch. If you want to create a new branch to retain commits you create, you may do so (now or later) by using -c with the switch command. Example: git switch -cOr undo this operation with: git switch - Turn off this advice by setting config variable advice.detachedHead to false HEAD is now at 03b0f3ac8 Bump version to 4.0.2 (#20725)
Next, install all required dependencies for Mastodon with the following command:
gem install bundler
sudo -u mastodon bundle config deployment 'true'
sudo -u mastodon bundle config without 'development test'
sudo -u mastodon bundle install -j$(getconf _NPROCESSORS_ONLN)
Finally, run the Mastodon setup wizard using the following command:
sudo -u mastodon RAILS_ENV=production bundle exec rake mastodon:setup
You will be asked to provide your domain name:
Type application/netcdf is already registered as a variant of application/netcdf.
Your instance is identified by its domain name. Changing it afterward will break things.
Domain name: mastodon.linuxbuz.com
Type your domain name and press the Enter key. You will be asked to enable single-user mode:
Single user mode disables registrations and redirects the landing page to your public profile.
Do you want to enable single user mode? No
Type No and press the Enter key. You will be asked to use Docker to run Mastodon:
Are you using Docker to run Mastodon? no
Type no and press the Enter key. You will be asked to provide PostgreSQL database details:
PostgreSQL host: /var/run/postgresql
PostgreSQL port: 5432
Name of PostgreSQL database: mastodon
Name of PostgreSQL user: mastodon
Password of PostgreSQL user:
Provide your PostgreSQL database details and press the Enter key. You will be asked to provide Redis server details:
Database configuration works! ????

Redis host: localhost
Redis port: 6379
Redis password:
Provide your Redis host, port and leave the password field blank then press the Enter key. You will be asked to store files on the cloud:
Redis configuration works! ????

Do you want to store uploaded files on the cloud? No
Type No and press the Enter key. You will be asked to send an email from localhost:
Do you want to send e-mails from localhost? yes
E-mail address to send e-mails "from": Mastodon <[email protected]>
Send a test e-mail with this configuration right now? no
Provide all required details and press the Enter key. You will be asked to save all configurations:
This configuration will be written to .env.production
Save configuration? (Y/n) Y
Type Y and press the Enter key. You will be asked to prepare the database:
Now that configuration is saved, the database schema must be loaded.
If the database already exists, this will erase its contents.
Prepare the database now? (Y/n) Y
Type Y and press the Enter key. You will be asked to compile the CSS/JS assets.
The final step is compiling CSS/JS assets.
This may take a while and consume a lot of RAM.
Compile the assets now? (Y/n) Y
Type Y and press the Enter key. You will be asked to setup an admin password:
All done! You can now power on the Mastodon server ????

Do you want to create an admin user straight away? Yes
Username: admin
E-mail: [email protected]
You can login with the password: 9835fbd5e569ad149610862178580da7
You can change your password once you login.
Provide your admin username, and email and press the Enter key to finish the installation.
Create Systemd Service File for Mastodon
Mastodon comes pre-configured systemd file to manage the Mastodon services. You will need to copy them to the /etc/sysetmd/system/ directory.
cp /var/www/mastodon/dist/mastodon*.service /etc/systemd/system/
Next, you will need to change the Mastodon working directory from /home/mastodon/live/ to /var/www/mastodon/ in the service file. You can do it with the following command:
sed -i 's/home\/mastodon\/live/var\/www\/mastodon/g' /etc/systemd/system/mastodon-*.service
You will also need to change the /home/mastodon/.rbenv/shims/bundle to /usr/local/bin/bundle in service files:
sed -i 's/home\/mastodon\/.rbenv\/shims/usr\/local\/bin/g' /etc/systemd/system/mastodon-*.service
Next, reload the systemd to apply the configuration changes:
systemctl daemon-reload
Next, start and enable all Mastodon services:
systemctl enable --now mastodon-web mastodon-sidekiq mastodon-streaming
You can check the status of all services using the following command:
systemctl status mastodon-web mastodon-sidekiq mastodon-streaming
Output:
? mastodon-web.service - mastodon-web
     Loaded: loaded (/etc/systemd/system/mastodon-web.service; enabled; vendor preset: enabled)
     Active: active (running) since Wed 2022-11-30 03:07:13 UTC; 19s ago
   Main PID: 10201 (ruby3.0)
      Tasks: 29 (limit: 464140)
     Memory: 249.0M
     CGroup: /system.slice/mastodon-web.service
             ??10201 "puma 5.6.5 (tcp://127.0.0.1:3000) [mastodon]" "" "" "" "" "" "" "" "" "" "" "" "" "" "" "" "" "" "" "" "" "" "" "" "" ">
             ??10228 "puma: cluster worker 0: 10201 [mastodon]" "" "" "" "" "" "" "" "" "" "" "" "" "" "" "" "" "" "" "" "" "" "" "" "" "" "">
             ??10232 "puma: cluster worker 1: 10201 [mastodon]" "" "" "" "" "" "" "" "" "" "" "" "" "" "" "" "" "" "" "" "" "" "" "" "" "" "">

Nov 30 03:07:15 ubuntu22042 bundle[10201]: [10201] *  Max threads: 5
Nov 30 03:07:15 ubuntu22042 bundle[10201]: [10201] *  Environment: production
Nov 30 03:07:15 ubuntu22042 bundle[10201]: [10201] *   Master PID: 10201
Nov 30 03:07:15 ubuntu22042 bundle[10201]: [10201] *      Workers: 2
Nov 30 03:07:15 ubuntu22042 bundle[10201]: [10201] *     Restarts: (?) hot (?) phased
Nov 30 03:07:15 ubuntu22042 bundle[10201]: [10201] * Preloading application
Nov 30 03:07:27 ubuntu22042 bundle[10201]: [10201] * Listening on http://127.0.0.1:3000
Nov 30 03:07:27 ubuntu22042 bundle[10201]: [10201] Use Ctrl-C to stop
Nov 30 03:07:27 ubuntu22042 bundle[10201]: [10201] - Worker 0 (PID: 10228) booted in 0.04s, phase: 0
Nov 30 03:07:27 ubuntu22042 bundle[10201]: [10201] - Worker 1 (PID: 10232) booted in 0.01s, phase: 0

? mastodon-sidekiq.service - mastodon-sidekiq
     Loaded: loaded (/etc/systemd/system/mastodon-sidekiq.service; enabled; vendor preset: enabled)
     Active: active (running) since Wed 2022-11-30 03:07:13 UTC; 19s ago
   Main PID: 10199 (ruby3.0)
      Tasks: 32 (limit: 464140)
     Memory: 247.1M
     CGroup: /system.slice/mastodon-sidekiq.service
             ??10199 "sidekiq 6.5.7 mastodon [0 of 25 busy]" "" "" "" "" "" "" "" "" "" "" "" "" "" "" "" "" "" "" "" "" "" "" "" "" "" "" "">

Nov 30 03:07:29 ubuntu22042 bundle[10199]: 2022-11-30T03:07:29.202Z pid=10199 tid=cc7 uniquejobs=upgrade_locks INFO: Start - Converting v6 lo>
Nov 30 03:07:29 ubuntu22042 bundle[10199]: 2022-11-30T03:07:29.202Z pid=10199 tid=cc7 uniquejobs=upgrade_locks INFO: Done - Converting v6 loc>
Nov 30 03:07:29 ubuntu22042 bundle[10199]: 2022-11-30T03:07:29.202Z pid=10199 tid=cc7 uniquejobs=upgrade_locks INFO: Start - Deleting v6 keys
Nov 30 03:07:29 ubuntu22042 bundle[10199]: 2022-11-30T03:07:29.203Z pid=10199 tid=cc7 uniquejobs=upgrade_locks INFO: Done - Deleting v6 keys
By default, Mastodon listens on port 3000. You can check it with the following command:
ss -lnpt | grep 3000
Output:
LISTEN 0 1024 127.0.0.1:3000 0.0.0.0:* users:(("ruby3.0",pid=10232,fd=5),("ruby3.0",pid=10228,fd=5),("ruby3.0",pid=10201,fd=5))
Configure Nginx as a Reverse Proxy
First, install the Nginx web server package using the following command:
apt install nginx -y
Next, copy the Nginx virtual host configuration file to the Nginx directory:
cp /var/www/mastodon/dist/nginx.conf /etc/nginx/conf.d/mastodon.conf
Next, edit the Mastodon virtual host configuration file:
nano /etc/nginx/conf.d/mastodon.conf
Find the following line in both the port 80 server block and port 443 server block:
server_name example.com;
Replaced them with the following line:
server_name mastodon.linuxbuz.com;
Find the following line in both the port 80 server block and port 443 server block.
root /home/mastodon/live/public;
Replaced it with the following line:
root /var/www/mastodon/public;
Find the following two lines.
# ssl_certificate /etc/letsencrypt/live/example.com/fullchain.pem;
# ssl_certificate_key /etc/letsencrypt/live/example.com/privkey.pem;
Change them to the following, so Nginx will temporarily use a self-signed TLS certificate. We will obtain a valid Let’s Encrypt certificate later.
ssl_certificate /etc/ssl/certs/ssl-cert-snakeoil.pem;
ssl_certificate_key /etc/ssl/private/ssl-cert-snakeoil.key;
Save and close the file then create a cache directory for Nginx:
mkdir -p /var/nginx/cache/
Next, verify the Nginx for any syntax error:
nginx -t
You will get the following output:
nginx: the configuration file /etc/nginx/nginx.conf syntax is ok
nginx: configuration file /etc/nginx/nginx.conf test is successful
Next, restart the Nginx service to apply the changes:
systemctl restart nginx
Secure Mastodon with Let's Encrypt SSL
To enable HTTPS on the Mastodon website, you will need to install the Certbot package on your server.
First, install the Snap package manager with the following command:
apt install snapd
Next, update the Snap package to the latest version:
snap install core
snap refresh core
Next, install the Certbot package using the following command:
snap install --classic certbot
Next, create a symbolic link for the Certbot binary to the system location:
ln -s /snap/bin/certbot /usr/bin/certbot
Next, run the following command to download and install Let's Encrypt SSL certificates:
certbot --nginx -d mastodon.linuxbuz.com
You will be asked to provide your email address and accept the term of service:
Saving debug log to /var/log/letsencrypt/letsencrypt.log
Enter email address (used for urgent renewal and security notices)
 (Enter 'c' to cancel): [email protected]

- - - - - - - - - - - - - - - - - - - - - - - - - - - - - - - - - - - - - - - -
Please read the Terms of Service at
https://letsencrypt.org/documents/LE-SA-v1.3-September-21-2022.pdf. You must
agree in order to register with the ACME server. Do you agree?
- - - - - - - - - - - - - - - - - - - - - - - - - - - - - - - - - - - - - - - -
(Y)es/(N)o: Y

- - - - - - - - - - - - - - - - - - - - - - - - - - - - - - - - - - - - - - - -
Would you be willing, once your first certificate is successfully issued, to
share your email address with the Electronic Frontier Foundation, a founding
partner of the Let's Encrypt project and the non-profit organization that
develops Certbot? We'd like to send you email about our work encrypting the web,
EFF news, campaigns, and ways to support digital freedom.
- - - - - - - - - - - - - - - - - - - - - - - - - - - - - - - - - - - - - - - -
(Y)es/(N)o: Y
Type Y and press the Enter key to download and install the SSL certificates for your domain:
Account registered.
Requesting a certificate for mastodon.linuxbuz.com

Successfully received certificate.
Certificate is saved at: /etc/letsencrypt/live/mastodon.linuxbuz.com/fullchain.pem
Key is saved at:         /etc/letsencrypt/live/mastodon.linuxbuz.com/privkey.pem
This certificate expires on 2023-02-28.
These files will be updated when the certificate renews.
Certbot has set up a scheduled task to automatically renew this certificate in the background.

Deploying certificate
Successfully deployed certificate for mastodon.linuxbuz.com to /etc/nginx/conf.d/mastodon.conf
Congratulations! You have successfully enabled HTTPS on https://mastodon.linuxbuz.com

- - - - - - - - - - - - - - - - - - - - - - - - - - - - - - - - - - - - - - - -
If you like Certbot, please consider supporting our work by:
 * Donating to ISRG / Let's Encrypt:   https://letsencrypt.org/donate
 * Donating to EFF:                    https://eff.org/donate-le
- - - - - - - - - - - - - - - - - - - - - - - - - - - - - - - - - - - - - - - -
Access Mastodon Web Interface
Now, open your web browser and type the URL https://mastodon.linuxbuz.com. You will be redirected to the following page:
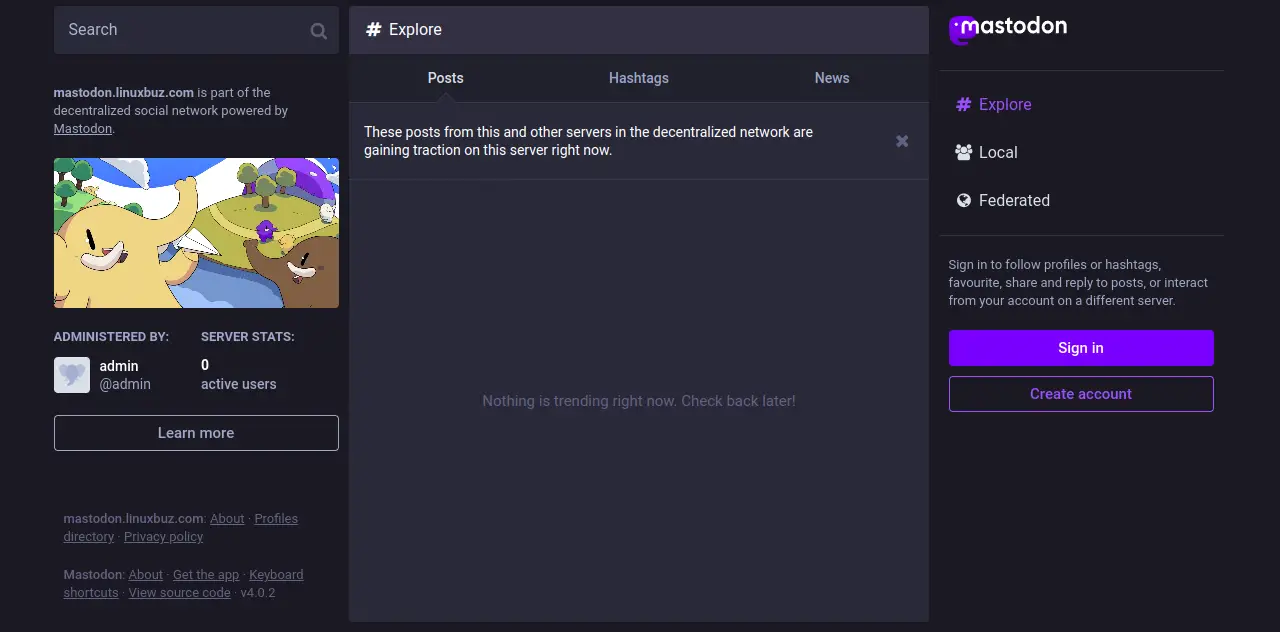
Click on the Sign In button. You should see the Mastodon login page:
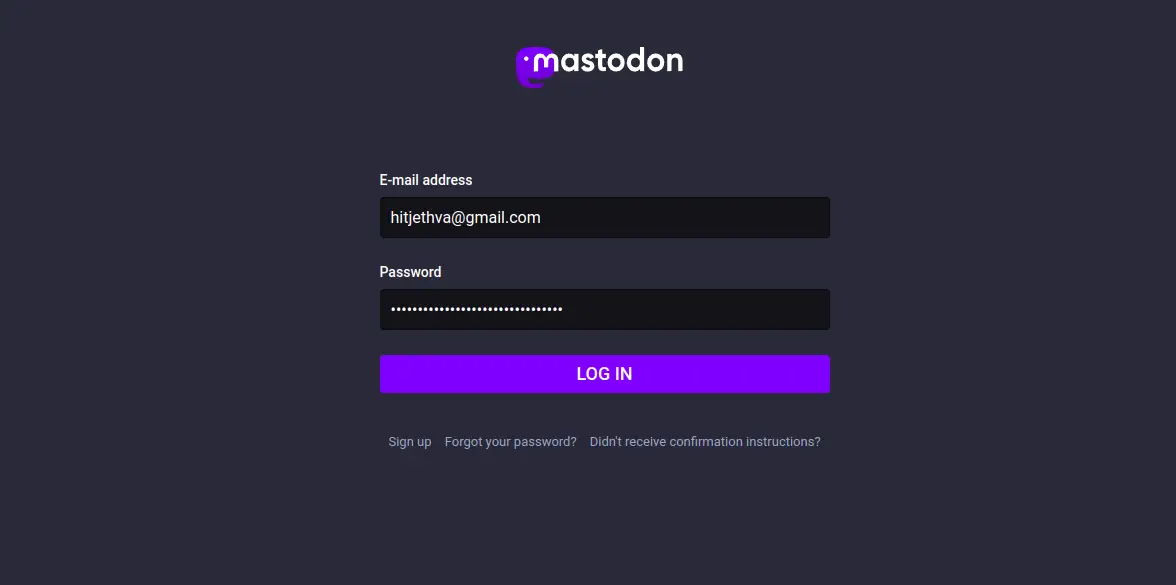
Now, provide your admin email and password which you created earlier, and click on the Log in button. You should see the Mastodon dashboard on the following page:
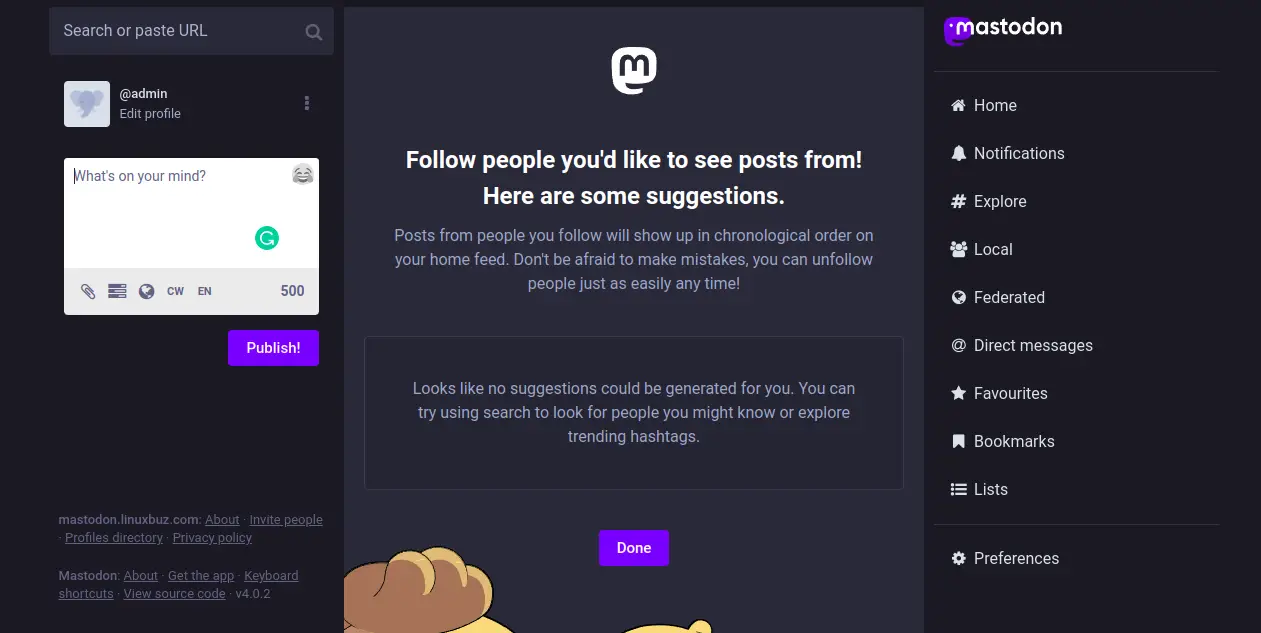
Congratulations! you have successfully installed and configured Mastodon on Ubuntu 22.04 server. You can now easily create your own social media network using Mastodon. Feel free to ask me if you have any questions.

