How to Install LOMP Stack (OpenLiteSpeed, MySQL, and PHP) on Rocky Linux 9
OpenLiteSpeed is a lightweight and open-source version of the LiteSpeed Server developed by LiteSpeed Technologies. It supports Apache Rewrite rules, HTTP/2 and HTTP/3, and TLS v1.3 and QUIC protocols. It comes with a WebGUI-based Administration panel, making it different from other servers and easier to manage.
The LOMP Stack is an acronym for Linux, OpenLiteSpeed, MySQL/MariaDB, and PHP. Litespeed servers are known for their speed, especially with PHP which integrates using the LiteSpeed Server Application Programming Interface (LSAPI). The LiteSpeed PHP (LSPHP) interpreter serves dynamic PHP pages via LSAPI.
This tutorial will show you step-by-step how to install a LOMP Server on a Rocky Linux 9 machine.
Prerequisites
-
A server running Rocky Linux 9.
-
A non-root user with sudo privileges.
-
A fully qualified domain name (FQDN) like
example.compointing to the server. -
SELinux doesn't need to be disabled or configured to work with OpenLiteSpeed.
-
Make sure everything is updated.
$ sudo dnf update
-
Few packages that your system needs.
$ sudo dnf install wget curl nano unzip yum-utils -y
Some of these packages may already be installed on your system.
Step 1 - Configure Firewall
The first step is to configure the firewall. Rocky Linux uses Firewalld Firewall. Check the firewall's status.
$ sudo firewall-cmd --state
running
The firewall works with different zones, and the public zone is the default one that we will use. List all the services and ports active on the firewall.
$ sudo firewall-cmd --permanent --list-services
It should show the following output.
cockpit dhcpv6-client ssh
OpenLiteSpeed needs the 7080 port for its administration panel.
$ sudo firewall-cmd --permanent --add-port=7080/tcp
We also need HTTP and HTTPS ports to function. Open them.
$ sudo firewall-cmd --permanent --add-service=http
$ sudo firewall-cmd --permanent --add-service=https
Reload the firewall to apply the changes.
$ sudo firewall-cmd --reload
List all the services again.
$ sudo firewall-cmd --permanent --list-services
You should get the following output.
cockpit dhcpv6-client http https ssh
Step 2 - Install OpenLiteSpeed
Download the OpenLiteSpeed binary file. You can get the link to the latest binary file from the OpenLiteSpeed official downloads page.
$ wget https://openlitespeed.org/packages/openlitespeed-1.7.16.tgz
Extract the file.
$ tar -zxf openlitespeed-*.tgz
Switch to the extracted directory.
$ cd openlitespeed
Run the installer.
$ sudo ./install.sh
Wait for some time for the installer to finish.
There are some issues with OpenLiteSpeed on Rocky Linux 9 machine due to which you might see some errors about missing PHP packages. You can ignore them for now because the server can still run with various workarounds.
The installer script installs and enables the lshttpd systemd service.
Start the OpenLiteSpeed server.
$ sudo systemctl start lshttpd
Check the version of the server installed.
$ /usr/local/lsws/bin/lshttpd -v
LiteSpeed/1.7.16 Open (BUILD built: Thu Nov 17 16:18:46 UTC 2022)
        module versions:
        lsquic 3.1.1
        modgzip 1.1
        cache 1.64
        mod_security 1.4
Create the Administrator Password
Run the password reset script.
$ sudo /usr/local/lsws/admin/misc/admpass.sh
You will get the following output. Give admin as the username and set a strong password.
Please specify the user name of administrator.
This is the user name required to login the administration Web interface.

User name [admin]: admin

Please specify the administrator's password.
This is the password required to login the administration Web interface.

Password:
Retype password:
Administrator's username/password is updated successfully!
You can now use the new administrator password.
Open http://<YOURSERVERIP>:7080 to access OpenLiteSpeed's administration panel. On your first login, your browser will warn that your connection is not private. Click Advanced and click "Accept the risk and Continue" (in the case of Firefox) or "Proceed to <YOURSERVERIP>(unsafe)" (in the case of Chromium-based browser). You won't see the warning again.
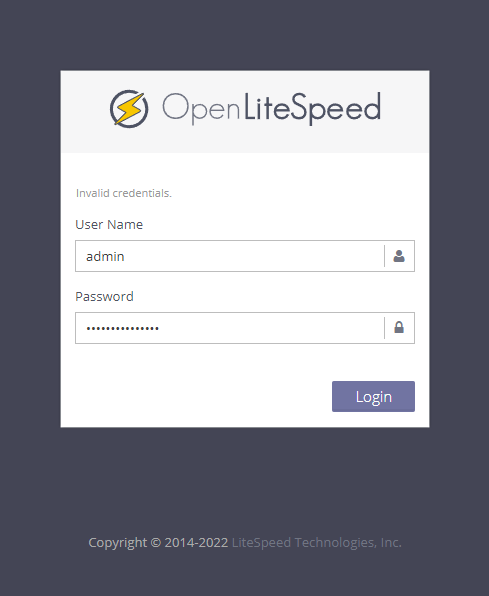
You should see the login page.
Enter admin as the username and password, you set earlier, and press the Login button to proceed.
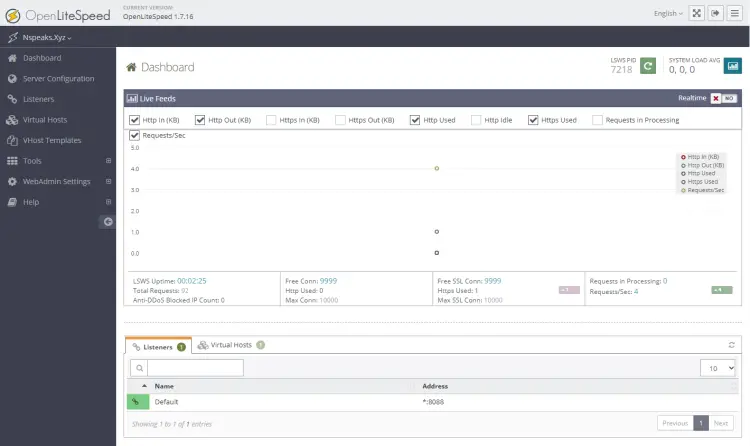
You will get the following screen.
Step 3 - Install PHP
OpenLiteSpeed installer usually installs PHP 7.4 by default. In the case of Rocky Linux 9, it doesn't get automatically installed. Moreover, we will install a recent version of PHP. Before doing that, we need to install the LiteSpeed repository.
Install the OpenLiteSpeed repository by running the following command.
$ sudo rpm -Uvh http://rpms.litespeedtech.com/centos/litespeed-repo-1.3-1.el8.noarch.rpm
You can grab the latest version of the RPM file from the OpenLiteSpeed repo page.
Install PHP 8.2.
$ sudo dnf install lsphp82 lsphp82-mysqlnd lsphp82-process lsphp82-bcmath lsphp82-pdo lsphp82-common lsphp82-xml lsphp82-opcache lsphp82-soap
The lsphp-gd, and lsphp-mbstring packages are still missing from the repository. So if you want them, you will need to wait for a while before they are officially released.
Verify the PHP installation.
$ /usr/local/lsws/lsphp82/bin/php -v
PHP 8.2.1 (cli) (built: Jan  3 2023 18:40:55) (NTS)
Copyright (c) The PHP Group
Zend Engine v4.2.1, Copyright (c) Zend Technologies
    with Zend OPcache v8.2.1, Copyright (c), by Zend Technologies
You can check the list of enabled PHP modules.
$ /usr/local/lsws/lsphp82/bin/php --modules
[PHP Modules]
bcmath
bz2
calendar
Core
ctype
curl
date
dom
exif
fileinfo
filter
ftp
gettext
hash
iconv
json
libxml
mysqli
mysqlnd
openssl
pcntl
pcre
PDO
pdo_mysql
pdo_sqlite
Phar
posix
random
readline
Reflection
session
shmop
SimpleXML
soap
sockets
SPL
sqlite3
standard
sysvmsg
sysvsem
sysvshm
tokenizer
xml
xmlreader
xmlwriter
xsl
Zend OPcache
zip
zlib

[Zend Modules]
Zend OPcache
We will configure OpenLiteSpeed to work with PHP later.
Step 4 - Install MySQL
Install MySQL server.
$ sudo dnf install mysql-server
Enable and start the MySQL server.
$ sudo systemctl enable mysqld --now
Check the status of the service.
$ sudo systemctl status mysqld
You will get the following output.
? mysqld.service - MySQL 8.0 database server
     Loaded: loaded (/usr/lib/systemd/system/mysqld.service; enabled; vendor preset: disabled)
     Active: active (running) since Fri 2023-02-17 07:31:00 UTC; 2s ago
    Process: 14933 ExecStartPre=/usr/libexec/mysql-check-socket (code=exited, status=0/SUCCESS)
    Process: 14955 ExecStartPre=/usr/libexec/mysql-prepare-db-dir mysqld.service (code=exited, status=0/SUCCESS)
   Main PID: 15054 (mysqld)
     Status: "Server is operational"
      Tasks: 39 (limit: 5873)
     Memory: 427.1M
        CPU: 4.079s
     CGroup: /system.slice/mysqld.service
             ??15054 /usr/libexec/mysqld --basedir=/usr

Feb 17 07:30:51 nspeaks.xyz systemd[1]: Starting MySQL 8.0 database server...
Feb 17 07:30:51 nspeaks.xyz mysql-prepare-db-dir[14955]: Initializing MySQL database
Feb 17 07:31:00 nspeaks.xyz systemd[1]: Started MySQL 8.0 database server.
Run the MySQL security script.
$ sudo mysql_secure_installation
You will receive several prompts. The first prompt will ask whether you want to install the Validate Password Plugin. Press Y to install the plugin. Choose 2 as its security level which will require your password to be at least 8 characters long and include a mix of uppercase, lowercase, numeric, and special characters.
Securing the MySQL server deployment.

Connecting to MySQL using a blank password.

VALIDATE PASSWORD COMPONENT can be used to test passwords
and improve security. It checks the strength of password
and allows the users to set only those passwords which are
secure enough. Would you like to setup VALIDATE PASSWORD component?

Press y|Y for Yes, any other key for No: Y

There are three levels of password validation policy:

LOW    Length >= 8
MEDIUM Length >= 8, numeric, mixed case, and special characters
STRONG Length >= 8, numeric, mixed case, special characters and dictionary                  file

Please enter 0 = LOW, 1 = MEDIUM and 2 = STRONG: 2
Next, you will be asked to create a strong root password. Make sure your password matches the requirements of the Validate plugin.
Please set the password for root here.

New password:

Re-enter new password:

Estimated strength of the password: 100
Do you wish to continue with the password provided?(Press y|Y for Yes, any other key for No) : Y
Next, you will be asked several prompts relating to increasing the security of the database. Press Y in each prompt.
By default, a MySQL installation has an anonymous user,
allowing anyone to log into MySQL without having to have
a user account created for them. This is intended only for
testing, and to make the installation go a bit smoother.
You should remove them before moving into a production
environment.

Remove anonymous users? (Press y|Y for Yes, any other key for No) : Y
Success.


Normally, root should only be allowed to connect from
'localhost'. This ensures that someone cannot guess at
the root password from the network.

Disallow root login remotely? (Press y|Y for Yes, any other key for No) : Y
Success.

By default, MySQL comes with a database named 'test' that
anyone can access. This is also intended only for testing,
and should be removed before moving into a production
environment.


Remove test database and access to it? (Press y|Y for Yes, any other key for No) : Y
 - Dropping test database...
Success.

 - Removing privileges on test database...
Success.

Reloading the privilege tables will ensure that all changes
made so far will take effect immediately.

Reload privilege tables now? (Press y|Y for Yes, any other key for No) : Y
Success.

All done!
Log in to the MySQL shell.
$ mysql -u root -p
Enter your root password when prompted.
Create a test database and user with access permission. Replace testdb and testuser with appropriate names for your setup. Replace password with a strong password.
mysql> CREATE DATABASE testdb;
mysql> CREATE USER 'testuser' IDENTIFIED BY 'Your_Password123';
mysql> GRANT ALL PRIVILEGES ON testdb.* TO 'testuser';
mysql> FLUSH PRIVILEGES;
Exit the MySQL shell.
mysql> exit
Step 5 - Configure OpenLiteSpeed
Switch HTTP port back to 80
Let us change the default HTTP port to 80. Log in to your administration panel at http://<YOURSERVERIP>:7080 with the credentials you just created.
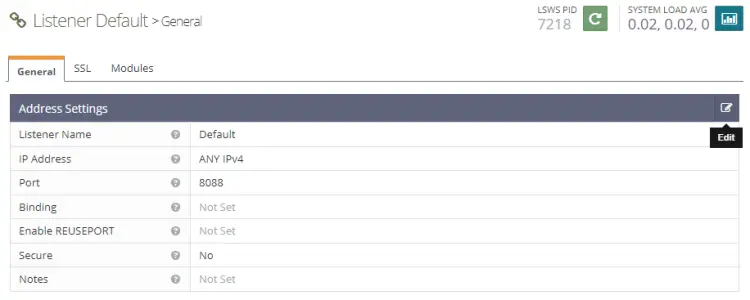
Visit the Listeners section from the left. You will see the default listeners with port 8080.
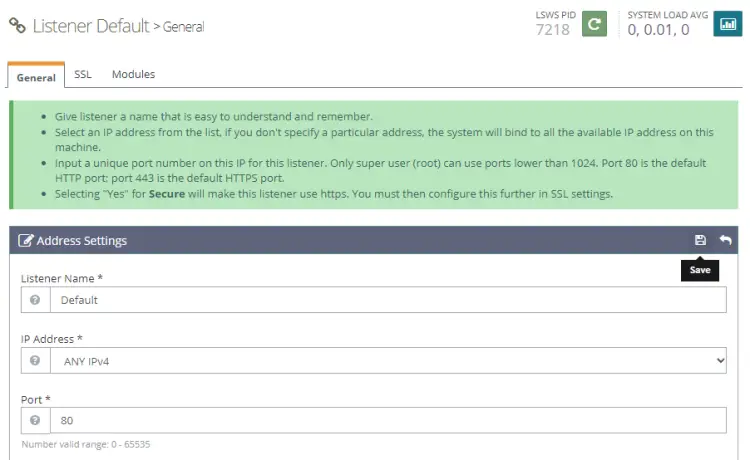
Click the View button to see the detailed configuration. On the next page under Listener Default > General Page, click on the Edit icon and change the port from 8080 to 80.
Click Save and restart the server by clicking the Graceful restart button.
Step 6 - Configure PHP
In this step, we need to associate our copy of PHP 8.2 with the server.
Click on the Server Configuration section on the left and then on the tab External App. You will see an existing LiteSpeed App for PHP. We will make some edits to it.
Click on the Edit button to edit the PHP app.
Next, match the configuration as shown below. Leave all the other fields blank.
Name: lsphp
Address: uds://tmp/lshttpd/lsphp.sock
Max Connections: 35
Environment: PHP_LSAPI_MAX_REQUESTS=500
             PHP_LSAPI_CHILDREN=35
             LSAPI_AVOID_FORK=200M
Initial Request Timeout (secs): 60
Retry Timeout : 0
Persistent Connection: Yes
Response Buffering: no
Start By Server: Yes(Through CGI Daemon)
Command: lsphp82/bin/lsphp
Back Log: 100
Instances: 1
Priority: 0
Memory Soft Limit (bytes): 2047M
Memory Hard Limit (bytes): 2047M
Process Soft Limit: 1400
Process Hard Limit: 1500
Click Save when finished.
Now that we have created our own PHP 8.2 app, we must tell the server to start using it. Since we edited the default listing, it is already configured. Restart the server by clicking on the Graceful restart button.
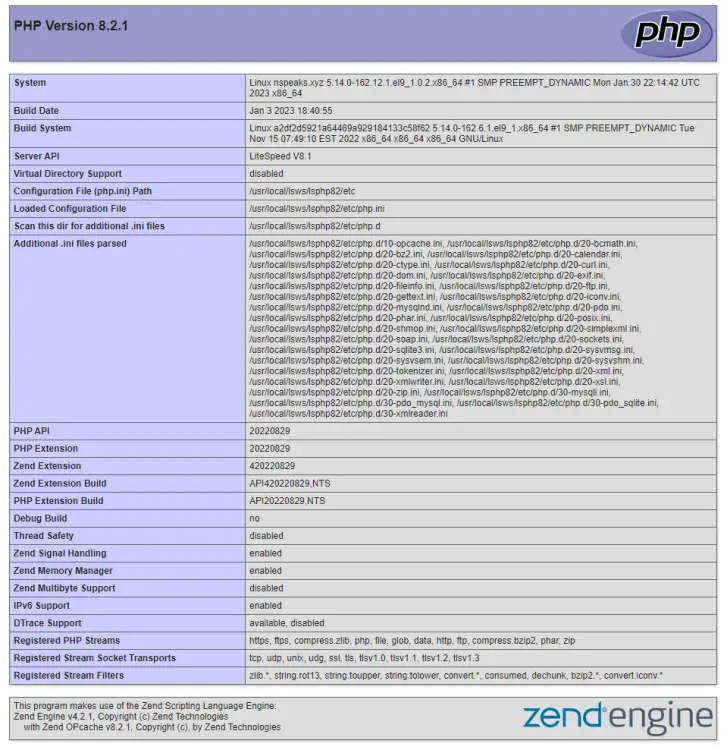
To test whether your PHP has been switched correctly, visit http://<YOURSERVERIP>/phpinfo.php in your browser.
Step 7 - Create VirtualHost
First, we need to create directories for our virtual host.
$ sudo mkdir /usr/local/lsws/example.com/{html,logs} -p
The html directory will hold the public files and the logs directory will contain server logs.
Next, open the Admin console, access the Virtual Hosts section from the left, and click the Add button.
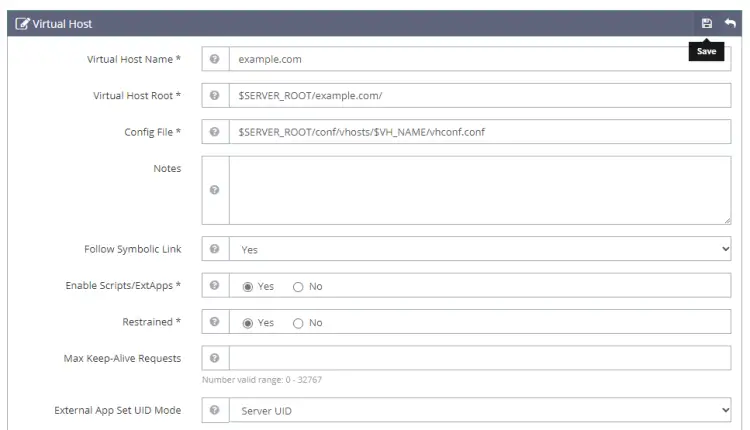
Fill in the values as specified
Virtual Host Name: example.com
Virtual Host Root: $SERVER_ROOT/example.com/
Config File: $SERVER_ROOT/conf/vhosts/$VH_NAME/vhconf.conf
Follow Symbolic Link: Yes
Enable Scripts/ExtApps: Yes
Restrained: Yes
External App Set UID Mode: Server UID
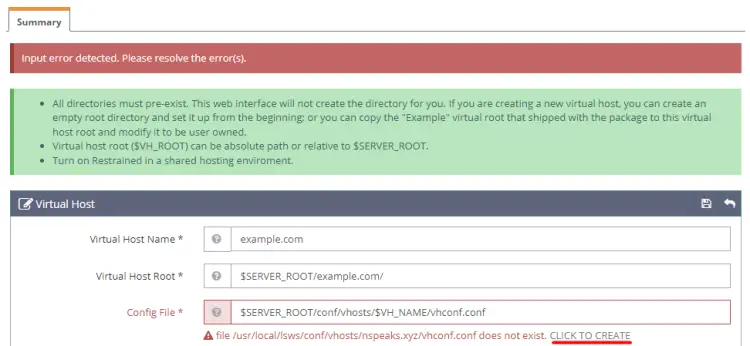
Click on the Save button when finished. You will get the following error because the configuration file doesn't exist as of now. Click on the link to create the configuration file.
Click the Save button again to finish creating the Virtual Host.
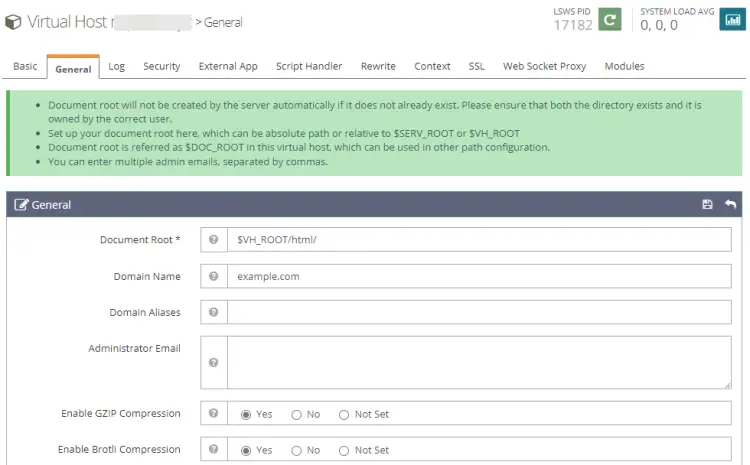
Once the virtual host is created, go to Virtual Hosts -> Choose Virtual Host(example.com) -> General and modify the configuration as given.
Document Root: $VH_ROOT/html/
Domain Name: example.com
Enable GZIP Compression: Yes
Enable Brotli Compression: Yes
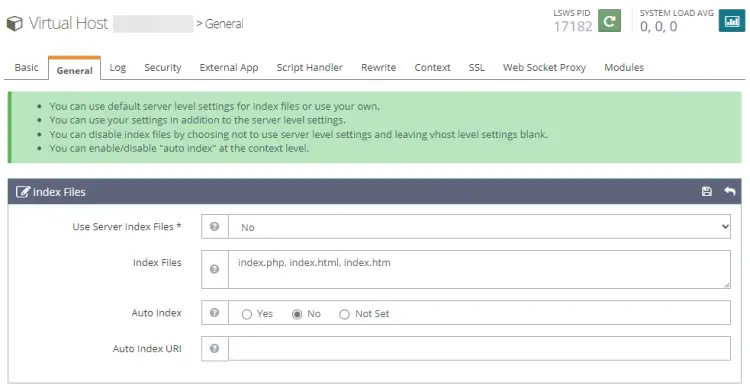
Click the Save button when finished. Next, we need to set up index files. Click the edit button against Index files below the General Section. Set the following options.
Use Server Index Files: No
Index files: index.php, index.html, index.htm
Auto Index: No
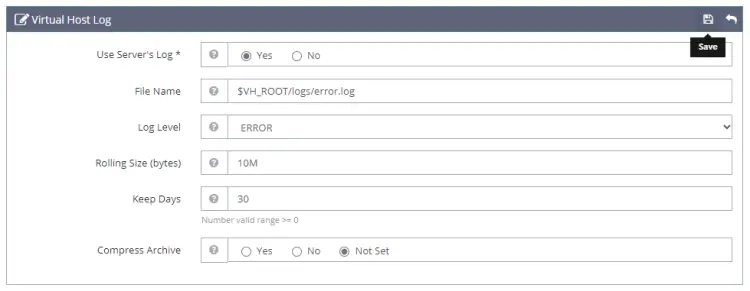
Click Save when done. Next, we need to choose Log files. Go to the Log section, click Edit against Virtual Host Log, and fill in the following values. Leave other settings unchanged.
Use Server’s Log: Yes
File Name: $VH_ROOT/logs/error.log
Log Level: ERROR
Rolling Size (bytes): 10M
Keep Days: 30
Compress Archive: Not Set
You can choose the Log Level as DEBUG if you are on a production/development machine.
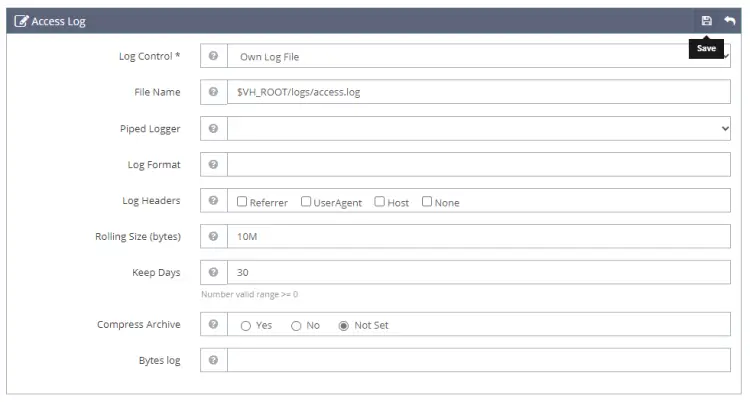
Click Save and then click the plus sign in the Access Log section to add a new entry. Fill in the following values.
Log Control: Own Log File
File Name: $VH_ROOT/logs/access.log
Piped Logger: Not Set
Log Format: Not Set
Log Headers: Not Set
Rolling Size (bytes): 10M
Keep Days: 30
Bytes log: Not Set
Compress Archive: Not Set
Click Save when done. Next, we need to configure Access Control under the Security section. Set the following Values.
Allowed List: *
Denied List: Not set
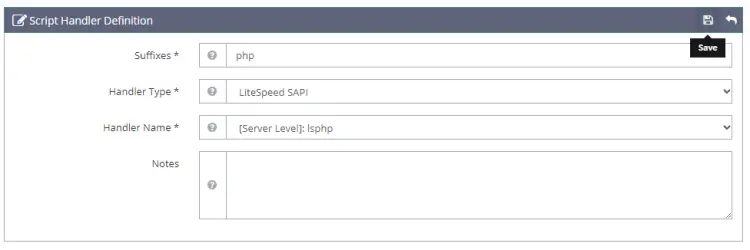
Click Save when done. Next, we need to set the Script Handler Definition. Click the plus (+) sign to add a new definition. Set the following values.
Suffixes: php
Handler Type: LiteSpeed SAPI
Handler Name: [Server Level]: lsphp
Click Save when done. Next, we need to set Rewrite Control under the Rewrite section. Set the following values.
Enable Rewrite: Yes
Auto Load from .htaccess: Yes
Log Level: Not Set
Click Save when done. And at last, we need to set the Listeners. Go to the Listeners section and click on the View button against Default Listener. Then, click on the Add button against Virtual Host Mappings to add a new mapping and set the following values.
Virtual Host: example.com
Domains: example.com
Click Save when done. Now, click on the Graceful restart button to apply all the changes above and restart the server.
Step 8 - Install SSL
Setting up SSL in OpenLiteSpeed requires us to set up two certificates. A self-signed certificate for the overall server and a Let's Encrypt site-specific server.
Let us create the Self Signed Certificate first.
$ openssl req -x509 -days 365 -newkey rsa:4096 -keyout key.pem -out cert.pem -nodes
You will get a similar output.
-----
You are about to be asked to enter information that will be incorporated
into your certificate request.
What you are about to enter is what is called a Distinguished Name or a DN.
There are quite a few fields but you can leave some blank
For some fields there will be a default value,
If you enter '.', the field will be left blank.
-----
Country Name (2 letter code) [XX]:
State or Province Name (full name) []:
Locality Name (eg, city) [Default City]:
Organization Name (eg, company) [Default Company Ltd]:
Organizational Unit Name (eg, section) []:
Common Name (eg, your name or your server's hostname) []:example.com
Email Address []:[email protected]
You can press enter through all the fields and leave them empty. Fill in your domain for the Common name and your email address.
The certificates are now stored in the /home/user directory. We will need this information later.
To use Let's Encrypt, we need to install the Certbot tool. We will use the Snapd package installer for that. Since Rocky Linux doesn't ship with it, install the Snapd installer. It requires the EPEL repository to work.
$ sudo dnf install -y epel-release
Install Snapd.
$ sudo dnf install -y snapd
Enable and Start the Snap service.
$ sudo systemctl enable snapd --now
Install the Snap core package, and ensure that your version of Snapd is up to date.
$ sudo snap install core && sudo snap refresh core
Create necessary links for Snapd to work.
$ sudo ln -s /var/lib/snapd/snap /snap
$ echo 'export PATH=$PATH:/var/lib/snapd/snap/bin' | sudo tee -a /etc/profile.d/snapd.sh
Issue the following command to install Certbot.
$ sudo snap install --classic certbot
Use the following command to ensure that the Certbot command can be run by creating a symbolic link to the /usr/bin directory.
$ sudo ln -s /snap/bin/certbot /usr/bin/certbot
Verify the installation.
$ certbot --version
certbot 2.3.0
Run the following command to generate an SSL Certificate.
Obtain the SSL certificate. The webroot directory is set to the public HTML directory configured earlier.
$ sudo certbot certonly --webroot -w /usr/local/lsws/example.com/html/ --agree-tos --no-eff-email --staple-ocsp --preferred-challenges http -m [email protected] -d example.com
Generate a Diffie-Hellman group certificate.
$ sudo openssl dhparam -dsaparam -out /etc/ssl/certs/dhparam.pem 4096
To check whether the SSL renewal is working fine, do a dry run of the process.
$ sudo certbot renew --dry-run
If you see no errors, you are all set. Your certificate will renew automatically.
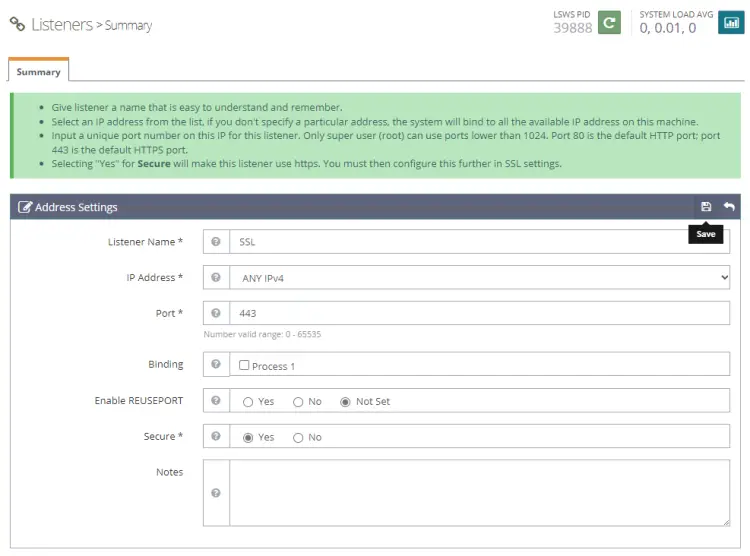
Now open the Admin console and go to Listeners >> Add New Listener and add the following values.
Listener Name: SSL
IP Address: ANY
Port: 443
Secure: Yes
Click Save when done. Next, go to the Virtual Host Mappings section under the SSL Listener by clicking on SSL, clicking on the Add button, and filling in the following values.
Virtual Host: example.com
Domains: example.com
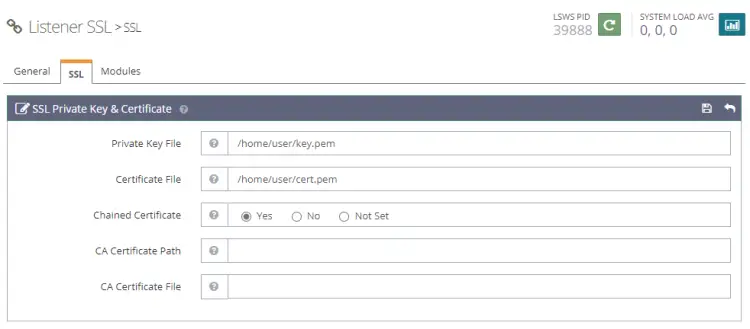
Click Save when done. Next, go to Listeners >> SSL Listener >> SSL Tab >>SSL Private Key & Certificate (Edit button) and fill in the following values for the self-signed certificate we created before.
Private Key File: /home/user/key.pem
Certificate File: /home/user/cert.pem
Chained Certificate: Yes
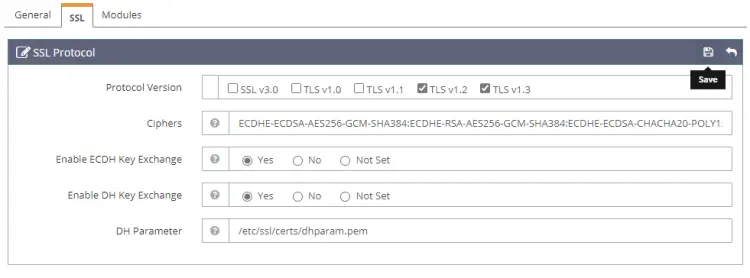
Click Save when done. Next, go to Listeners >> SSL Listener >> SSL Tab >> SSL Protocol (Edit button) and fill in the following values for the SSL protocol and cipher details.
Protocol Version: TLS v1.2 TLS v1.3
Ciphers: ECDHE-ECDSA-AES256-GCM-SHA384:ECDHE-RSA-AES256-GCM-SHA384:ECDHE-ECDSA-CHACHA20-POLY1305:ECDHE-RSA-CHACHA20-POLY1305:ECDHE-ECDSA-AES256-SHA384:ECDHE-RSA-AES256-SHA384
Enable ECDH Key Exchange: Yes
Enable DH Key Exchange: Yes
DH Parameter: /etc/ssl/certs/dhparam.pem
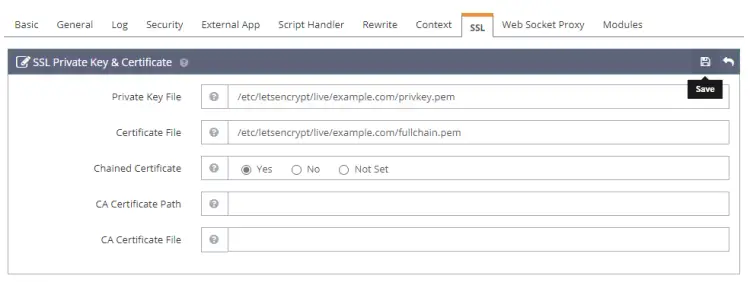
Click Save when done. Next, go to Virtual Hosts >> example.com >> SSL Tab >> SSL Private Key & Certificate (Edit button) and fill in the following values with the Let's Encrypt Certificate.
Private Key File: /etc/letsencrypt/live/example.com/privkey.pem
Certificate File: /etc/letsencrypt/live/example.com/fullchain.pem
Chained Certificate: Yes
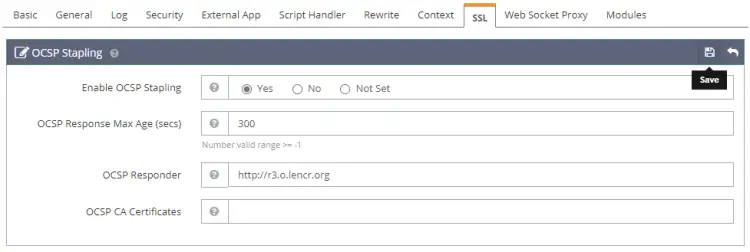
Click Save when done. Next, go to Virtual Hosts >> example.com >> SSL Tab >> OCSP Stapling (Edit button) and fill in the following values to enable OCSP Stapling.
Enable OCSP Stapling: Yes
OCSP Response Max Age(Secs): 300
OCSP Responder: http://r3.o.lencr.org
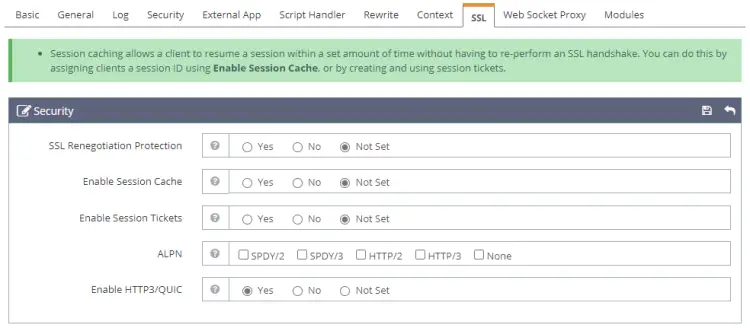
Click Save when done. Next, go to Virtual Hosts >> example.com >> SSL Tab >> Security (Edit button) and fill in the following values to enable HTTP3/QUIC protocol.
Enable HTTP3/QUIC: Yes
We don't need to enable other options because they are on by default.
Click Save when finished.
Restart the server by clicking on the Graceful restart button.
Step 9 - Test Site
Create a Test file in your html directory.
$ sudo nano /usr/local/lsws/example.com/html/index.php
Paste the following code in the Nano editor.
<html>
<head>
    <h2>OpenLiteSpeed Server Install Test</h2>
</head>
    <body>
    <?php echo '<p>Hello,</p>';

    // Define PHP variables for the MySQL connection.
    $servername = "localhost";
    $username = "testuser";
    $password = "password";

    // Create a MySQL connection.
    $conn = mysqli_connect($servername, $username, $password);

    // Report if the connection fails or is successful.
    if (!$conn) {
        exit('<p>Your connection has failed.<p>' .  mysqli_connect_error());
    }
    echo '<p>You have connected successfully.</p>';
    ?>
</body>
</html>
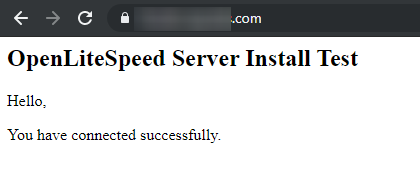
Open the URL https://example.com in a browser and you should see the following page.
The test site is fully functional. You can start using the server to serve dynamic PHP websites and applications.
Conclusion
This concludes our tutorial on installing LOMP Stack (OpenLiteSpeed, MySQL, and PHP) on a Rocky Linux 9 server. If you have any questions, post them in the comments below.

