How to Install Glances Monitoring Tool on Ubuntu 22.04
This tutorial exists for these OS versions
- Ubuntu 22.04 (Jammy Jellyfish)
- Ubuntu 20.04 (Focal Fossa)
On this page
Glances is a free, open-source, and cross-platform curses-based system monitoring tool written in Python. It is a real-time system monitoring tool that monitors system resources, including CPU, Memory, Load, Disk I/O, Processes, File System space, Network interface and more. It is designed to present a large amount of monitoring information via command-line and web-based interface. It uses psutil library to grab information from the system. It allows you to set different thresholds such as careful, warning, and critical in the configuration file and show each in different colors.
Features
With Glances, you can monitor the following:
- RAM, Swap and free memory usage.
- Average CPU load of system.
- Total active and sleeping processes.
- Disk I/O.
- Display file system space.
- Display current date and time.
In this post, we will show you how to install and monitor system resources with Glances on Ubuntu 22.04.
Prerequisites
- A server running Ubuntu 22.04.
- A root password is configured on the server.
Install Glances
By default, Glances is included in the Ubuntu default repository. You can install it with the following command:
apt-get install glances -y
After installing Glances, verify the installed version of Glances using the following command:
glances --version
You should see the following output:
Glances v3.2.4.2 with PsUtil v5.9.0
Log file: /root/.local/share/glances/glances.log
You can also check the status of the Glances with the following command:
systemctl status glances
You should see the following output:
? glances.service - Glances
     Loaded: loaded (/lib/systemd/system/glances.service; enabled; vendor preset: enabled)
     Active: active (running) since Sun 2022-08-21 11:46:53 UTC; 10min ago
       Docs: man:glances(1)
             https://github.com/nicolargo/glances
   Main PID: 23387 (glances)
      Tasks: 1 (limit: 2242)
     Memory: 34.5M
        CPU: 757ms
     CGroup: /system.slice/glances.service
             ??23387 /usr/bin/python3 /usr/bin/glances -s -B 127.0.0.1

Aug 21 11:46:53 ubuntu2204 systemd[1]: Started Glances.
Launch Glances Command Interface
Glances provide a command-line interface to monitor your system resources via the command line. You can launch the Glances using the following command:
glances
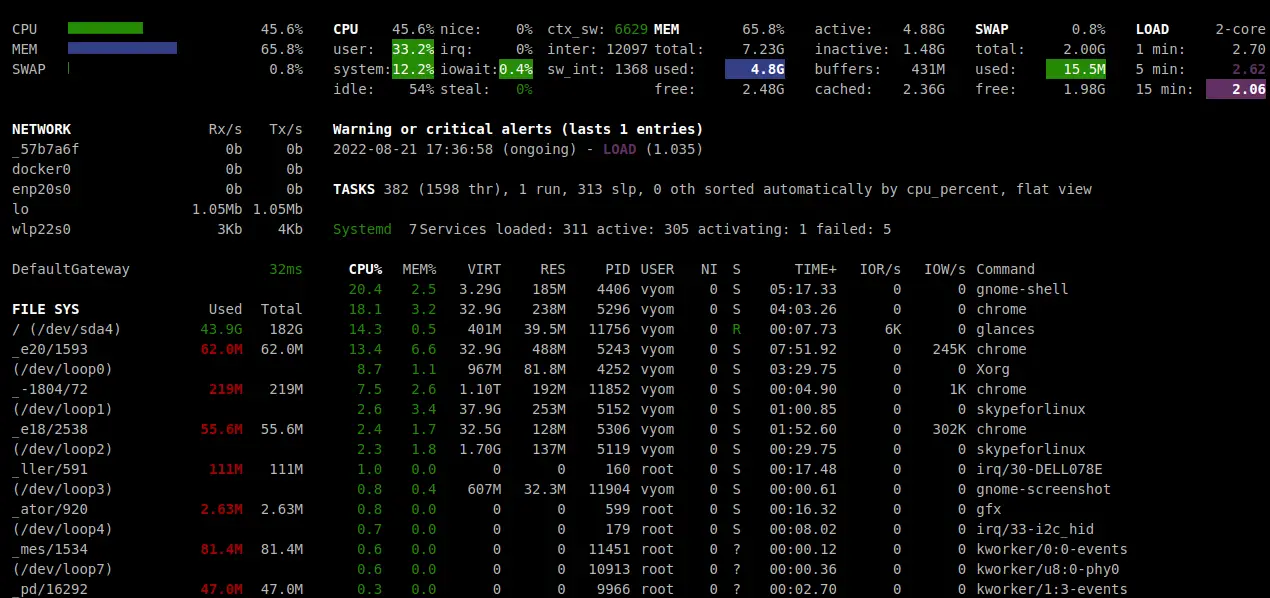
You should see the following screen:

On the above screen, you should see all the system-related information on a single page with different colors.
A brief explanation of each color code is shown below:
- Green: Everything is going well.
- Blue: Caution.
- Violeta: Warning.
- Red color: Critical.
The default thresholds settings are shown below:
- careful=50
- warning=70
- critical=90
You can change the default settings by editing /etc/glances/glances.conf file:
nano /etc/glances/glances.conf
Change the following lines as per your requirements:
[quicklook]
# Define CPU, MEM and SWAP thresholds in %
cpu_careful=50
cpu_warning=70
cpu_critical=90
mem_careful=50
mem_warning=70
mem_critical=90
swap_careful=50
swap_warning=70
swap_critical=90
Save and close the file when you are finished.
Keyboard Shortcuts of Glances
Glances provide several keyboard shortcuts to display the information in a more orderly and clear way. A brief explanation of each shortcut is shown below:
- m: Sort processes by MEM%
- p: Sort processes by name
- c: Sort processes by CPU%
- i: Sort processes by I/O rate
- s: Show/hide sensors stats
- n: Show/hide network stats
- x: Delete warning and critical logs
- d: Show/hide disk I/O stats
- a: Sort Processes automatically
- f: Show/hide file system statshddtemp
- y: Show/hide hddtemp stats
- l: Show/hide logs
- h: Show/hide help screen
- q: Quit
- w: Delete warning logs
You can exit from the Glances using the Ctrl+C. You can see all the options available with Glances command by running the following command:
glances -h
Run Glances in Web Server Mode
Glances also allow you to run in web browser mode. This mode will allow you to monitor your system resources through the web browser.
First, create a systemd service file to run Glances in a web server mode:
nano /usr/lib/systemd/system/glancesweb.service
Add the following lines:
[Unit]
Description = Glances in Web Server Mode
After = network.target

[Service]
ExecStart = /usr/bin/glances  -w  -t  5

[Install]
WantedBy = multi-user.target
Save and close the file, then reload the systemd daemon with the following command:
systemctl daemon-reload
Next, start the Glances service and enable it to start at system reboot:
systemctl start glancesweb
systemctl enable glancesweb
systemctl status glancesweb
You should see the following output:
? glancesweb.service - Glances in Web Server Mode
     Loaded: loaded (/lib/systemd/system/glancesweb.service; disabled; vendor preset: enabled)
     Active: active (running) since Sun 2022-08-21 11:52:00 UTC; 6s ago
   Main PID: 24107 (glances)
      Tasks: 1 (limit: 2242)
     Memory: 26.0M
        CPU: 488ms
     CGroup: /system.slice/glancesweb.service
             ??24107 /usr/bin/python3 /usr/bin/glances -w -t 5

Aug 21 11:52:00 ubuntu2204 systemd[1]: Started Glances in Web Server Mode.
At this point, Glances is started and listen on port 61208. You can check the listening port with the following command:
ss -antpl | grep glances
You should see the following output:
LISTEN 0      5            0.0.0.0:61208      0.0.0.0:*    users:(("glances",pid=24107,fd=7))
LISTEN 0      5          127.0.0.1:61209      0.0.0.0:*    users:(("glances",pid=23387,fd=4))
Now, open your web browser and access the Glances using the URL http://your-server-ip:61208. You should see the following page:
You can now use different keyboard shortcuts to filter the output.
Conclusion
Congratulations! you have successfully installed Glances on Ubuntu 22.04 server. You can now use Glances to monitor your system resource usage from the command-line a.s well as a web browser. Feel free to ask me if you have any questions

