How to Install and Use Vuls Vulnerability Scanner on Ubuntu 22.04
This tutorial exists for these OS versions
- Ubuntu 22.04 (Jammy Jellyfish)
- Ubuntu 18.04 (Bionic Beaver)
On this page
Vuls is an agentless, free, and open-source vulnerability scanner for Linux and FreeBSD. Vuls is mainly written in Go and can be run anywhere. You can run Vuls on Cloud, on-premise, and Docker, and supports major distributions. Vuls provides high-quality scan that supports multiple vulnerability databases such as NVD, JVN, OVAL, RHSA/ALAS/ELSA/FreeBSD-SA.
With Vuls, you can scan multiple operating systems with multiple methods. You can scan the local of your host, and also you can scan remote hosts/servers via SSH. It also provides multiple methods for scanning, a fast scan that does not require root privileges, and a deep scan that required root privileges. Vuls can scan multiple target servers at once. when the scan is finished, you can send the result via Email and Slack.
In this tutorial, you will install Vuls - an open-source and agent-less vulnerability scanner - on an Ubuntu 22.04 server. You will also set up Vuls by creating the configuration file and building Vuls databases via the command-line tools provided by Vuls. Then, you will also scan your server with Vuls and scan the remote server via SSH and Vuls.
This tutorial also includes installing and integrating VulsRepo - a web application that allows you to show Vuls scan results via web browser - with Vuls.
Prerequisites
To complete this guide, you must ensure that you have the following requirements:
- A Linux server running Ubuntu 22.04 server - This example will be using an Ubuntu machine with the hostname 'vuls' and IP address '192.168.5.20'.
- A non-root user with sudo/root administrator privileges.
- An additional server will be used as the target machine for remote server scanning via Vuls.
With those requirements ready, you can now start installing Vuls on your Ubuntu machine.
Installing Vuls via Installer Script
Vuls is a security scanner that can be used to scan major Linux distributions, FreeBSD, cloud, on-premises, and also supports Docker. Vuls can be installed on multiple operating systems manually or using an installer script, and also can be installed with Docker.
In this section, you will install Vuls automatically to an Ubuntu 22.04 machine via the Vuls installer script.
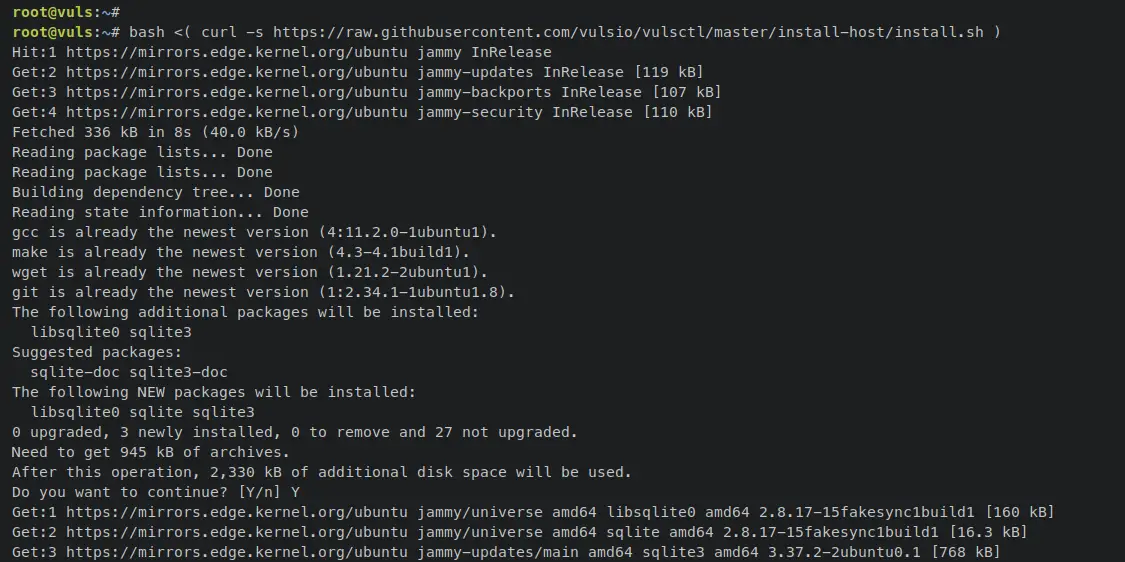
Enter the following command to install Vuls on your machine. This will download the Vuls installer script 'install.sh' and run it on your server.
bash <( curl -s https://raw.githubusercontent.com/vulsio/vulsctl/master/install-host/install.sh )
Below is a similar output that will be printed out to your terminal.
So the Vuls installer script 'install.sh' will do the following tasks:
- Installing basic dependencies such as gcc, git, wget, curl, and sqlite3 database tool.
- Install Go the latest version manually from the binary package.
- Compiling and installing Vuls with some additional tools such as go-cti, go-kev, go-exploitdb, go-msfdb, go-cve-dictionary, goval-dictionary, and gost.
When the installation is finished, the vuls binary file and other tools will be stored in the '/usr/local/bin' directory.
Enter the following command to verify the list of binary files on the '/usr/local/bin/' directory.
ls /usr/local/bin/
You should receive an output like this - You will get the vuls binary file, go-cti, go-kev, go-exploitdb, go-msfdb, go-cve-dictionary, goval-dictionary, and gost.

With this, you have now installed Vuls on your Ubuntu machine via the installer script. In the next step, you will start configuring Vuls installation.
Configuring Vuls Vulnerability Scanner
Before using Vuls, you must define and create the configuration file for Vuls and set up the data directory that will be used to store Vuls' data.
In this section, you will set up the Vuls data directory to '/usr/share/vuls-data' and create a new Vuls configuration file 'config.toml'. You will also define multiple CVE databases and set up the first scan that can be used to scan the current local machine or server.
When running the vuls command, you must be in the working directory '/usr/share/vuls-data' where the config file 'config.toml' is located.
Enter the following command to create a new data directory '/usr/share/vuls-data' for Vuls. Then, create a new config file '/usr/share/vuls-data/config.toml' using the touch command below.
mkdir -p /usr/share/vuls-data
touch /usr/share/vuls-data/config.toml
Open the config file '/usr/share/vuls-data/config.toml' using the following nano editor command.
nano /usr/share/vuls-data/config.toml
Add the following lines to the file.
[cveDict]
type = "sqlite3"
SQLite3Path = "/usr/share/vuls-data/cve.sqlite3"

[ovalDict]
type = "sqlite3"
SQLite3Path = "/usr/share/vuls-data/oval.sqlite3"

[gost]
type = "sqlite3"
SQLite3Path = "/usr/share/vuls-data/gost.sqlite3"

[metasploit]
type = "sqlite3"
SQLite3Path = "/usr/share/vuls-data/go-msfdb.sqlite3"

[servers]

[servers.localhost]
host = "localhost"
port = "local"
scanMode = [ "fast" ]
#scanMode = ["fast", "fast-root", "deep", "offline"]
Save and close the file when you're done.
With this, you will define 4 vuls databases with the format SQLite3 which will be taken from the vuls data directory '/usr/share/vuls-data/'. The 4 databases that will be used in this example are:
- CVE (Common Vulnerabilities and Exposures).
- OVAL (Open Vulnerability and Assessment Language).
- Gost - tracks the security tracker of Linux distributions such as Rehat, Debian, Ubuntu, and the Microsoft Windows OS.
- CVEs from Metasploit-Framework modules.
You will also define the first scan called 'localhost' that allows you to scan the current local machine via SSH and the 'scanMode' or method is 'fast', which not required the root-privilege and no dependencies needed.
Next, move your working directory to '/usr/share/vuls-data/'. Whenever you run the 'vuls' command, you must be in this directory where the config file 'config.toml' is located.
cd /usr/share/vuls-data/
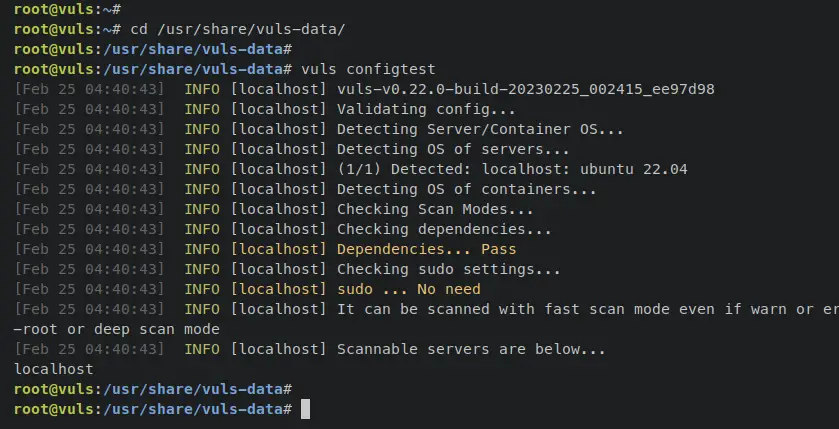
Enter the 'vuls' command below to verify the configuration.
vuls configtest
If successful, you should receive a similar output on your terminal screen.
At this point, you have now created the Vuls configuration, defined Vuls databases, and scan for localhost. In the next step, you will build vuls databases via multiple command-line tools provided by Vuls.
In addition, if you want to create a full Vuls configuration file, enter the following command to generate an example of Vuls configuration.
vuls discover 127.0.0.1/32
This will print out an example of Vuls configuration on your terminal.
Building Vuls CVE Databases
Within the Vuls config file 'config.toml' you have defined 4 databases using gost (Security Tracker), OVAL, CVE, and Metasploit-Framework CVEs. Before scanning any target server, you must ensure that Vuls databases are created and available on the Vuls data directory '/usr/share/vuls-data'.
In this section, you will build the Vuls database via Vuls command-line tools that you have installed and available on the '/usr/local/bin' directory. You will generate Vuls databases of Gost (Security Tracker) for the Ubuntu system, the CVE database from NVD (NIST National Vulnerability Database), the Ubuntu OVAL database, and the Metasploit-Framework CVEs database.
Each database can be generated with a specific tool that you have installed. For the basic usage of the Vuls command-line tool, you can print out the help page of Vuls tools with the following format.
vuls-command help
To start, enter the following 'gost' command to build and generate the vuls database of Security Tracker. In this example, you will generate a vuls database of security tracker for Ubuntu distribution to the target file '/usr/share/vuls-data/gost.sqlite3'.
gost fetch ubuntu --dbpath /usr/share/vuls-data/gost.sqlite3

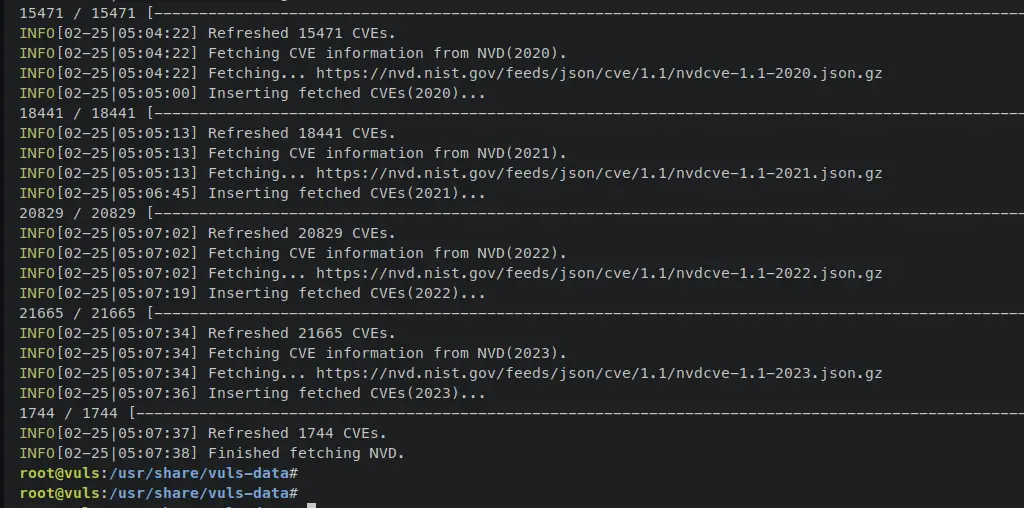
Enter the following 'go-cve-dictionary' command to generate the vuls database for CVE. The 'go-cve-dictionary' command supports two sources of CVE providers, NVD from Nist and JVD from Japanese JVN. In this example, you will generate the CVE database from Nist to '/usr/share/vuls-data/cve.sqlite3'.
go-cve-dictionary fetch nvd --dbpath /usr/share/vuls-data/cve.sqlite3

Below is an output when all CVEs database finished.
Next, generate the vuls database of OVAL using the 'goval-dictionary' command below. OVAL provides multiple dictionaries for multiple Linux distributions and versions. In this example, you will generate an OVAL database for Ubuntu 22 to the file '/usr/share/vuls-data/oval.sqlite3'.
goval-dictionary fetch ubuntu 22 --dbpath /usr/share/vuls-data/oval.sqlite3

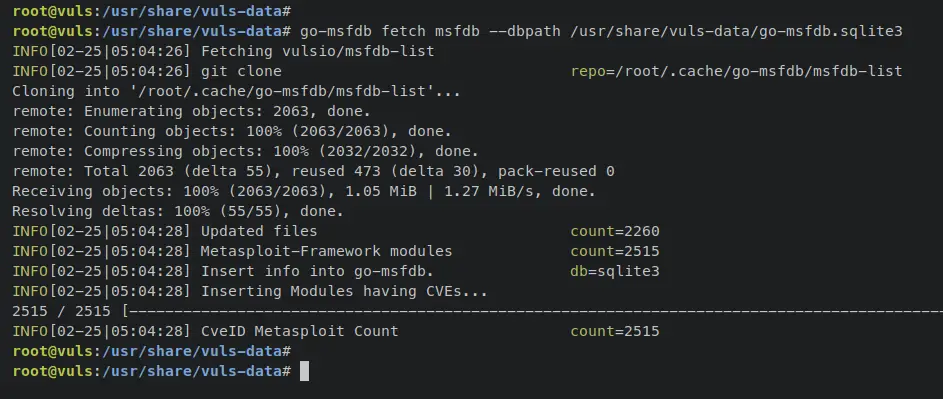
Lastly, enter the following 'go-msfdb' command to generate the CVE database from Metasploit-Framework modules. The vuls database file for this will be stored at '/usr/share/vuls-data/go-msfdb.sqlite3'.
go-msfdb fetch msfdb --dbpath /usr/share/vuls-data/go-msfdb.sqlite3
When vuls databases are generated, enter the following command to verify the list of vuls databases.
ls /usr/share/vuls-data/*.sqlite3
You should see Vuls databases 'gost.sqlite3', 'cve.sqlite3', 'oval.sqlite3', and 'go-msfdb.sqlite3' generated and available on the directory '/usr/share/vuls-data/'.

At this point, you have installed Vuls, configured the Vuls data directory, created the Vuls configuration file, and defined multiple vuls databases that will be used as the source database for scanning. You have also created the first scan called 'localhost' that allows you to scan the local machine that you're currently using.
In the next step, you will start scanning your local machine, then you will also create another scan that will scan the remote server with Vuls.
Scanning Local Machine with Vuls
Within the Vuls config file 'config.toml' you have created your first scan called 'localhost' that allows you to scan your current machine with Vuls. In this section, you will scan your current machine with Vuls.
Below is the first Vuls scan that you've created. This will scan the target server 'localhost' with connection type as 'local' and the 'scanMode' is 'fast', which does not require any root privileges for this.
[servers.localhost]
host = "localhost"
port = "local"
scanMode = [ "fast" ]
#scanMode = ["fast", "fast-root", "deep", "offline"]
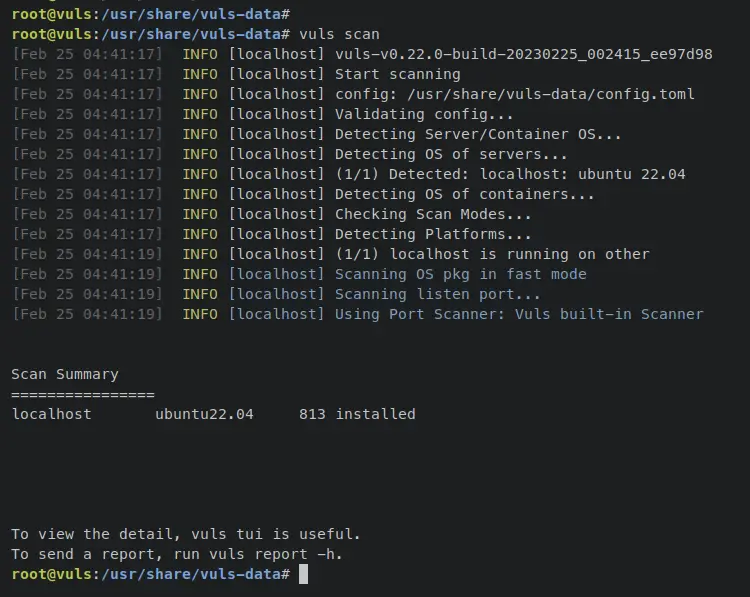
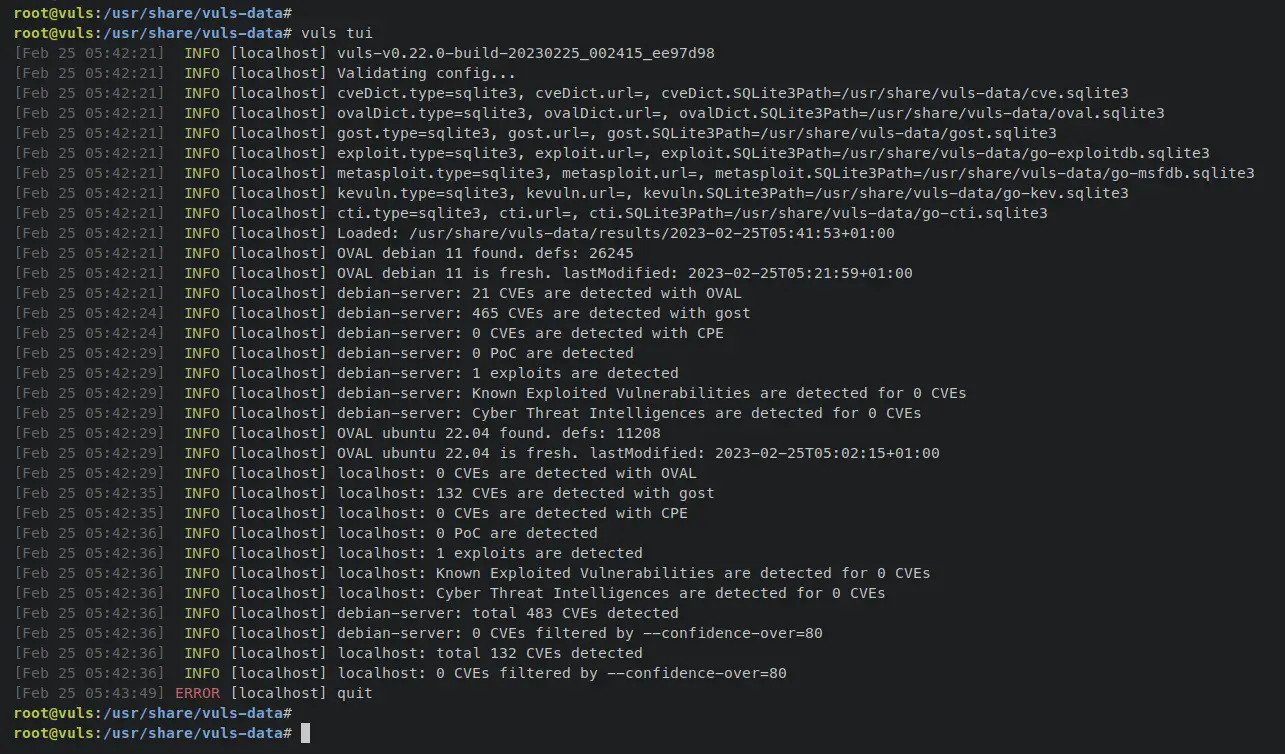
To start, enter the following command to start scanning your system, This command will scan all target servers that are available on the config file 'config.toml'.
vuls scan
To scan a specific target server, you can use the scan name as the parameter. This will only scan the target server called 'localhost'.
vuls scan localhost
When the scanning process is finished, you should get an output similar to this - You can see that Vuls will detect the current operating systems of the target server, then start scanning the system with available vuls databases. Also, you can see the scan summary at the bottom of the output.
Next, enter the following command to view and show the detailed reports of your scan.
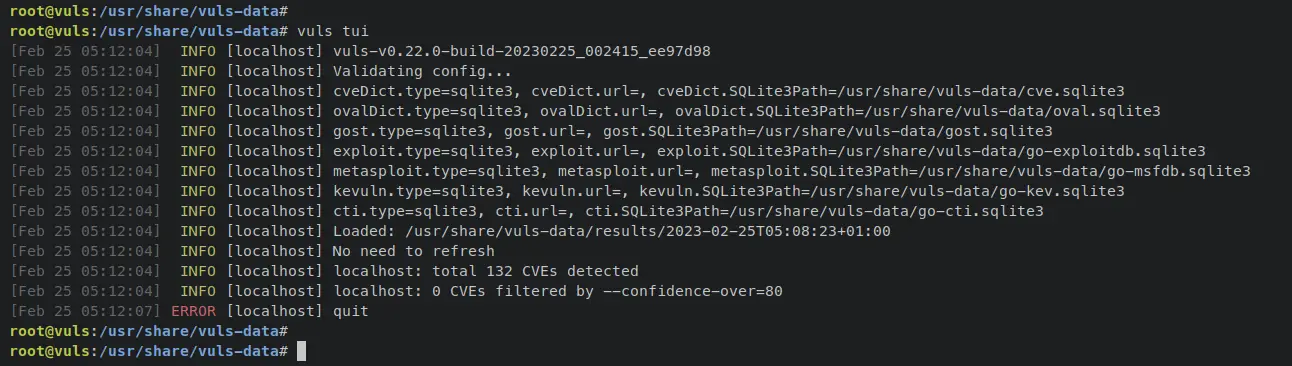
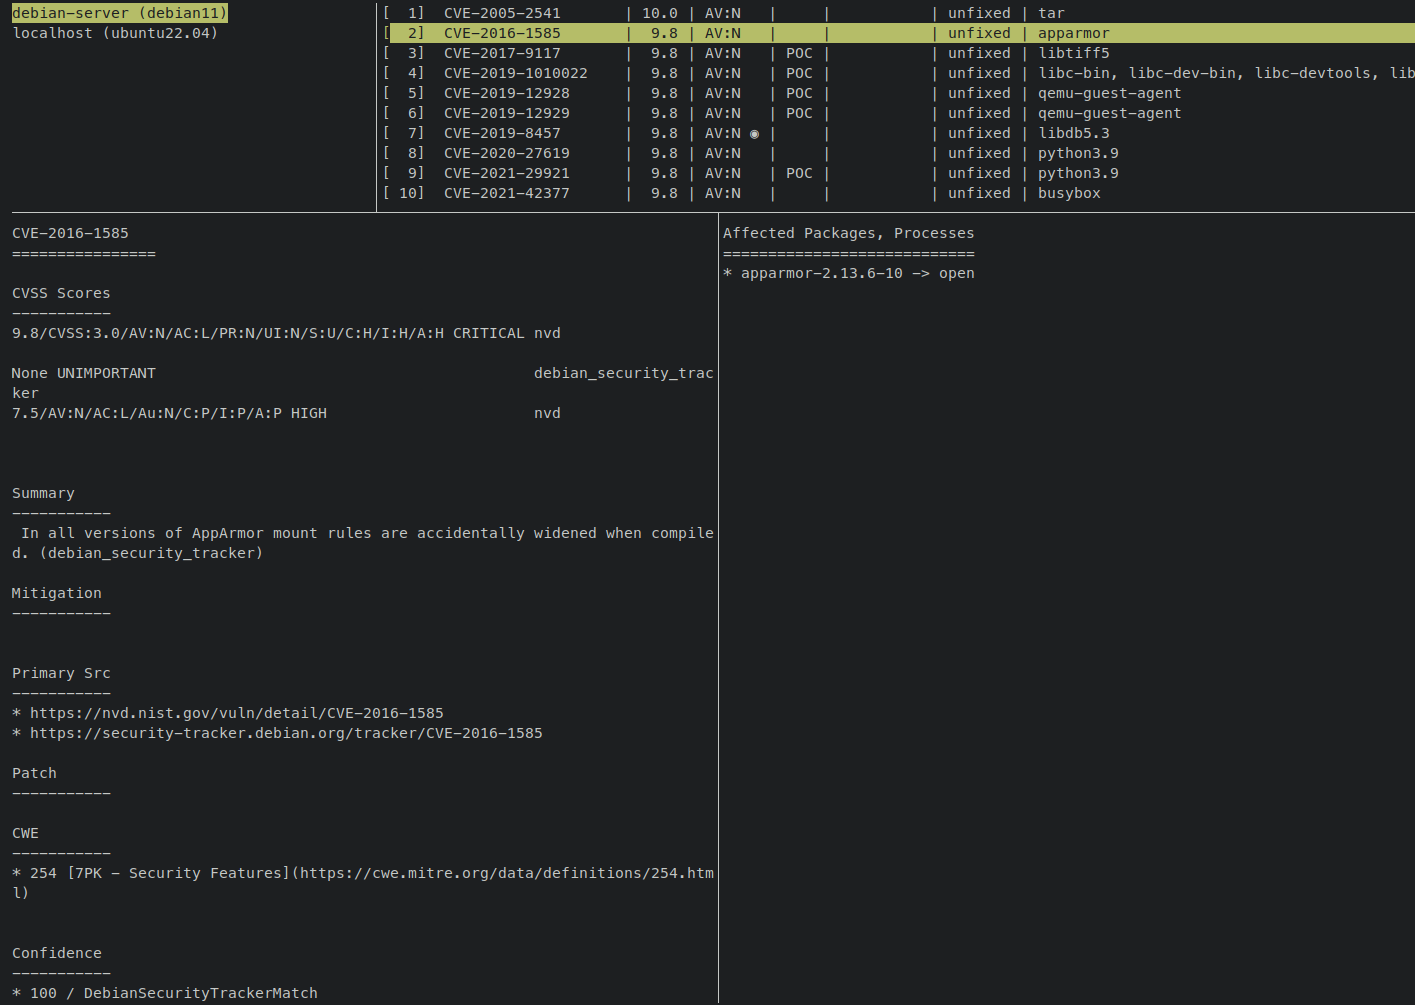
vuls tui
You should see 4 columns in your terminal screen, the list of target servers, the list of detected CVEs, a column that shows you the details of CVE, and the column that shows the list of affected packages. You can press the TAB button to switch from one column to others.
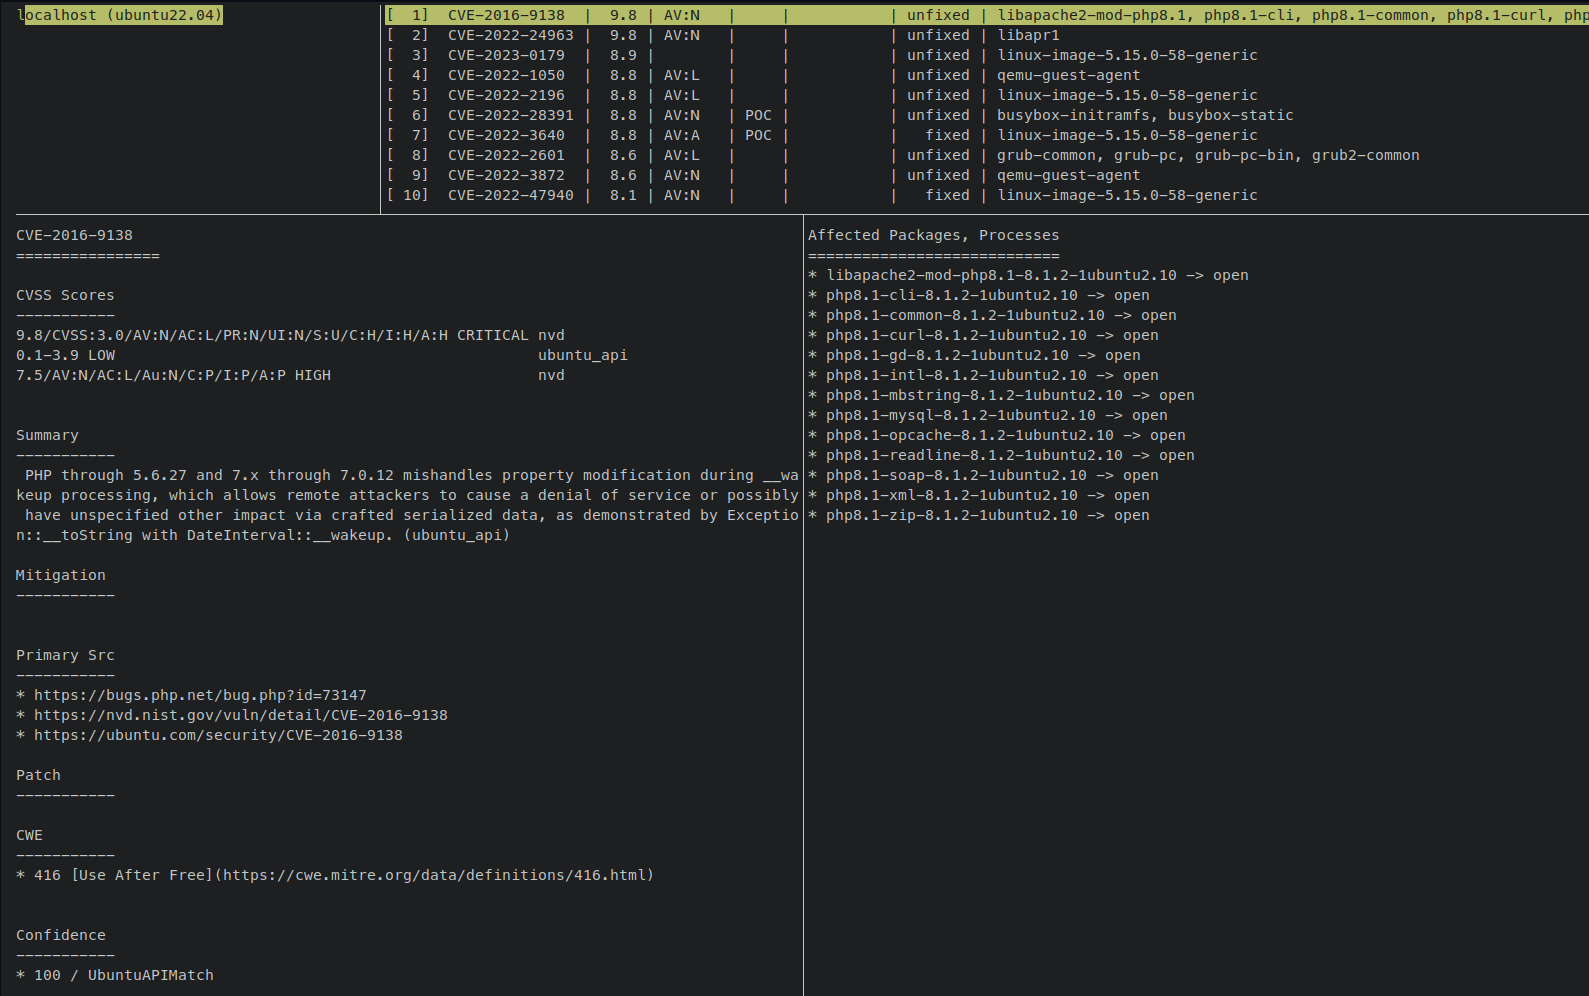
Lastly, press the Ctrl+C button to terminate the vuls viewer.
In addition to that, you can also track the history of scanning that you've made by typing the following 'vuls' command.
vuls history
With this, you have learned how to scan the target server using Vuls and view or show the result via the 'vuls tui' command. Next, you will learn how to scan a remote machine or server with Vuls.
Scanning Remote Server with Vuls
In this section, you will learn how to scan the remote server using Vuls via SSH. Below are the server details that will be used as the target machine:
Hostname        IP Address      OS
------------------------------------------
debian-server   192.168.5.75    Debian 11
Below are the steps of tasks for configuring Vuls and scanning the remote server via SSH:
- Install dependencies on the target server - when needed and depending on the scanMode.
- Retrieve additional CVE database for your specific system. Ensure that you have the proper Vuls database as the target server.
- Add and define target scan to the Vuls config file 'config.toml'.
- Start scanning your target server.
Now let's begin.
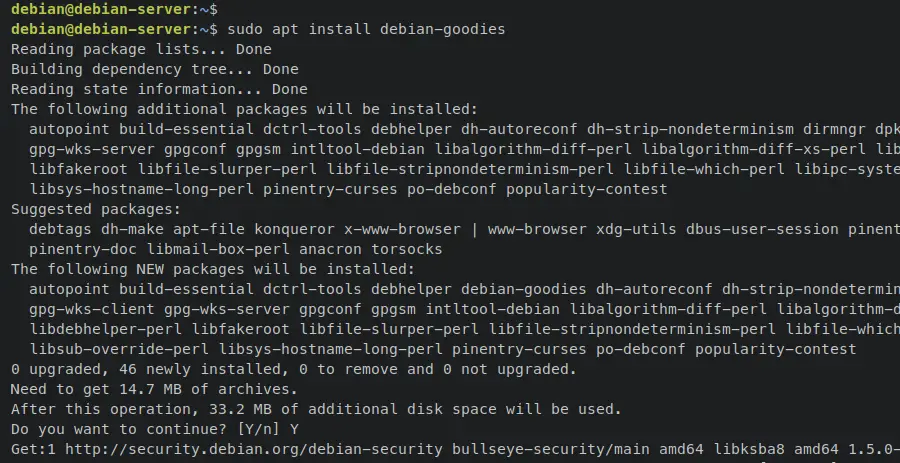
First, log in to the target remote server and install package dependencies 'debian-goodies' and 'reboot-notifier' using the following 'apt install' command. These packages are needed to be installed on the Debian target server.
sudo apt install debian-goodies reboot-notifier
Input y when prompted and press ENTER to proceed.
Now move to the Vuls server and retrieve a new CVE database for your specific system. In this example, you will rebuild the new database for OVAL and gost by adding the dictionary contents for the Debian Linux distribution.
Enter the following command to add new OVAL content for Debian 11 distribution to existing database '/usr/share/vuls-data/oval.sqlite3'
goval-dictionary fetch debian 11 --dbpath /usr/share/vuls-data/oval.sqlite3

Enter the following command to add a new Security Tracker for Debian distribution to the vuls gost database file '/usr/share/vuls-data/gost.sqlite3'.
gost fetch debian --dbpath /usr/share/vuls-data/gost.sqlite3

Next, open the vuls config file '/usr/share/vuls-data/config.toml' using the following nano editor command.
nano /usr/share/vuls-data/config.toml
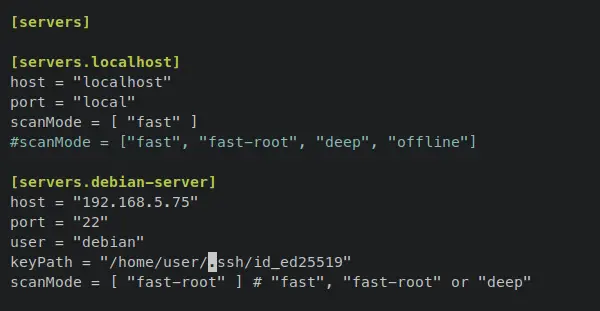
Add the following lines to the bottom of the line. With this, you'll create a new scan called 'debian-server' with the detailed host IP address '192.168.5.75', the SSH service running on default port '22', the default user that will be used is 'debian', and using the key-based authentication via SSH with the private key '~/.ssh/id_ed25519'. And the 'scanMode' that you will be using is 'fast-root', which required the root privileges on the target server, so be sure that your user has the password-less sudo.
[servers.debian-server]
host = "192.168.5.75"
port = "22"
user = "debian"
keyPath = "~/.ssh/id_ed25519"
scanMode = [ "fast-root" ] # "fast", "fast-root" or "deep"
Save and close the file when you're done.
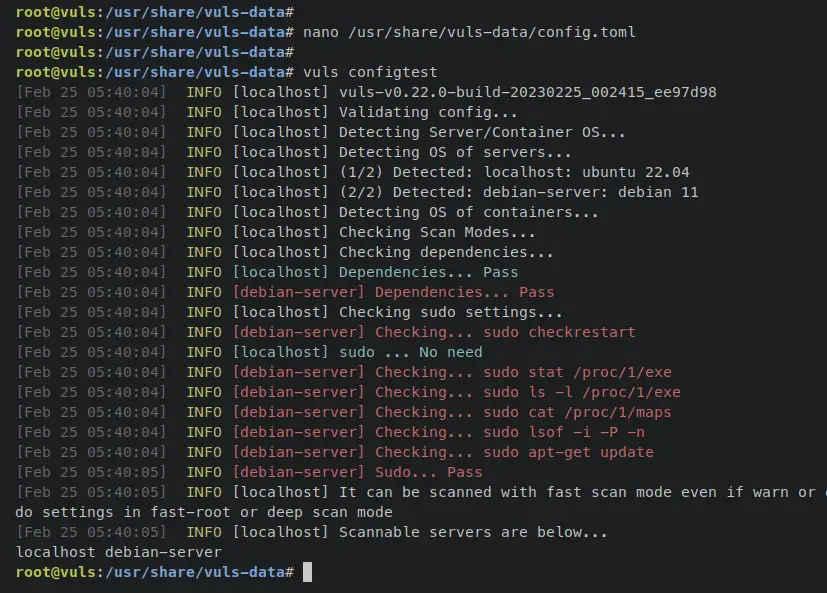
Now enter the following vuls command to verify the configuration file 'config.toml' file. This will ensure that you have proper Vuls configuration before scanning target servers.
vuls configtest
You should see an output like this - Vuls will check whether target servers are ready or not by checking the available dependencies and required privileges to do the scanning tasks. Also at the bottom, you should see the list of target servers that are ready to scan, in this example 'localhost' and 'debian-server'.
Now enter the following command to start scanning all available target servers on the 'config.toml' file. For this example, the following command will scan both target servers 'localhost' and 'debian-server'.
vuls scan
Or you can specify the scan to a specific target server by typing the vuls command below.
vuls scan debian-server
Below is an output when the scanning is finished. In this example, you're scanning the target server 'localhost' with the scanMode 'fast' and the target server 'debian-server' with the scanMode 'fast-root'.

Enter the following command to check the scanning result that you've done. On the host list column, you should see the scanning result of the target server 'debian-server'.
vuls tui
Press Ctrl+C to exit from the vuls tui window.
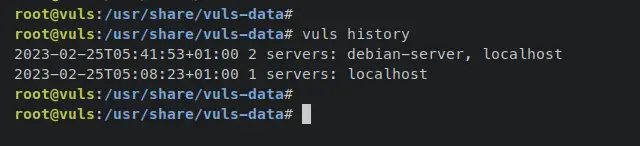
Now if you check the scanning history via the 'vuls history' command, you should see two different scanning results - The first scan targeted 'localhost' and the second scan result targeted 'localhost' and 'debian-server'.
vuls history
At this point, you have learned the basic usage of Vuls for scanning the local server and remote server via SSH. You have also learned how to rebuild the Vuls database and show or view the scan result via Vuls Terminal-Based User Interface (TUI).
Next, you will learn how to install and integrate VulsRepo with Vuls.
Integration with VulsRepo as Web Dashboard Administration for Vuls
VulsRepo is a web application that can be used to view or show Vuls scan results via the web browser. This allows an administrator easily to show the scan results like an Excel pivot table on the web browser.
In this section, you will download VulsRepo and integrate the VulsRepo with your Vuls server. In the end, you will also verify the Vuls scan result from your web browser via the VulsRepo web application.
First, move to the Vuls data directory '/usr/share/vuls-data/' and type the following command 'vuls report' to generate Vuls reports to a json file.
cd /usr/share/vuls-data/
vuls report -format-json
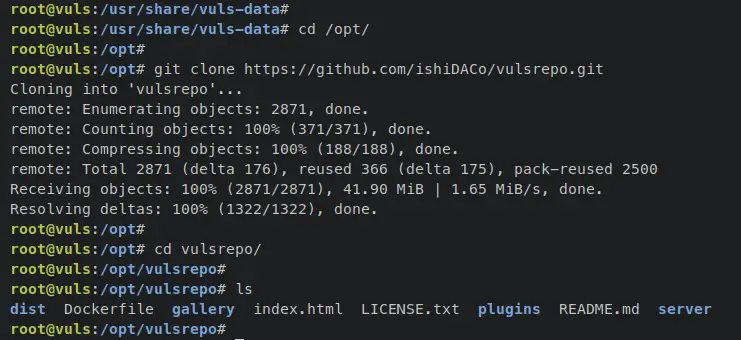
Now move the working directory '/opt' and download the VulsRepo source code via the 'git clone' command below. The VulsRepo source code will be available in the '/opt/vulsrepo/' directory.
cd /opt/
git clone https://github.com/ishiDACo/vulsrepo.git
Change the working directory to '/opt/vulsrepo/server/'.
cd /opt/vulsrepo/server/
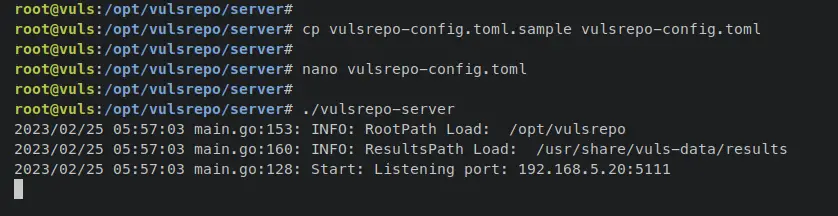
Copy the default configuration to 'vulsrepo-config.toml' and open it via the nano editor command below.
cp vulsrepo-config.toml.sample vulsrepo-config.toml
nano vulsrepo-config.toml
Change the default configuration with the following lines. The 'resultsPath' parameter must be the Vuls data 'results' directory '/usr/share/vuls-data/results'. For the 'serverPort' and 'serverIP', adjust those parameters with your server details.
[Server]
rootPath = "/opt/vulsrepo"
resultsPath  = "/usr/share/vuls-data/results"
serverPort  = "5111"
serverIP = "192.168.5.20"
Save and close the file when finished.
Next, enter the following command to execute the binary file of 'vulsrepo-server' and run the web dashboard of VulsRepo.
./vulsrepo-server
You should receive an output like this on your terminal - You can see the VulsRepo is running on the server IP address '192.168.5.20' with port '5111'.
Open your web browser and visit the server IP address followed by port 5111 (i.e: http://192.168.5.20:5111/). You should see the VulsRepo web application page.
On the left side menu, you should see the list of available scan results in json format. Select the desired scan result that you want to review, then click 'Submit'.
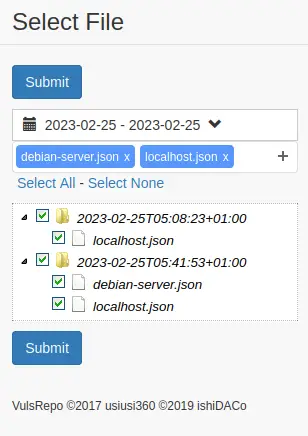
Below is an example of scan results of target servers 'localhost' and 'debian-server' shown in a web browser using VulsRepo.

With this, you have now installed and integrated the VulsRepo web application with your Vuls server. You can now view the scan results easily from the web browser via the VulsRepo application.
Conclusion
In this tutorial, you have installed Vuls - an open-source and agentless vulnerability scanner on an Ubuntu 22.04 server. You have also configured Vuls, created scans, and also configured Vuls databases from multiple sources such as CVEs from NIST, OVAL, Linux Distribution Security Tracker, and the Metasplot-Framework CVEs.
In addition to that, you have also learned how to scan local machines with Vuls and scan the remote server via SSH and Vuls. Then you have also learned the basic usage of Vuls for viewing the scan result via the terminal-based interface.
Through the end, you also installed and integrated Vuls with VulsRepo, allowing you to view and show Vuls scan results from the web browser. To learn more, visit the Vuls official documentation.

