How to Install and Use Portainer for Docker management with Nginx Proxy Manager
On this page
- Prerequisites
- Step 1 - Configure Firewall
- Step 2 - Install Docker
- Step 3 - Install Docker Compose
- Step 4 - Install Portainer
- Step 5 - Access and Configure Portainer
- Step 5 - Put Portainer behind a reverse proxy using Nginx Proxy Manager (NPM)
- Step 6 - Deploy a container using App Template
- Step 7 - Manage Containers
- Conclusion
Portainer is an open-source container management solution for Docker, Kubernetes, and Nomad that simplifies starting, creating and running containers in an easy way. It provides a web-based dashboard to manage containers, images, networks, and volumes.
In this tutorial, you will learn to install and configure the Portainer container management solution on a Linux server and use it to create and manage Docker containers to run different apps. You will also learn to put these containers behind Nginx using the Nginx proxy manager.
Prerequisites
- A Linux server running Ubuntu / Debian / Cent OS / Rocky Linux 8 / Alma Linux.
- A non-root user with sudo privileges.
- A Fully Qualified Domain Name (FQDN) pointing to the server for Portainer (
portrainer.example.com) and Nginx Proxy Manager (npm.example.com).
Step 1 - Configure Firewall
Cent OS/Rocky Linux/Alma Linux
You should have the Firewalld firewall installed. Check the firewall's status.
$ sudo firewall-cmd --state
running
Open ports 80, 9443 and 443. Portainer uses port 9443 to expose its web UI via HTTPS. Nginx Proxy Manager uses port 81 for its UI.
$ sudo firewall-cmd --permanent --add-service=http
$ sudo firewall-cmd --permanent --add-service=https
$ sudo firewall-cmd --permanent --add-port=9443/tcp
$ sudo firewall-cmd --permanent --add-port=81/tcp
Reload the firewall to enable the changes.
$ sudo firewall-cmd --reload
Ubuntu/Debian
Ubuntu and Debian systems use ufw (Uncomplicated Firewall) by default.
Check if the firewall is running.
$ sudo ufw status
If it is running, then open ports 80, 9443 and 443.
$ sudo ufw allow 80
$ sudo ufw allow 443
$ sudo ufw allow 9443
$ sudo ufw allow 81
Open the SSH port if the firewall isn't running.
$ sudo ufw allow "OpenSSH"
Enable the firewall if it is not running.
$ sudo ufw enable
If it is running, reload it to apply the changes.
$ sudo ufw reload
Step 2 - Install Docker
Cent OS/Rocky Linux/Alma Linux
Run the following command to install Docker.
$ sudo yum install -y yum-utils
$ sudo yum-config-manager \
    --add-repo \
    https://download.docker.com/linux/centos/docker-ce.repo
$ sudo yum install docker-ce docker-ce-cli containerd.io
Ubuntu
$ sudo apt install ca-certificates curl gnupg lsb-release
$ curl -fsSL https://download.docker.com/linux/ubuntu/gpg | sudo gpg --dearmor -o /usr/share/keyrings/docker-archive-keyring.gpg
$ echo "deb [arch=$(dpkg --print-architecture) signed-by=/usr/share/keyrings/docker-archive-keyring.gpg] https://download.docker.com/linux/ubuntu \
  $(lsb_release -cs) stable" | sudo tee /etc/apt/sources.list.d/docker.list > /dev/null
$ sudo apt update
$ sudo apt install docker-ce docker-ce-cli containerd.io
Debian
$ sudo apt install ca-certificates curl gnupg lsb-release
$ curl -fsSL https://download.docker.com/linux/debian/gpg | sudo gpg --dearmor -o /usr/share/keyrings/docker-archive-keyring.gpg
$ echo "deb [arch=$(dpkg --print-architecture) signed-by=/usr/share/keyrings/docker-archive-keyring.gpg] https://download.docker.com/linux/debian \
  $(lsb_release -cs) stable" | sudo tee /etc/apt/sources.list.d/docker.list > /dev/null
$ sudo apt update
$ sudo apt install docker-ce docker-ce-cli containerd.io
Enable and Start the Docker service.
$ sudo systemctl start docker --now
Add your username to the Docker group.
$ sudo usermod -aG docker $USER
Log out of the system and log back in to apply the change.
Step 3 - Install Docker Compose
Download and install Docker compose binary.
$ sudo curl -L "https://github.com/docker/compose/releases/download/1.29.2/docker-compose-$(uname -s)-$(uname -m)" -o /usr/local/bin/docker-compose
Apply executable permission to the binary.
$ sudo chmod +x /usr/local/bin/docker-compose
Step 4 - Install Portainer
Create a directory for Portainer.
$ mkdir ~/portainer
Switch to the directory.
$ cd ~/portainer
Create and open the Docker Compose file for editing.
$ nano docker-compose.yaml
Paste the following code in it.
version: "3.3"
services:
    portainer:
      image: portainer/portainer-ce:latest
      container_name: portainer
      restart: always
      privileged: true
      volumes:
        - ./data:/data:Z
        - /var/run/docker.sock:/var/run/docker.sock:Z
      ports:
        - 9443:9443
Save the file by pressing Ctrl + X and entering Y when prompted.
Let us go through the Docker compose file.
- We are pulling the latest version of the Portainer Community Edition from Docker Hub. Portainer Community Edition is free to use, while their Business edition requires a paid license. You can pull the Business Edition, but you will be asked for the license key to use it.
- We have named our container as
portainerfor identification and linking purposes. - The restart policy is set to
alwaysso that the container remains up during boot up. - The
privileged: truesetting is for Portainer to be able to access the Docker socket and run in a privileged context since we are using SELinux. If you are not using SELinux, you can remove this setting. This setting gives Portainer container access to everything on the host system, including access to the hardware. So, enable this setting only when you know what you are doing. - The
volumessection maps the folder on the host to the folders in the container using Bind mounts. We have exposed the directory~/portainer/datato the container for storing any relevant data and Docker socket API for container management. The:Zlabel tells Docker that we are running SELinux on our host. If you don't have SELinux enabled, you should remove the label.
Start Portainer.
$ docker-compose up -d
Check the status of the container.
$ docker ps
CONTAINER ID   IMAGE                           COMMAND        CREATED         STATUS         PORTS                                                           NAMES
916411e8d12e   portainer/portainer-ce:latest   "/portainer"   5 seconds ago   Up 4 seconds   8000/tcp, 9000/tcp, 0.0.0.0:9443->9443/tcp, :::9443->9443/tcp   portainer
Step 5 - Access and Configure Portainer
Open the URL https://<yourserverIP>:9443 in your browser, and you will get the following screen.
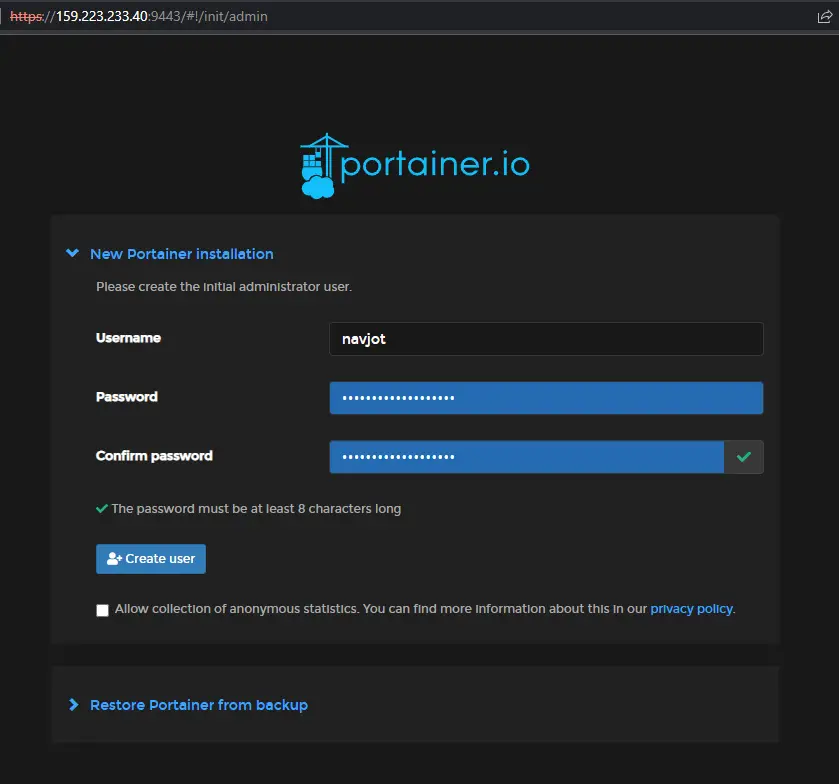
You will be asked to create a new administrator user. Add your user details. Uncheck the box Allow collection of anonymous statistics if you care about privacy. Click the Create user button to start the installation and create a new administrator account.
Next, you will be taken to the following dashboard screen.
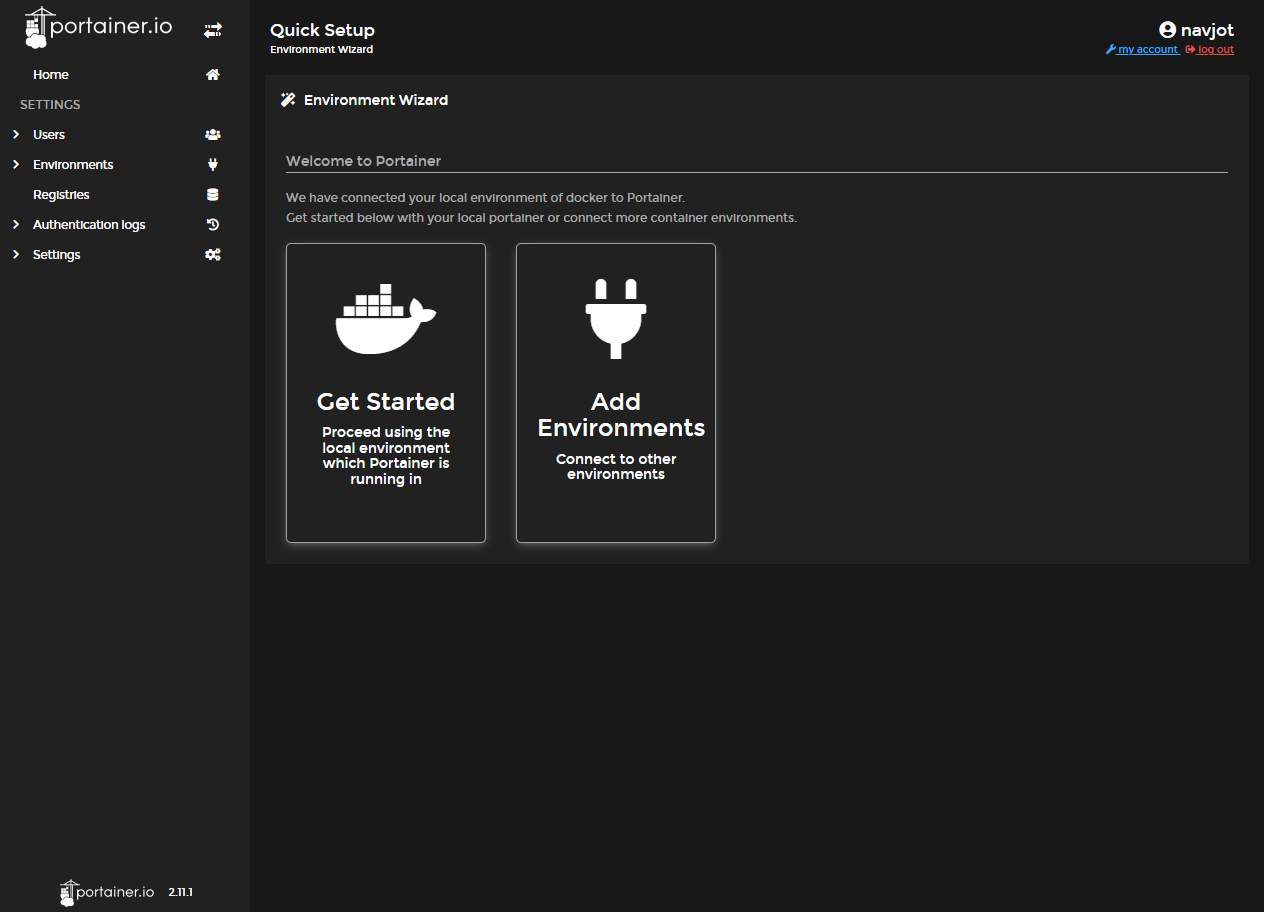
After a few seconds, it will automatically refresh and show you the following screen.
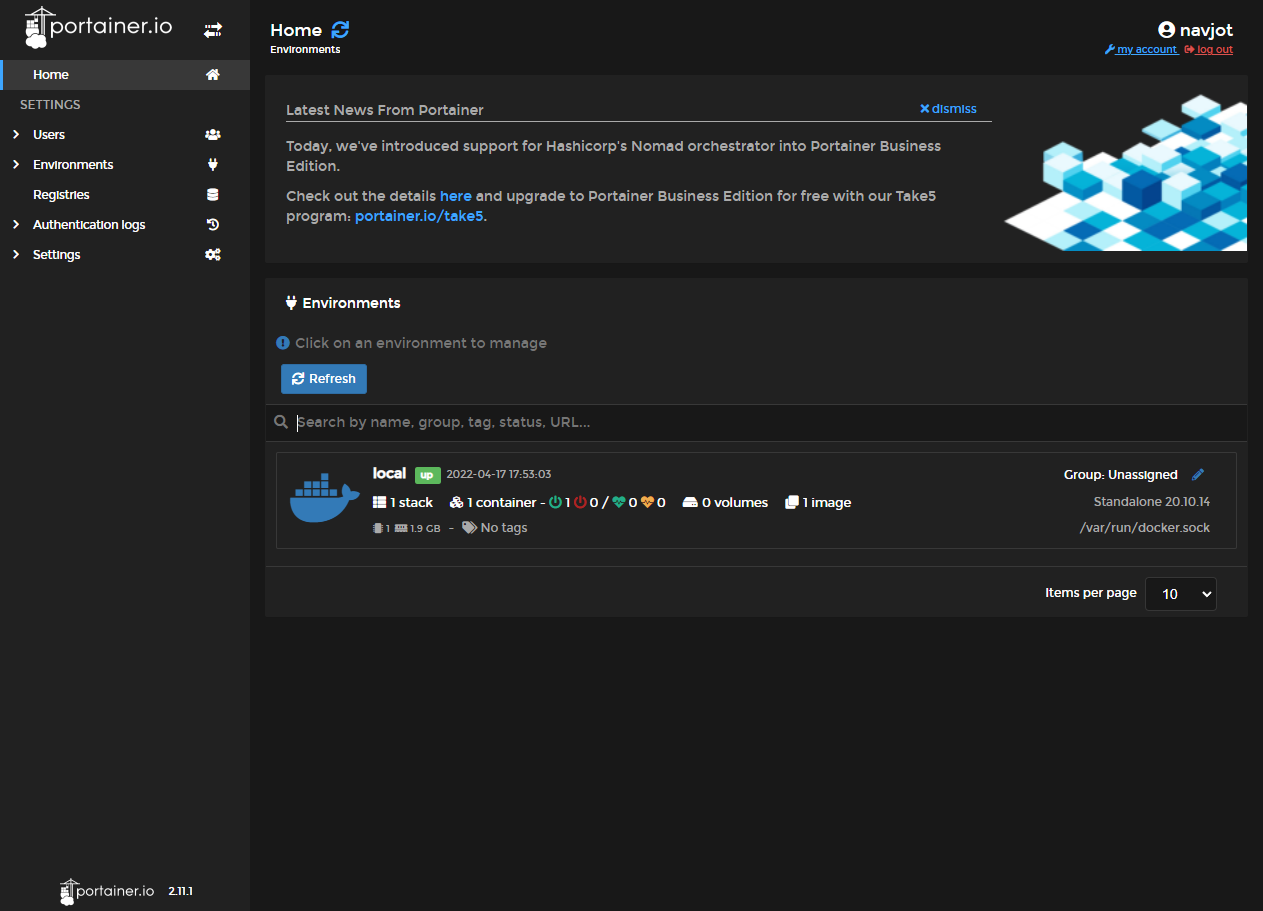
It will show you the local environment in which Portainer is running. Click on the local environment to get started.

Most of the sections are self-explanatory. The Stacks section helps in creating containers using Docker compose files. You can deploy containers directly using the Containers category in the sidebar. You can configure the current docker environment through the Hosts section. The App Templates section comes with pre-installed Docker compose files for installing the most common applications. You can also create custom templates.
The Settings section allows you to configure various settings such as adding custom Docker registries, adding multiple hosts for Docker swarm, configuring user access, backing up data, and customizing Portainer.
Step 5 - Put Portainer behind a reverse proxy using Nginx Proxy Manager (NPM)
Before moving ahead, let us put Portainer behind a reverse proxy using Nginx Proxy Manager. Nginx Proxy Manager is a Docker application that provides a web management UI for setting up Nginx as a reverse proxy host. It can also be used as a redirect or a streaming host.
Install NPM
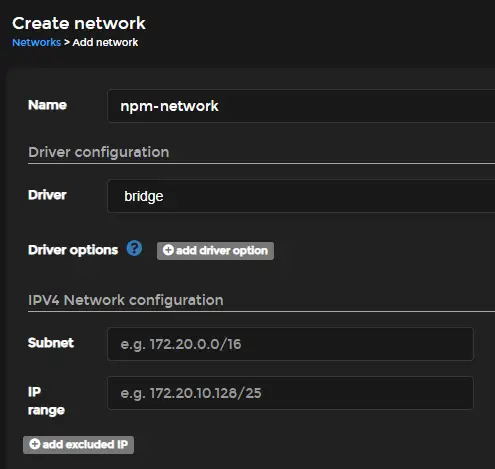
The first step is to create a network for Nginx Proxy Manager (NPM). Open the Networks section and click the button Add Network to create a new network.
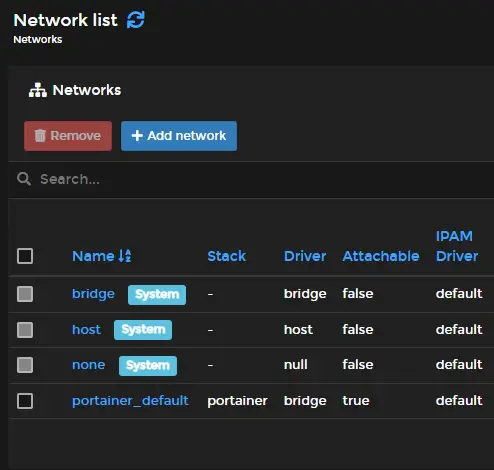
Give a name to the network and leave all the settings unchanged. Click the Create the network button to finish.
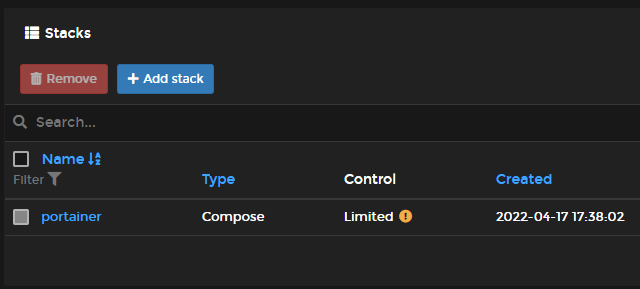
Visit the Stacks and create a new stack using the Add stack button.
Name the stack as nginx-proxy-manager and paste the following code into it.
version: "3.3"
services:
  npm-app:
    image: 'jc21/nginx-proxy-manager:latest'
    container_name: npm-app
    restart: unless-stopped
    ports:
      - '80:80' # Public HTTP Port
      - '443:443' # Public HTTPS Port
      - '81:81' # Admin Web Port
      # Add any other Stream port you want to expose
      # - '21:21' # FTP
    environment:
      DB_MYSQL_HOST: "npm-db"
      DB_MYSQL_PORT: 3306
      DB_MYSQL_USER: "npm"
      DB_MYSQL_PASSWORD: ${DB_MYSQL_PASSWORD}
      DB_MYSQL_NAME: "npm"
      # Uncomment the line below if IPv6 is not enabled on your host
      # DISABLE_IPV6: 'true'
    volumes:
      - ./npm-data:/data:Z
      - ./letsencrypt:/etc/letsencrypt:Z
    depends_on:
      - npm-db
    networks:
      - npm-network
      - npm-internal

  npm-db:
    image: 'mariadb:latest'
    container_name: npm-db
    restart: unless-stopped
    environment:
      MYSQL_ROOT_PASSWORD: ${MYSQL_ROOT_PASSWORD}
      MYSQL_DATABASE: 'npm'
      MYSQL_USER: 'npm'
      MYSQL_PASSWORD: ${DB_MYSQL_PASSWORD}
    volumes:
      - ./npm-data/mysql:/var/lib/mysql:Z
    networks:
      - npm-internal

networks:
  npm-internal:
  npm-network:
    external: true

We have set two environment variables to set database and root MySQL passwords. Portainer can be used to set secrets using environment variables. Scroll down the page and click the Add environment variable button to add strong passwords.

Click the Deploy the stack button to create and start the NPM container.
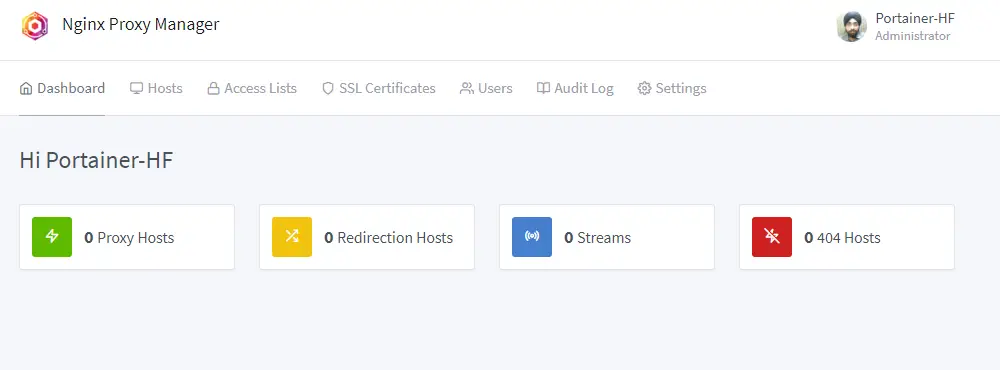
Access NPM
Open the URL https://<yourserverIP>:81 in your browser, and you will get the following screen. Enter the following default credentials to sign in.
Email address: [email protected] Password: changeme
Next, you will be immediately asked to set a name and an email address. Click the Save button, and you will be asked to create a new password. Click the Save button again to get started.
Visit the Hosts >> Proxy Hosts and click the Add Proxy Host button.
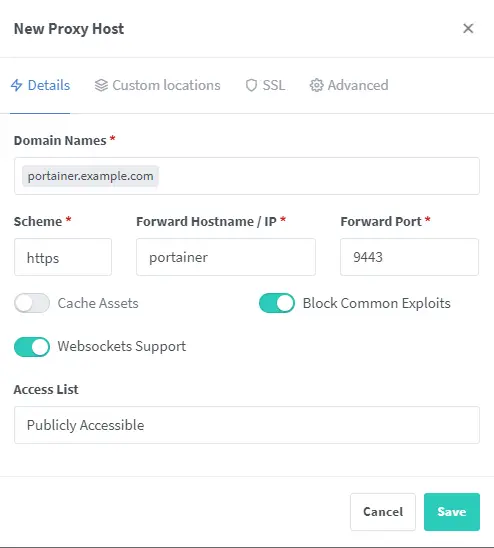
Enter the domain name as portainer.example.com. Choose the scheme as https. Enter the name of the container as the Forward Hostname and 9443 as the Forward port. Check the options Block Common Exploits and Websockets Support options.
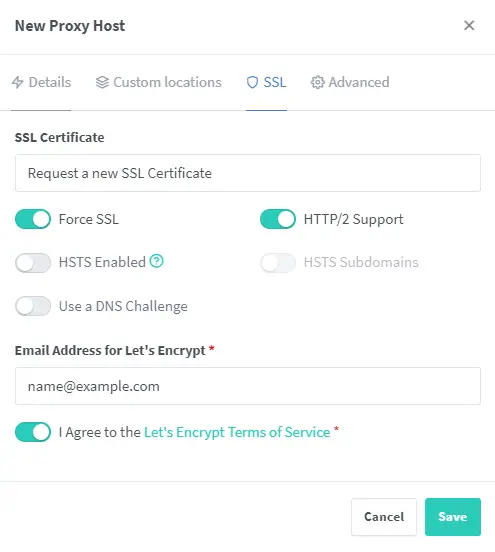
Switch to the SSL tab and select Request a new SSL Certificate from the dropdown menu. Check the Force SSL and HTTP/2 Support options to secure and optimize your SSL connection. Enter the email address to receive renewal notifications and agree to the terms of service. Click the Save button to finish setting up the Proxy Host for Portainer.
Connect Portainer to the NPM Container
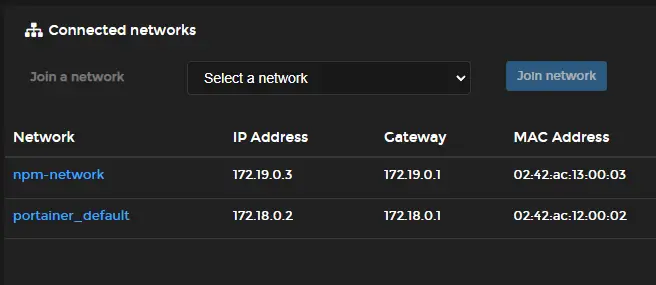
We have set up the Proxy host, but the container is still not connected to the NPM network. Go back to the Portainer dashboard, visit the Containers section, and select the portainer container.
Select npm-network from the dropdown menu under the Connected networks section and click the Join network button to add the Portainer container to the proxy manager's network.
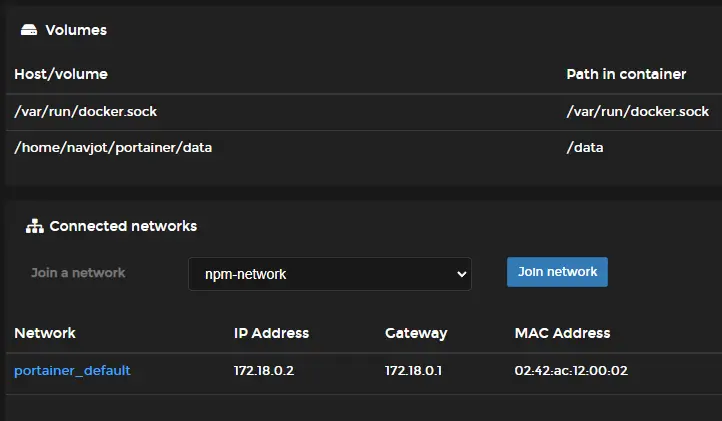
You might get an error but refresh the page, and you should see the container added to the NPM network.
You should be able to access Portainer using the URL https://portainer.example.com in your browser.
You can follow a similar procedure to put NPM behind a publicly accessible URL like, https://npm.example.com as discussed in our Nginx Proxy Manager tutorial.
Now that you have set a public URL for Portainer, you can remove the exposed 9443 port. To do that, go back to the Terminal and switch to the portainer directory.
$ cd ~/portainer
Open the Docker compose file for editing.
$ nano docker-compose.yaml
Remove the ports section by commenting it out, as shown below.
version: "3.3"
services:
    portainer:
      image: portainer/portainer-ce:latest
      container_name: portainer
      restart: always
      privileged: true
      volumes:
        - ./data:/data:Z
        - /var/run/docker.sock:/var/run/docker.sock:Z
      #ports:
      #  - 9443:9443
      networks:
        - npm-network

networks:
  npm-network:
    external: true
Save the file by pressing Ctrl + X and entering Y when prompted.
Here, we have added the details of the NPM network because we will need to restart the Portainer container.
Stop the Portainer container.
$ docker-compose down --remove-orphans
Start the container again with the updated configuration.
$ docker-compose up -d
Step 6 - Deploy a container using App Template
Portainer provides several pre-defined templates to launch applications directly with minimal configuration.
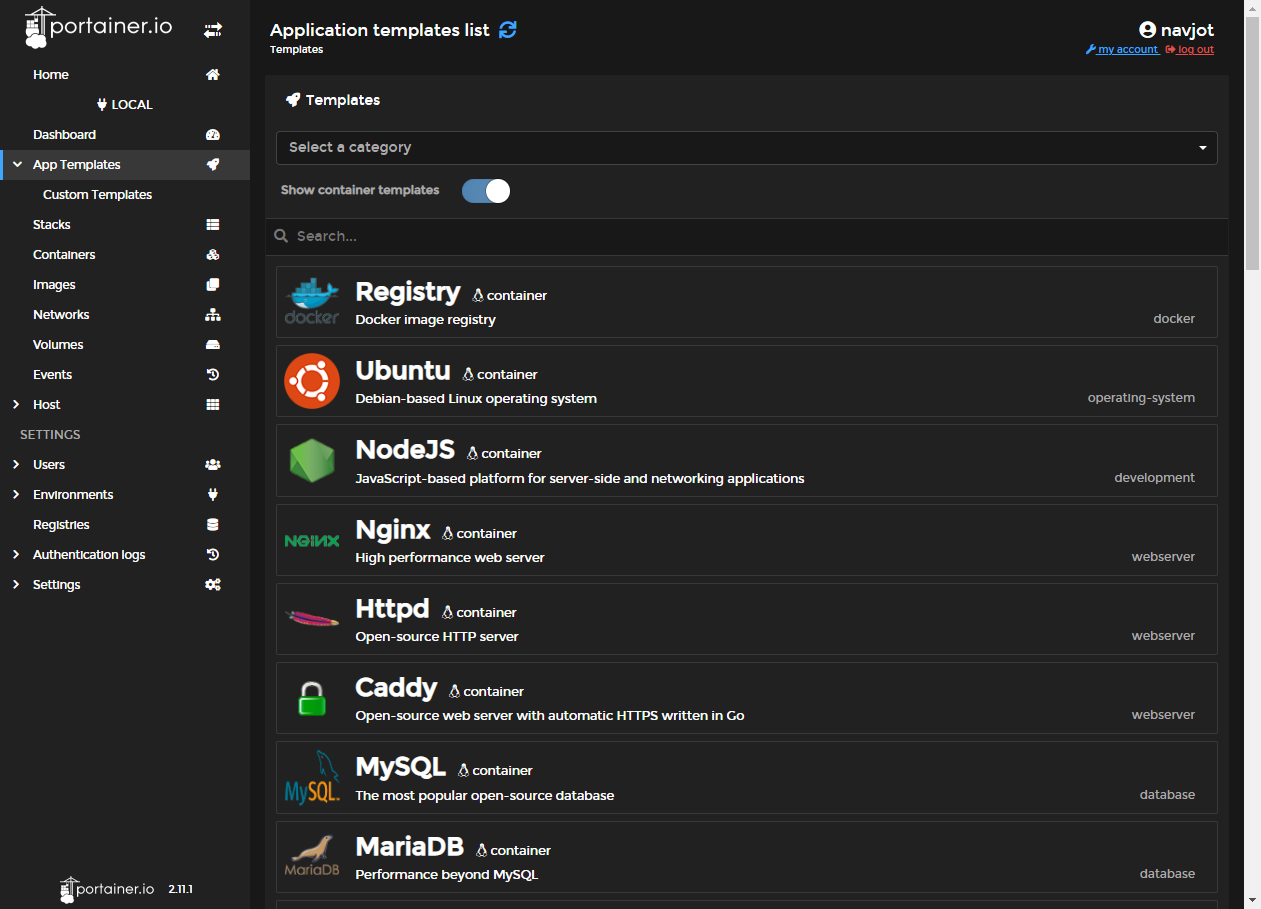
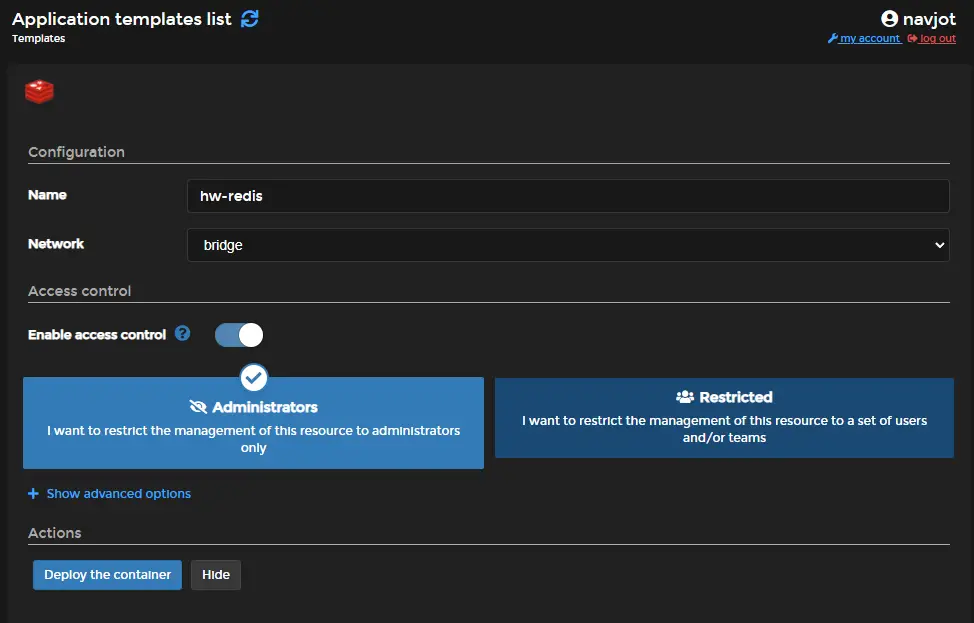
Visit the App Templates section and select any template. Give it a name, and select the network for use. Use the advanced options section to deploy custom ports, networks, and volume mounts.
Click the Deploy the container button to finish deploying your application. Here we are deploying the Redis container.
Step 7 - Manage Containers
Let us manage an existing container. Open the containers page, and you will see all the running containers.
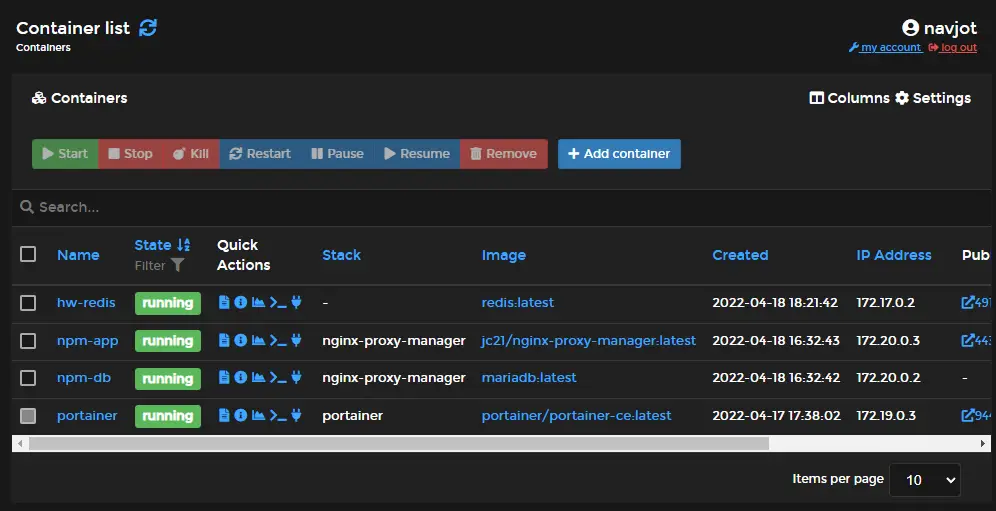
Click the recently created hw-redis container to proceed.

On top, you can see a list of actions you can perform on a running container. You can stop and kill the container. Recreate will create the container from scratch. The Duplicate/Edit option will allow you to create another identical container allowing you the ability to change settings before launching it.
The Container status shows the running time, IP address and other details about the container.
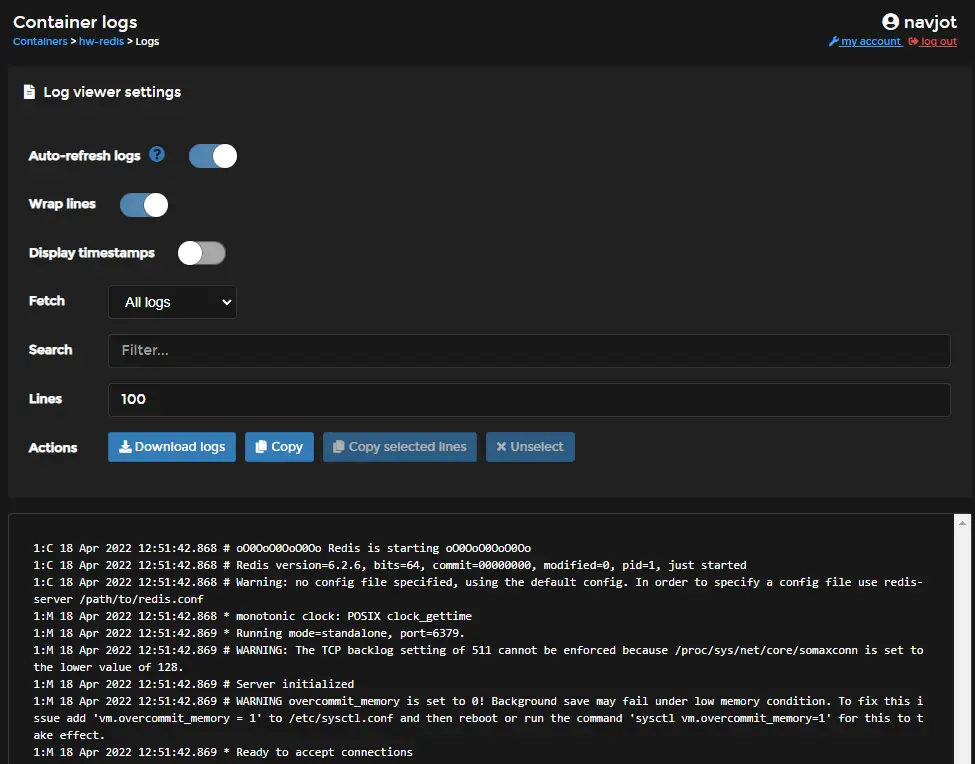
The Logs option shows the output of the docker logs command. Since the command's output is not cached, every time you refresh the page, the command is run from scratch.
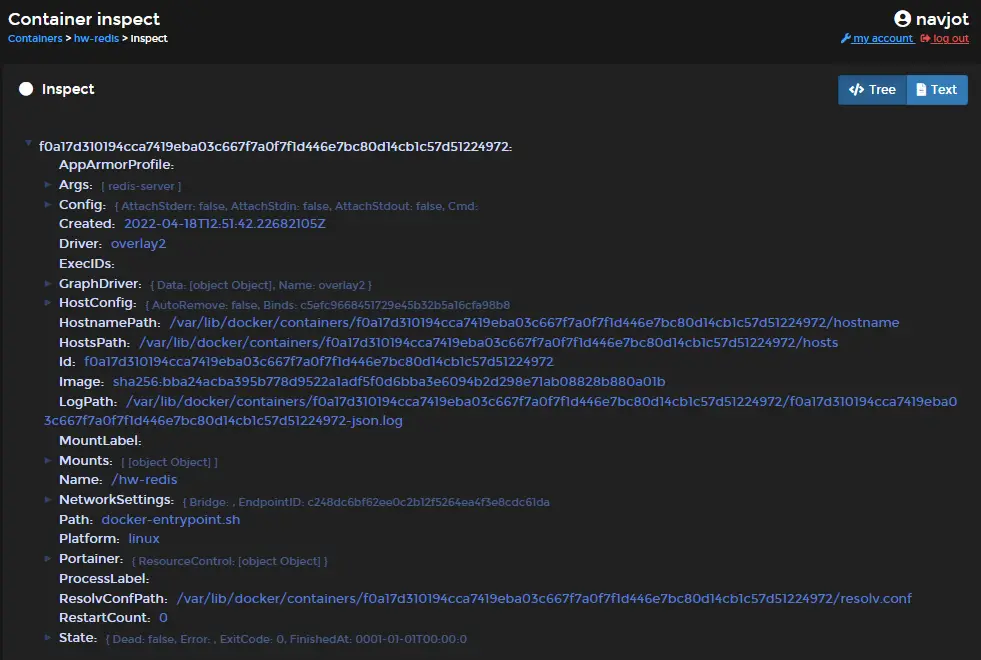
The Inspect option runs the command docker inspect on the container and shows its output.
The Stats option shows you the usage of the container in real-time.

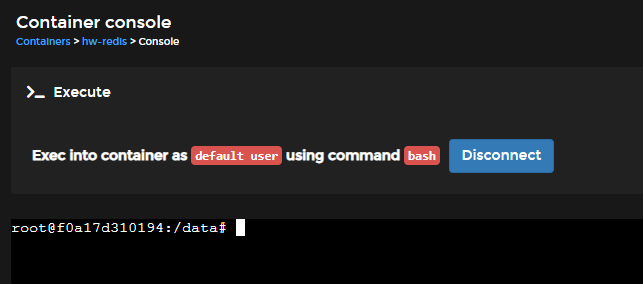
You can launch the Container console by using the Console option. You will be asked for the command and the system user to run.
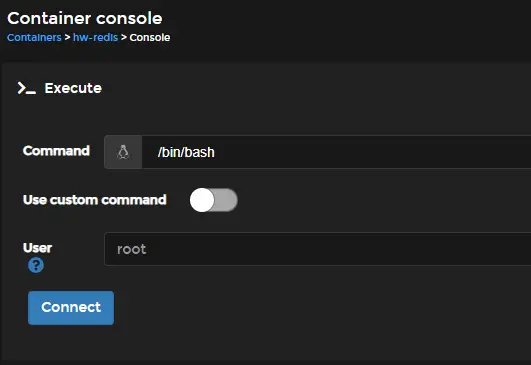
Press the Connect button to launch the console.
The Attach option runs the docker attach command.
There are other options on the Container details page. You can create an image using an existing container. Other options include changing a container's restart policy and connecting or disconnecting a network to an existing container.
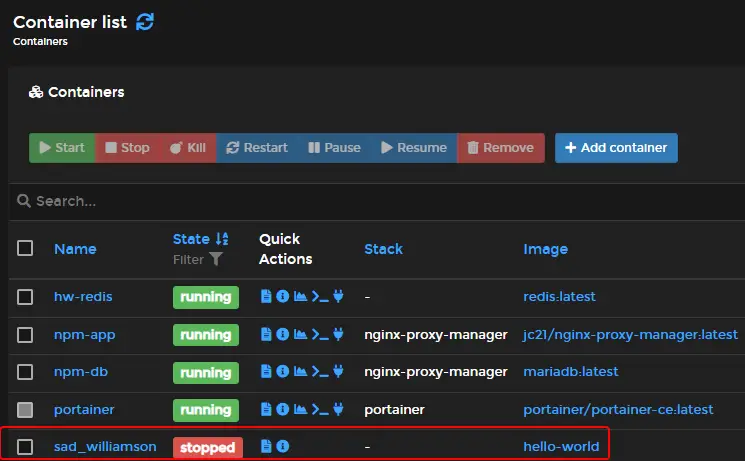
Attach an Outside container to Portainer
Creating any container outside of Portainer will show up inside it as long as it is created on the same system Portainer is running. This is possible because Portainer is hooked up with Docker using the websocket.
Let us test by running the Hello World Docker container.
$ docker run hello-world
Unable to find image 'hello-world:latest' locally
latest: Pulling from library/hello-world
2db29710123e: Pull complete
Digest: sha256:10d7d58d5ebd2a652f4d93fdd86da8f265f5318c6a73cc5b6a9798ff6d2b2e67
Status: Downloaded newer image for hello-world:latest

Hello from Docker!
This message shows that your installation appears to be working correctly.

To generate this message, Docker took the following steps:
 1. The Docker client contacted the Docker daemon.
 2. The Docker daemon pulled the "hello-world" image from the Docker Hub.
    (amd64)
 3. The Docker daemon created a new container from that image which runs the
    executable that produces the output you are currently reading.
 4. The Docker daemon streamed that output to the Docker client, which sent it
    to your terminal.

To try something more ambitious, you can run an Ubuntu container with:
 $ docker run -it ubuntu bash

Share images, automate workflows, and more with a free Docker ID:
 https://hub.docker.com/

For more examples and ideas, visit:
 https://docs.docker.com/get-started/
Check the container list in the terminal. We are using the -a flag to show the list of all containers, including the stopped ones. You can see the name of the container as sad_williamson.
$ docker ps -a
CONTAINER ID   IMAGE                             COMMAND                  CREATED         STATUS                     PORTS                                                                                  NAMES
5fa46b85d594   hello-world                       "/hello"                 3 minutes ago   Exited (0) 3 minutes ago                                                                                          sad_williamson
.....
Now, check the Portainer Containers page, and the hello world container will show up as stopped in the list with the same name.
Conclusion
This concludes our tutorial on installing and using Portainer for Docker management and Nginx Proxy Manager. We will explore building docker images, creating custom containers and using Portainer with Docker swarm in an upcoming tutorial. If you have any questions, post them in the comments below.

