How to Install and Configure Squid Proxy Server on Rocky Linux/Alma Linux 9
A proxy server is located between two networks and acts as a gateway between an end user and an internet resource. Through a proxy server, an end user is able to filter accesses. They can control and monitor web traffic for a variety of purposes, including privacy, security, and caching.
Squid is used as a distributed caching mechanism, by saving data obtained from different requests, increasing the traffic speed when similar requests are done. If the caching server does not have the cached data, it then forwards the request to the web server where the data is stored.
In this tutorial, you will learn how to install and configure Squid Proxy on a Rocky / Alma Linux 9 server.
Prerequisites
-
A server running Rocky Linux 9 or Alma Linux 9.
-
A non-root user with sudo privileges.
-
Make sure everything is updated.
$ sudo dnf update
-
Install basic utility packages. Some of them may already be installed.
$ sudo dnf install wget curl nano unzip yum-utils -y
Step 1 - Install Squid
Epel repository is required to install Squid. Install the Epel repository.
$ sudo dnf install epel-release
Install Squid proxy.
$ sudo dnf install squid
Verify the installation.
$ squid --version
Squid Cache: Version 5.2
Service Name: squid

This binary uses OpenSSL 3.0.1 14 Dec 2021..........
Enable and Start the Squid service.
$ sudo systemctl enable squid --now
Check the status of the service.
$ sudo systemctl status squid
? squid.service - Squid caching proxy
     Loaded: loaded (/usr/lib/systemd/system/squid.service; enabled; vendor preset: disabled)
     Active: active (running) since Wed 2022-09-28 11:52:24 UTC; 2min ago
       Docs: man:squid(8)
    Process: 94622 ExecStartPre=/usr/libexec/squid/cache_swap.sh (code=exited, status=0/SUCCESS)
   Main PID: 94624 (squid)
      Tasks: 3 (limit: 5915)
     Memory: 16.3M
        CPU: 4.207s
     CGroup: /system.slice/squid.service
             ??94624 /usr/sbin/squid --foreground -f /etc/squid/squid.conf
             ??94626 "(squid-1)" --kid squid-1 --foreground -f /etc/squid/squid.conf
             ??94627 "(logfile-daemon)" /var/log/squid/access.log

Sep 28 11:52:24 squidproxy systemd[1]: Starting Squid caching proxy...
Sep 28 11:52:24 squidproxy squid[94624]: Squid Parent: will start 1 kids
Sep 28 11:52:24 squidproxy squid[94624]: Squid Parent: (squid-1) process 94626 started
Sep 28 11:52:24 squidproxy systemd[1]: Started Squid caching proxy.
Step 2 - Configure Squid Proxy
Squid stores its configuration in the file /etc/squid/squid.conf. Check the content of the file without the comments.
$ sudo grep -vE "^#|^$" /etc/squid/squid.conf
The above command filters out all the statements starting with # which represent comments. You will get the following output.
acl localnet src 0.0.0.1-0.255.255.255  # RFC 1122 "this" network (LAN)
acl localnet src 10.0.0.0/8             # RFC 1918 local private network (LAN)
acl localnet src 100.64.0.0/10          # RFC 6598 shared address space (CGN)
acl localnet src 169.254.0.0/16         # RFC 3927 link-local (directly plugged) machines
acl localnet src 172.16.0.0/12          # RFC 1918 local private network (LAN)
acl localnet src 192.168.0.0/16         # RFC 1918 local private network (LAN)
acl localnet src fc00::/7               # RFC 4193 local private network range
acl localnet src fe80::/10              # RFC 4291 link-local (directly plugged) machines
acl SSL_ports port 443
acl Safe_ports port 80          # http
acl Safe_ports port 21          # ftp
acl Safe_ports port 443         # https
acl Safe_ports port 70          # gopher
acl Safe_ports port 210         # wais
acl Safe_ports port 1025-65535  # unregistered ports
acl Safe_ports port 280         # http-mgmt
acl Safe_ports port 488         # gss-http
acl Safe_ports port 591         # filemaker
acl Safe_ports port 777         # multiling http
http_access deny !Safe_ports
http_access deny CONNECT !SSL_ports
http_access allow localhost manager
http_access deny manager
http_access allow localnet
http_access allow localhost
http_access deny all
http_port 3128
coredump_dir /var/spool/squid
refresh_pattern ^ftp:           1440    20%     10080
refresh_pattern ^gopher:        1440    0%      1440
refresh_pattern -i (/cgi-bin/|\?) 0     0%      0
refresh_pattern .               0       20%     4320
The first step to editing the configuration is to take the backup of the existing configuration.
$ sudo cp /etc/squid/squid.conf{,.bak}
Open the file for editing.
$ sudo nano /etc/squid/squid.conf
1. Configure Squid Access Policies
The Access Control List(ACL) defines who is allowed to use Squid as the proxy on your local network.
Let us add hosts in the subnet 192.168.204.0/24 by defining the rules as the following.
acl newlocalnet src 192.168.205.0/24
This creates a new ACL known as newlocalnet with the hosts in the subnet.
To allow access to this ACL, add the following line below the line http_access deny all.
http_access allow newlocalnet
Squid reads the configuration file from top to bottom.
2. Website Blocking
Create a file to store the domains to be blocked.
$ sudo nano /etc/squid/blocked-sites
Add the websites to be blocked. For example,
example.com
example.net
example.org
Save the file by pressing Ctrl + X and entering Y when prompted.
Open the squid configuration file.
$ sudo nano /etc/squid/squid.conf
Add the following lines.
acl blocked_sites dstdomain "/etc/squid/blocked-sites"
http_access deny blocked_sites
3. Block downloads of specific files
You can also block files with specific extensions from being downloaded. Create a file for storing the extensions you want to block.
$ sudo nano /etc/squid/blocked-filextensions
Paste the following file extensions in the format specified.
\.exe(\?.*)?$
\.bat(\?.*)?$
\.tar(\?.*)?$
\.mp3(\?.*)?$
\.mp4(\?.*)?$
Save the file by pressing Ctrl + X and entering Y when prompted.
Paste the following code in the squid configuration file.
acl blockfiles urlpath_regex -i "/etc/squid/blocked-filextensions"
http_access deny blockfiles
4. Block Websites using keywords
Create a configuration file for keywords to be blocked.
$ sudo nano /etc/squid/banned-keywords
Paste the following keywords.
porn
gamble
ads
movie
Save the file by pressing Ctrl + X and entering Y when prompted.
Make the following changes in the Squid configuration file.
acl keyword-ban url_regex "/etc/squid/banned-keywords"
http_access deny keyword-ban
5. Mask the Client's IP address
You can anonymize traffic by not exposing the client IP addresses by adding the following lines in the Squid configuration file.
# Anonymize Traffic
via off
forwarded_for off
request_header_access Allow allow all
request_header_access Authorization allow all
request_header_access WWW-Authenticate allow all
request_header_access Proxy-Authorization allow all
request_header_access Proxy-Authenticate allow all
request_header_access Cache-Control allow all
request_header_access Content-Encoding allow all
request_header_access Content-Length allow all
request_header_access Content-Type allow all
request_header_access Date allow all
request_header_access Expires allow all
request_header_access Host allow all
request_header_access If-Modified-Since allow all
request_header_access Last-Modified allow all
request_header_access Location allow all
request_header_access Pragma allow all
request_header_access Accept allow all
request_header_access Accept-Charset allow all
request_header_access Accept-Encoding allow all
request_header_access Accept-Language allow all
request_header_access Content-Language allow all
request_header_access Mime-Version allow all
request_header_access Retry-After allow all
request_header_access Title allow all
request_header_access Connection allow all
request_header_access Proxy-Connection allow all
request_header_access User-Agent allow all
request_header_access Cookie allow all
request_header_access All deny all
6. Change Squid Proxy Port
By default, the Squid proxy server listens on port 3128. To change it, you need to comment the line http_port 3128 in the squid configuration file and change it as follows.
# Squid normally listens to port 3128
# http_port 3128
http_port 7035
Save the file by pressing Ctrl + X and entering Y when prompted.
Validate the configuration.
$ sudo squid -k parse
You will get the following output.
2022/10/04 12:29:25| Startup: Initializing Authentication Schemes ...
2022/10/04 12:29:25| Startup: Initialized Authentication Scheme 'basic'
2022/10/04 12:29:25| Startup: Initialized Authentication Scheme 'digest'
2022/10/04 12:29:25| Startup: Initialized Authentication Scheme 'negotiate'
2022/10/04 12:29:25| Startup: Initialized Authentication Scheme 'ntlm'
2022/10/04 12:29:25| Startup: Initialized Authentication.
2022/10/04 12:29:25| Processing Configuration File: /etc/squid/squid.conf (depth 0)
2022/10/04 12:29:25| Processing: acl localnet src 0.0.0.1-0.255.255.255 # RFC 1122 "this" network (LAN)
2022/10/04 12:29:25| Processing: acl localnet src 10.0.0.0/8            # RFC 1918 local private network (LAN)
................
2022/10/04 12:29:25| Processing: acl Safe_ports port 777                # multiling http
2022/10/04 12:29:25| Processing: http_access deny !Safe_ports
2022/10/04 12:29:25| Processing: http_access deny CONNECT !SSL_ports
2022/10/04 12:29:25| Processing: http_access allow localhost manager
2022/10/04 12:29:25| Processing: http_access deny manager
2022/10/04 12:29:25| Processing: http_access allow localnet
2022/10/04 12:29:25| Processing: http_access allow localhost
2022/10/04 12:29:25| Processing: http_access deny all
2022/10/04 12:29:25| Processing: http_port 3128
2022/10/04 12:29:25| Processing: coredump_dir /var/spool/squid
2022/10/04 12:29:25| Processing: refresh_pattern ^ftp:          1440    20%     10080
2022/10/04 12:29:25| Processing: refresh_pattern ^gopher:       1440    0%      1440
2022/10/04 12:29:25| Processing: refresh_pattern -i (/cgi-bin/|\?) 0    0%      0
2022/10/04 12:29:25| Processing: refresh_pattern .              0       20%     4320
2022/10/04 12:29:25| Initializing https:// proxy context
2022/10/04 12:29:25| Requiring client certificates.
Restart Squid server.
$ sudo systemctl restart squid
Verify if Squid is listening on the set port.
$ sudo ss -altnp | grep 8085
LISTEN 0      4096               *:7035            *:*    users:(("squid",pid=94626,fd=11))
7. Configure Firewall / SELinux
If you are using the default port, use the following commands to allow it via the firewall.
$ sudo firewall-cmd --add-service=squid --permanent
$ sudo firewall-cmd --reload
If you have enabled a custom port, use the following commands instead. Replace [port_number] with your custom port number.
sudo firewall-cmd --permanent --add-port=[port_number]/tcp
sudo firewall-cmd --reload
You will also need to enable the custom port using SELinux.
sudo semanage port -a -t squid_port_t -p tcp [port_number]
Step 3 - Setup Basic Authentication for Squid
To configure Squid to accept authentication, we will need to use the htpasswd utility. Install Apache tools package.
$ sudo dnf install httpd-tools
Create a username password pair using the following command.
$ sudo htpasswd -c /etc/squid/squid_passwd username
You will be prompted to create a password for the user.
Change ownership of the file to Squid user.
$ sudo chown squid /etc/squid/squid_passwd
Squid authenticates using an authentication helper. We will use the ncsa_auth helper. Check the location of the ncsa_auth file.
$ sudo rpm -ql squid | grep ncsa_auth
/usr/lib64/squid/basic_ncsa_auth
/usr/share/man/man8/basic_ncsa_auth.8.gz
The first result is the location of the file.
Paste the following lines in the Squid configuration.
auth_param basic program /usr/lib64/squid/basic_ncsa_auth /etc/squid/squid_passwd
acl ncsa_users proxy_auth REQUIRED
http_access allow ncsa_users
Restart Squid to enable authentication.
$ sudo systemctl restart squid
Step 4 - Configure Squid Proxy Clients
You need clients to connect to the Squid proxy server. There are three ways to connect to the server:
- System-wide proxy configuration
- Using Squid server as a gateway
- Using a web browser as a client
1. System-wide proxy configuration
You can configure Squid proxy to work across your system by creating a file /etc/profile.d/squid.sh defining the proxy configuration.
$ sudo nano /etc/profile.d/squid.sh
Paste the following lines.
PROXY_URL="192.168.205.10:7035"
HTTP_PROXY=$PROXY_URL
HTTPS_PROXY=$PROXY_URL
FTP_PROXY=$PROXY_URL
http_proxy=$PROXY_URL
https_proxy=$PROXY_URL
ftp_proxy=$PROXY_URL
export HTTP_PROXY HTTPS_PROXY FTP_PROXY http_proxy https_proxy ftp_proxy
Save the file by pressing Ctrl + X and entering Y when prompted. Source the file.
$ source /etc/profile.d/squid.sh
Verify the configuration by running the wget command.
$ wget google.com
--2022-10-04 12:15:59--  http://google.com/
Connecting to 192.168.205.10:7035... connected.
Proxy request sent, awaiting response... 301 Moved Permanently
Location: http://www.google.com/ [following]
--2022-10-04 12:15:59--  http://www.google.com/
Reusing existing connection to 192.168.205.10:7035.
Proxy request sent, awaiting response... 200 OK
Length: unspecified [text/html]
Saving to: ‘index.html.1’

index.html.1       [ <=>             ]  14.14K  --.-KB/s    in 0s

2022-10-04 12:15:59 (68.1 MB/s) - ‘index.html.1’ saved [14479]
To use it with your username and password, use the following command.
$ wget google.com --proxy-user=YOUR-USERNAME-HERE --proxy-password=YOUR-PASSWORD-HERE
You can check the Squid server logs.
1664885759.296      0 192.168.205.10 TCP_MEM_HIT/301 750 GET http://google.com/ - HIER_NONE/- text/html
1664885759.351     54 192.168.205.10 TCP_MISS/200 15113 GET http://www.google.com/ - HIER_DIRECT/216.58.208.100 text/html
2. Proxy setting on the browser
You can configure Squid proxy to work in Firefox or Chrome browser easily. But the default method doesn't support username and password. You will need to use a third-party extension in your browser to use Squid proxy with authentication. Use FoxyProxy Standard for Firefox browser and Proxy SwitchOmega for Chrome and Chrome-based browsers.
Let us test using FoxyProxy Standard extension on Chrome. Install the extension using the URL given above. Open the extension options and you will get the following screen.
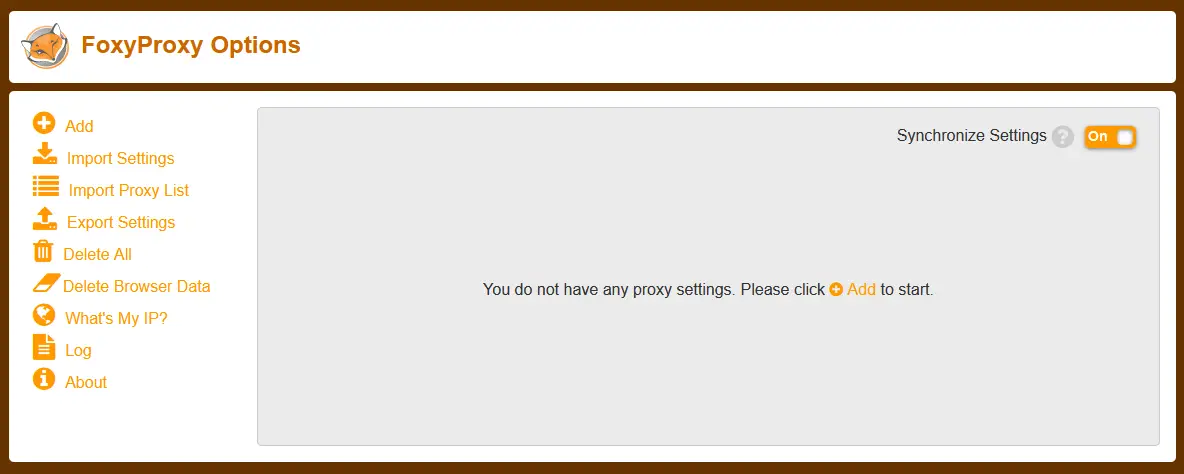
Click the Add button to add the proxy URL.
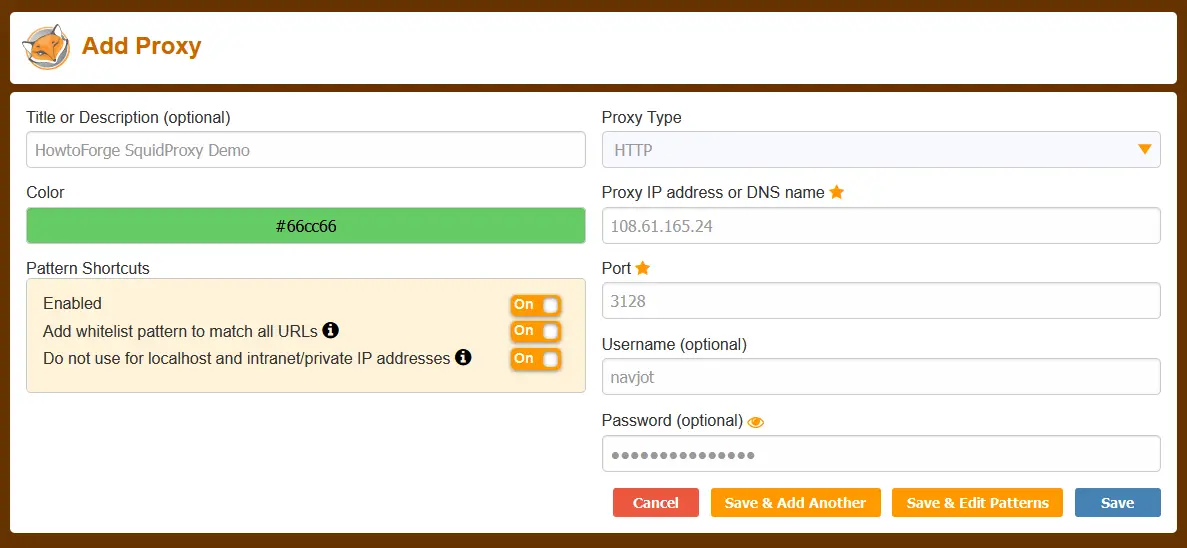
Enter the proxy parameters, including a name for the service, IP address, port number, username, and password. Enable the option Do not use for localhost and intranet/private IP addresses.
Click the Save button to proceed. Select the name of the proxy from the dropdown on the next page to enable it.
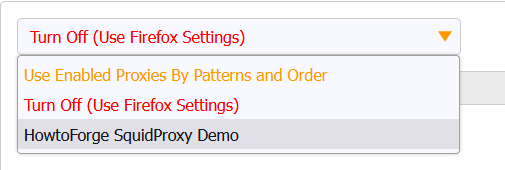
The screen should look like the following.

Visit https://whatismyip.com URL to check if the proxy works.
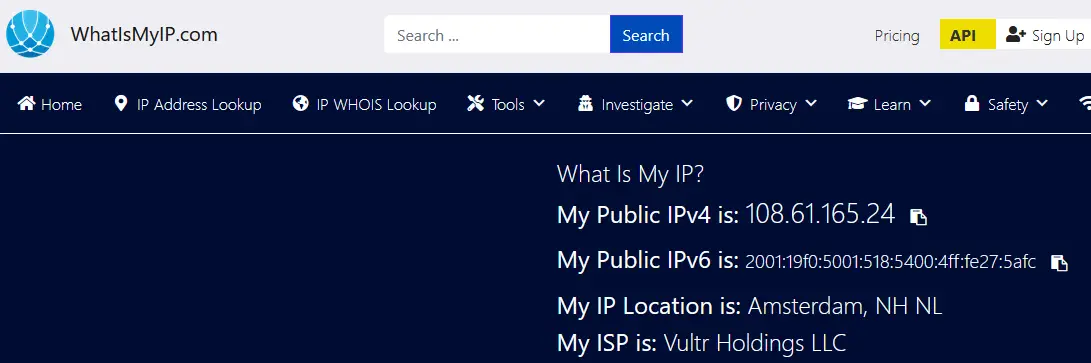
Since we have masked client IP, you will see the IP address of the server where Squid proxy is hosted at.
You can also verify via the Squid logs.
$ sudo tail -f /var/log/squid/access.log
You will get the following output.
1664909025.814    251 127.0.0.1 TCP_TUNNEL/200 8662 CONNECT mirrors.rockylinux.org:443 - HIER_DIRECT/2a04:4e42:9::644 -
1664909025.819      3 127.0.0.1 TCP_MISS/200 3347 GET http://mirror.nl.stackscale.com/rocky/9.0/extras/x86_64/os/repodata/repomd.xml - HIER_DIRECT/5.57.230.252 text/xml
1664909026.218    395 127.0.0.1 TCP_TUNNEL/200 8446 CONNECT apprepo.vultr.com:443 - HIER_DIRECT/45.63.19.147 -
1664909027.084      0 223.190.89.32 TCP_DENIED/403 3974 CONNECT www.whatismyip.com:443 - HIER_NONE/- text/html
1664909442.461     73 223.190.89.32 TCP_MISS/200 2362 POST http://ocsp.godaddy.com/ - HIER_DIRECT/192.124.249.41 application/ocsp-response
1664909612.229 171207 223.190.89.32 TCP_TUNNEL/200 6174 CONNECT api.whatismyip.com:443 - HIER_DIRECT/34.98.116.180 -
1664909612.245 172627 223.190.89.32 TCP_TUNNEL/200 67818 CONNECT www.whatismyip.com:443 - HIER_DIRECT/104.21.89.158 -
1664909613.231 171384 223.190.89.32 TCP_TUNNEL/200 3712 CONNECT apiv6.whatismyip.com:443 - HIER_DIRECT/2600:1901:0:e01d:: -
1664910098.088   3098 223.190.89.32 TCP_TUNNEL/200 10403 CONNECT profile.accounts.firefox.com:443 - HIER_DIRECT/52.40.171.113 -
1664910103.232    545 223.190.89.32 TCP_TUNNEL/200 6165 CONNECT safebrowsing.googleapis.com:443 - HIER_DIRECT/172.217.168.234 -
3. Configure DNF to use Squid Proxy
The DNF repository can be configured to use Squid proxy. Open the DNF configuration file.
$ sudo nano /etc/dnf/dnf.conf
Paste the following lines at the end of the file.
proxy=http://192.168.205.12:8085/
proxy_username=username
proxy_password=password
Save the file by pressing Ctrl + X and entering Y when prompted.
Verify the changes by updating the system or installing any package.
$ sudo dnf update
Check the logs.
http://mirror.nl.stackscale.com/rocky/9.0/AppStream/x86_64/os/Packages/t/telnet-0.17-85.el9.x86_64.rpm - HIER_DIRECT/5.57.230.252 application/x-redhat-package-manager
1664896976.909      3 192.168.205.12 TCP_MISS/200 24764 GET http://mirror.nl.stackscale.com/rocky/9.0/AppStream/x86_64/os/Packages/p/perl-HTTP-Date-6.05-7.el9.noarch.rpm - HIER_DIRECT/5.57.230.252 application/x-redhat-package-manager
1664896976.920      8 192.168.205.12 TCP_MISS/200 98591 GET http://mirror.nl.stackscale.com/rocky/9.0/AppStream/x86_64/os/Packages/p/perl-HTTP-Message-6.29-3.el9.noarch.rpm - HIER_DIRECT/5.57.230.252 application/x-redhat-package-manager
1664896976.932      9 192.168.205.12 TCP_MISS/200 32361 GET http://mirror.nl.stackscale.com/rocky/9.0/AppStream/x86_64/os/Packages/p/perl-I18N-Langinfo-0.19-479.el9.x86_64.rpm - HIER_DIRECT/5.57.230.252 application/x-redhat-package-manager
1664896977.024    340 192.168.205.12 TCP_MISS/200 44730 GET http://epel.mirror.constant.com/9/Everything/x86_64/Packages/h/hiredis-1.0.2-1.el9.x86_64.rpm - HIER_DIRECT/108.61.5.85 application/x-redhat-package-manager
1664896977.237    555 192.168.205.12 TCP_MISS/200 272291 GET http://epel.mirror.constant.com/9/Everything/x86_64/Packages/c/coturn-4.6.0-1.el9.x86_64.rpm - HIER_DIRECT/108.61.5.85 application/x-redhat-package-manager
4. Using Squidclient
Alternatively, you can use the bundled squidclient command to test. It outputs the response to a web request similar to wget or curl. But unlike wget and curl, squidclient automatically connects to the default proxy setup of Squid, localhost:3128.
Run the following command to test.
$ squidclient https://google.com
You will get the following output.
HTTP/1.1 301 Moved Permanently
Location: https://www.google.com/
Content-Type: text/html; charset=UTF-8
Date: Tue, 04 Oct 2022 16:35:35 GMT
Expires: Tue, 04 Oct 2022 16:35:35 GMT
Cache-Control: private, max-age=2592000
Server: gws
Content-Length: 220
X-XSS-Protection: 0
X-Frame-Options: SAMEORIGIN
Set-Cookie: CONSENT=PENDING+669; expires=Thu, 03-Oct-2024 16:35:35 GMT; path=/; domain=.google.com; Secure
P3P: CP="This is not a P3P policy! See g.co/p3phelp for more info."
Alt-Svc: h3=":443"; ma=2592000,h3-29=":443"; ma=2592000,h3-Q050=":443"; ma=2592000,h3-Q046=":443"; ma=2592000,h3-Q043=":443"; ma=2592000,quic=":443"; ma=2592000; v="46,43"
X-Cache: MISS from squidproxy
X-Cache-Lookup: MISS from squidproxy:3128
Via: 1.1 squidproxy (squid/5.2)
Connection: close
To run the command with an IP address and authentication parameters, run the following command.
$ squidclient -l 192.168.205.12 -p 7035 -u username -w password https://google.com
Conclusion
This concludes our tutorial on installing and configuring the Squid Proxy server on a Rocky Linux / Alma Linux 9 server. If you have any questions, post them in the comments below.

